This manual demonstrates with examples, how to begin using Tuntinetti and how it's basic functions work.
If you need help, call our free customer service 09-6898 8222
- 1 Wizards
- 1.1 Basic information wizard
- 1.2 Unit Wizard
- 1.2.1 Organizing units
- 1.2.2 Creating a new unit
- 1.2.3 Modifying and removing units
- 1.3 Employee wizard
- 1.3.1 Add a new employee
- 1.4 Project wizard
- 1.4.1 Creating a new project
- 1.5 Customer wizard
- 1.6 Task wizard
- 1.7 Organization cost wizard
- 1.8 Employees to project -wizard
- 1.9 The structure of Tuntinetti user interface
- 2 Users
- 3 Recruiting
- 4 Work shifts in the Work shift planning view
- 5 Projects
- 6 Units
- 7 Customers
- 8 Salary calculation
- 9 Vacation calendar
- 10 Sick leave management
- 11 Work shift cycles
- 12 Time reports
- 13 Creating an overtime assignment
- 14 Pricing
- 15 Calibrating work hour balances
- 16 Paid features of Tuntinetti
- 17 Training and remote training about using Tuntinetti
Wizards
Basic information wizard
When you log in to the system for the first time, Tuntinetti will show you a wizard that helps you get started quickly. The wizard will guide you with adding the first information to the system. If you need to stop the wizard, you are always able to return to it later. All the information will be saved instantly, but at any time you can go back and change things. You can also jump between all the different parts of the wizard. You can always click the Help -button, when you want in depth instructions for a particular screen.
In the Basic information wizard you can add your company's basic information such as the company name and contact information. In addition you can set some salary calculation settings and add the company logo. The logo will be visible in the top-left corner of Tuntinetti.
Unit Wizard
In unit wizard you can determine your company's structure. In Tuntinetti the company consists of units, which can represent for example your company's headquarters and their departments. Units may be structured in the hierarchy that makes sense from your company's point of view.
Organizing units
Tree diagram displays possible examples for the company's structure.
If you need help, call our free customer service 09-6898 8222
Creating a new unit
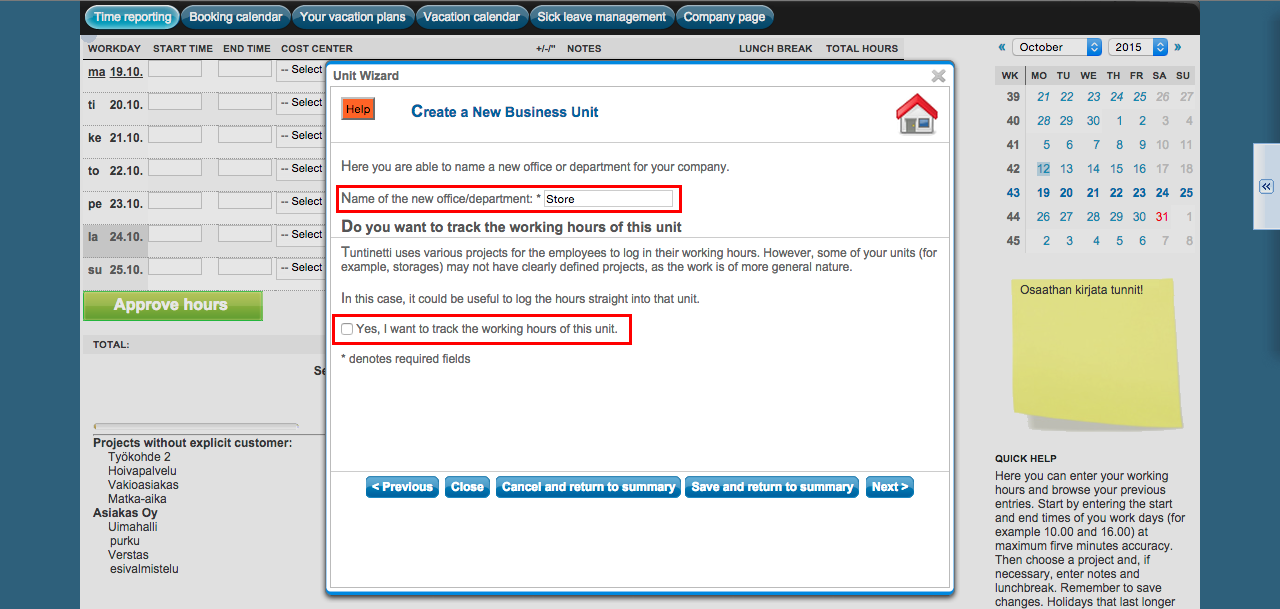
Lets create a new unit. The Create new unit -button starts the process.
First write the unit's name and choose whether you want to enter the hours directly into that unit or not.
If you need help, call our free customer service 09-6898 8222
Move forward by clicking the Next -button.
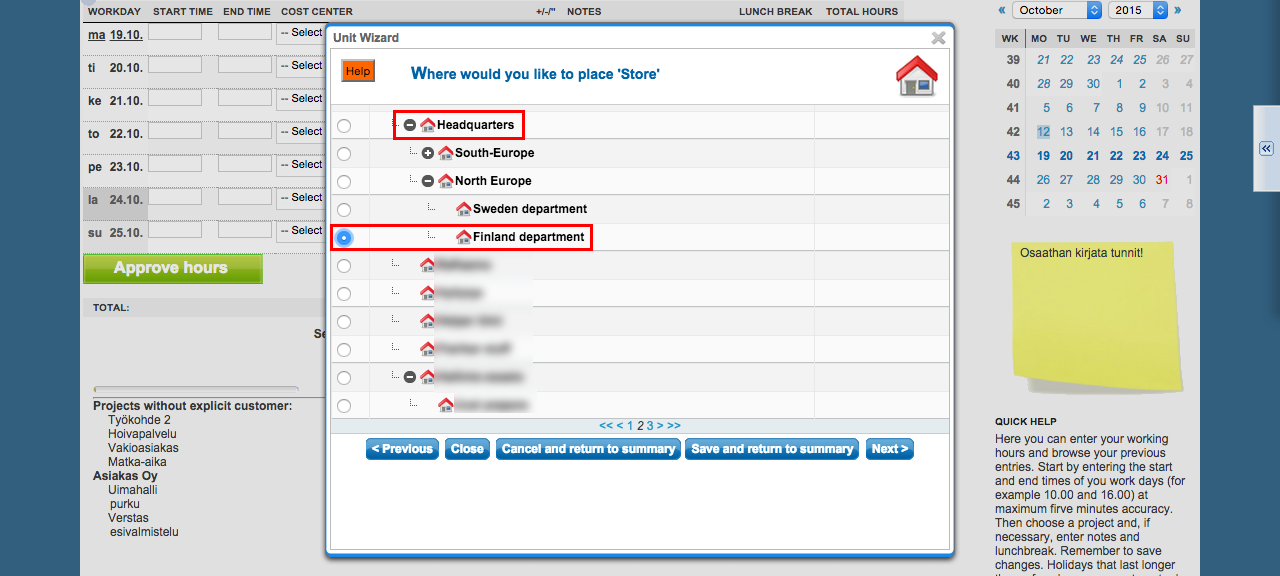
Now you can place the new unit to your company's structure.
Tuntinetti has automatically created one basic unit to the structure's base level. The unit's name is the company's name. Other units can be created under this unit or next to it on the base level.
You can create the unit hierarchy by clicking the radio button next to the existing unit under which the new unit should be placed.
If you need help, call our free customer service 09-6898 8222
Lets move forward by clicking the Next -button.
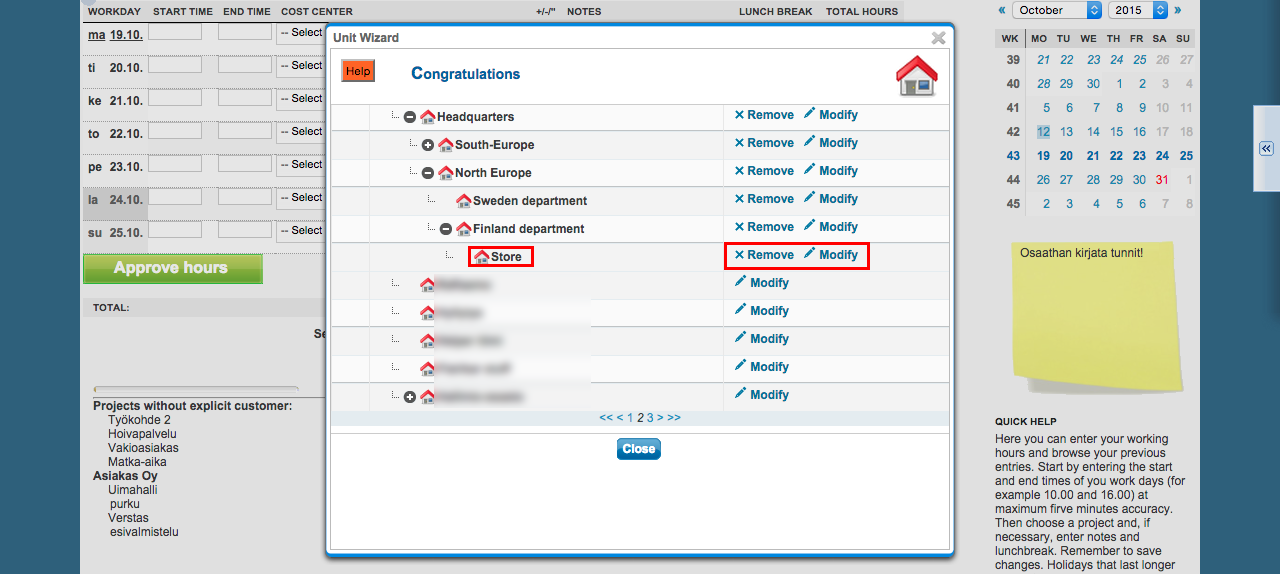
The new unit is now created and will be visible in the unit list.
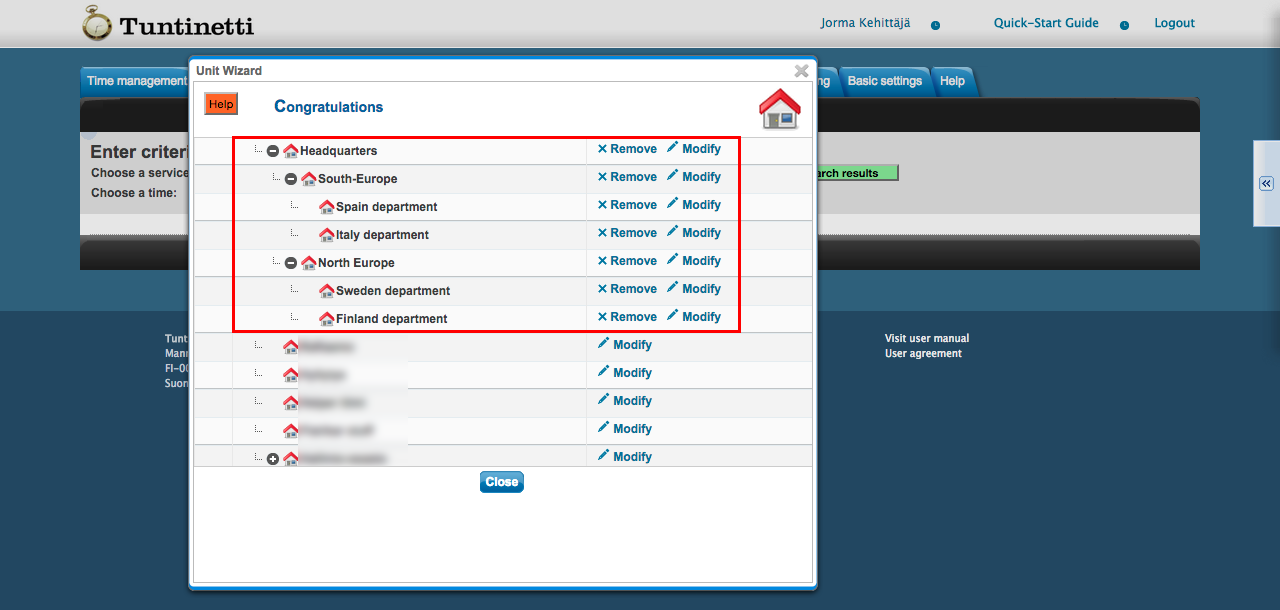
Modifying and removing units
At this page you are also able to modify the structure of your company by dragging units under each other or to the base level.
You can also modify and remove existing units using the highlighted buttons.
If you need help, call our free customer service 09-6898 8222
Employee wizard
The employees you add with the employee wizard are also automatically created as Tuntinetti users.
Tuntinetti has already created an employee which has been named based on the registration information.
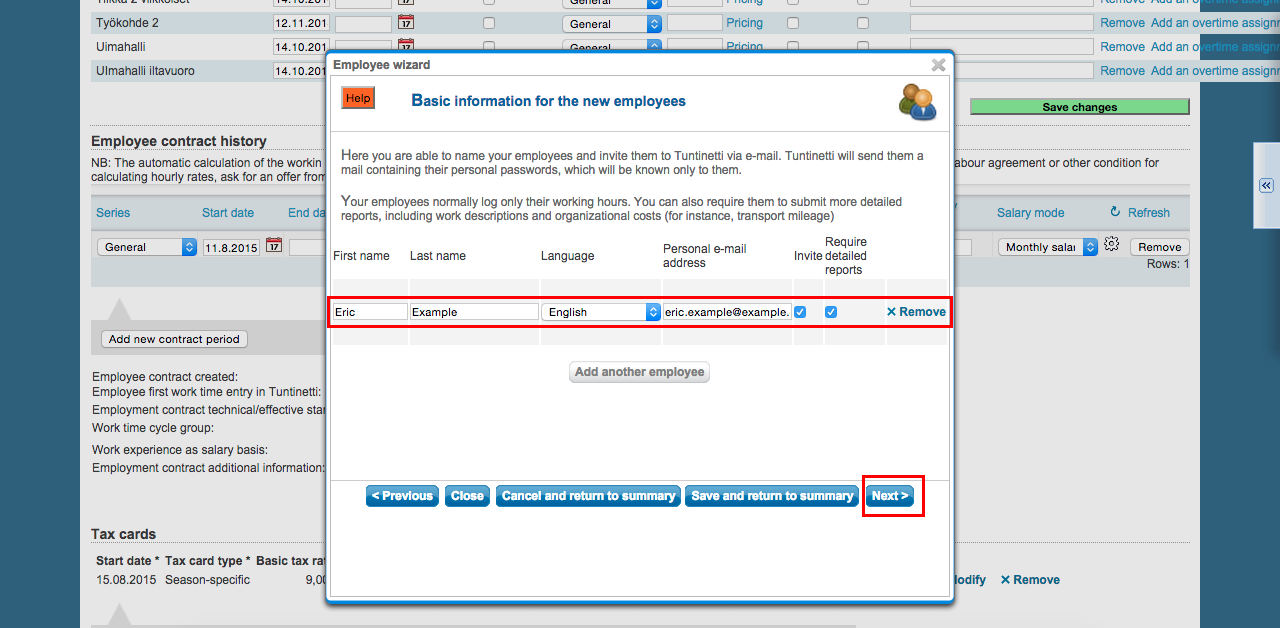
Add a new employee
You can create new employees with the Add new employee -button. First you need to enter the basic information of the employee:
- Enter the employee's name.
- Choose the user interface language suitable for the employee
- Add the employee's email address.
- You may immediately send an email invitation for the employee to use Tuntinetti.
- At the Require detailed reports -part you may choose if the employee will need to specify work tasks and possible expenses. Otherwise the system will only ask the working hours. This is more suitable for routine jobs.
You may create additional employees with the Add another employee -button and remove them with the Remove -button.
When the basic information is filled, you can click the Next -button to continue.
If you need help, call our free customer service 09-6898 8222
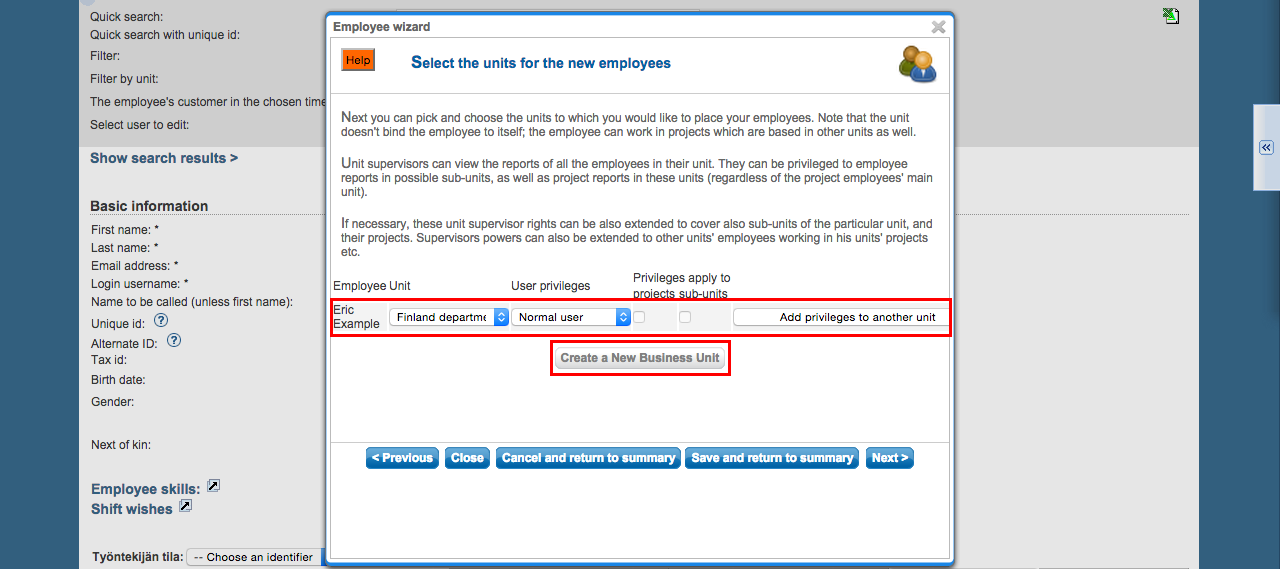
At this page the employees will be placed to units. Note that the this is done mostly for structure and that employees don't always have to work at their own unit's projects. Here you may also set the User privileges for the employees.
Lets select an unit for the employee. By clicking Create a new business unit -button you can also create a new unit.
The employee may have the privileges of a normal user, unit manager or administrator. Normal user is able to control his own time reports, vacation plans and personal settings. Unit manager can usually control those same things on the whole unit level possibly including it's sub units. Administrator is able to control all the information in Tuntinetti. You can select normal user or administration privileges for the user from the User privileges -pull down menu. Unit manager privileges can be set by first choosing normal user privileges and then clicking Add privileges to another unit -button. Unit manager privileges can be set to multiple units for the same person and they may later be modified in detail. Choose the user privileges and move forward by clicking Next -button.
If you need help, call our free customer service 09-6898 8222
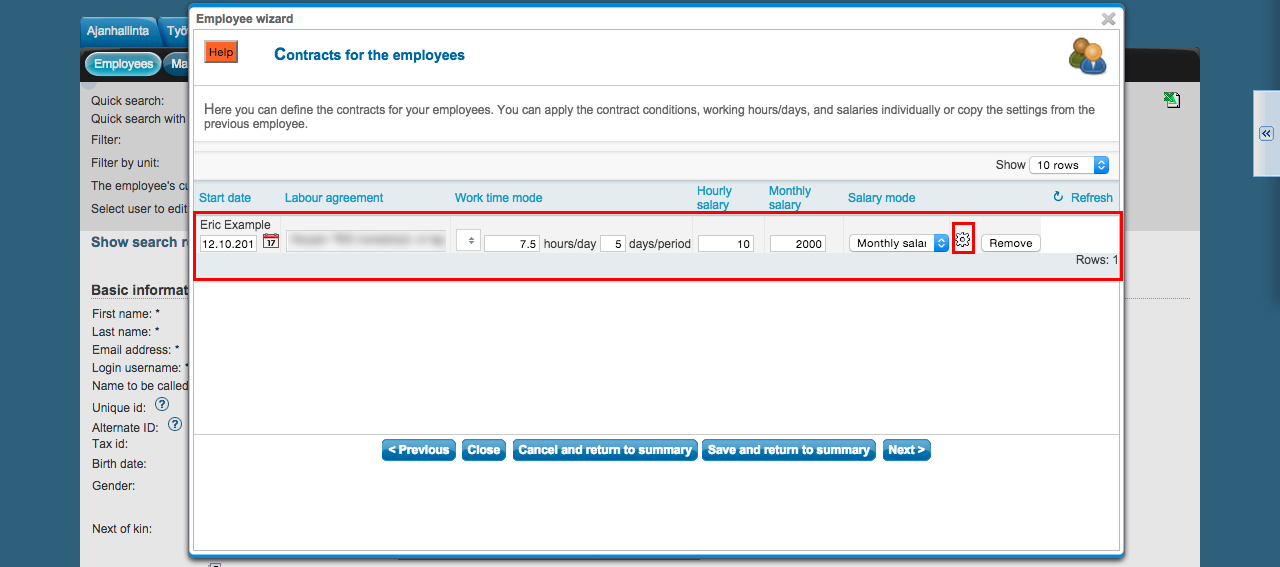
On this page you can define the employee's contracts: the start date, collective labour agreement, work time mode and salary.
In this view you are able to modify the following options:
- You may either enter the start date manually or use the calendar menu.
- Choose the collective labour agreement. There are lots of choices but if the suitable one is missing, you can choose (Jos muu niin kerro mikä, voimme lisätä toivomuksesta), this means "If something else, tell us what", and enter the name of the collective labour agreement that you need. Our customer support will add it to Tuntinetti and send you email when it's available.
- The work time mode fields will be pre-filled based on the selected collective labour agreement. They can be modified as needed.
- Next you can enter the salary information. If you don't find it necessary to use the Tuntinetti's payroll functions, it's sufficient to fill the Salary mode -field (bill / hourly salary / monthly salary).
- From the gear -icon you can set additional information as needed, such as employee benefits.
If you need help, call our free customer service 09-6898 8222
Move forward by clicking the Next -button.
This page has a summary of created employees.
Project wizard
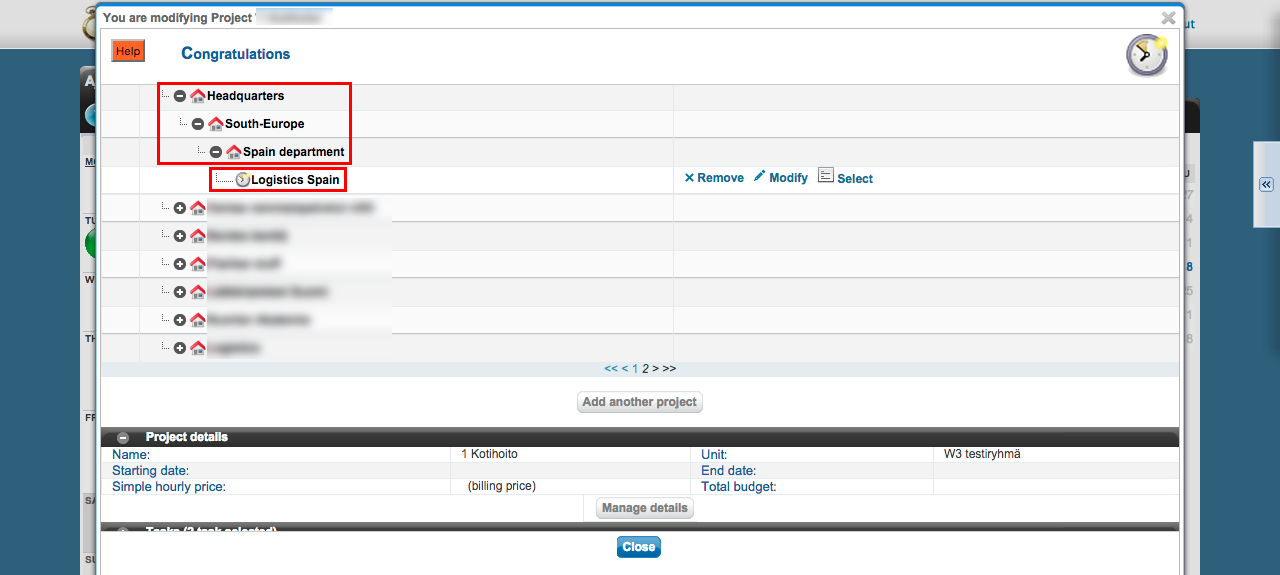
In the project wizard you can add projects to the company's units and define work tasks, organization costs and customers connected to the projects. It's also possible to add employees to the projects.
On top of the wizard there is a diagram about the company's units. It also shows the projects below each unit. You can move the projects from one unit to another simply by dragging them.
If you need help, call our free customer service 09-6898 8222
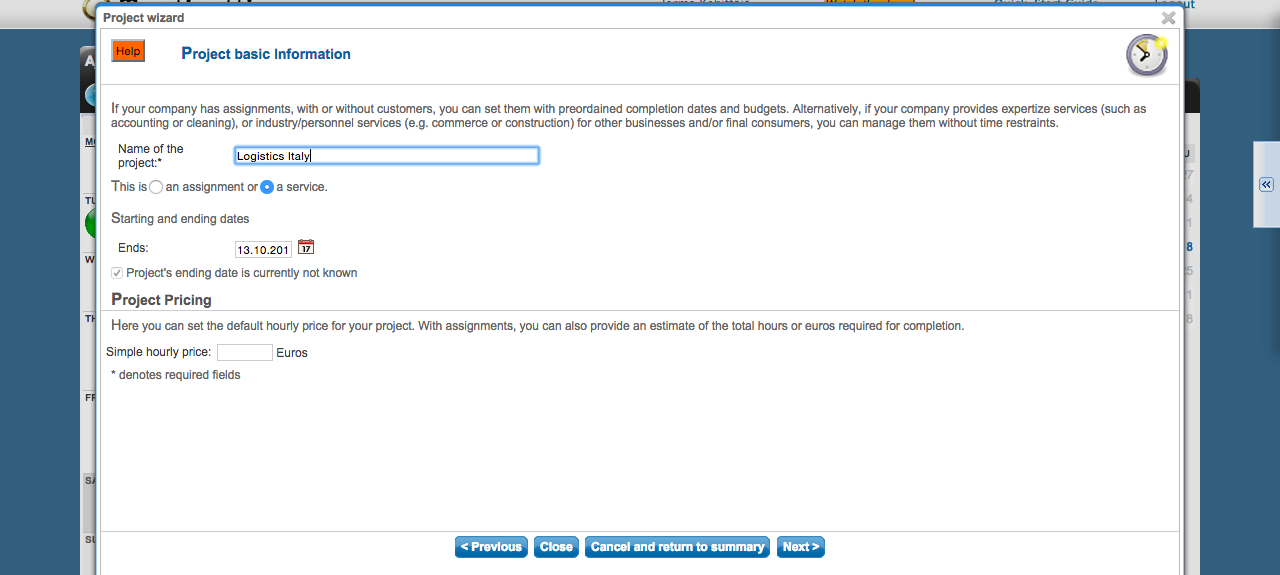
Creating a new project
Lets create one example project by clicking Add another project -button.
First you need to enter the basic information of the project:
- Enter the name of the project.
- Choose the time structure of the project. Assignment type means that the project has a start- and end date. Service type means that the project is always in effect.
- Next define the hourly price for the project. For Assignment type projects you may also enter an estimate of the total budget.
If you need help, call our free customer service 09-6898 8222
Lets move forward by clicking the Next -button.
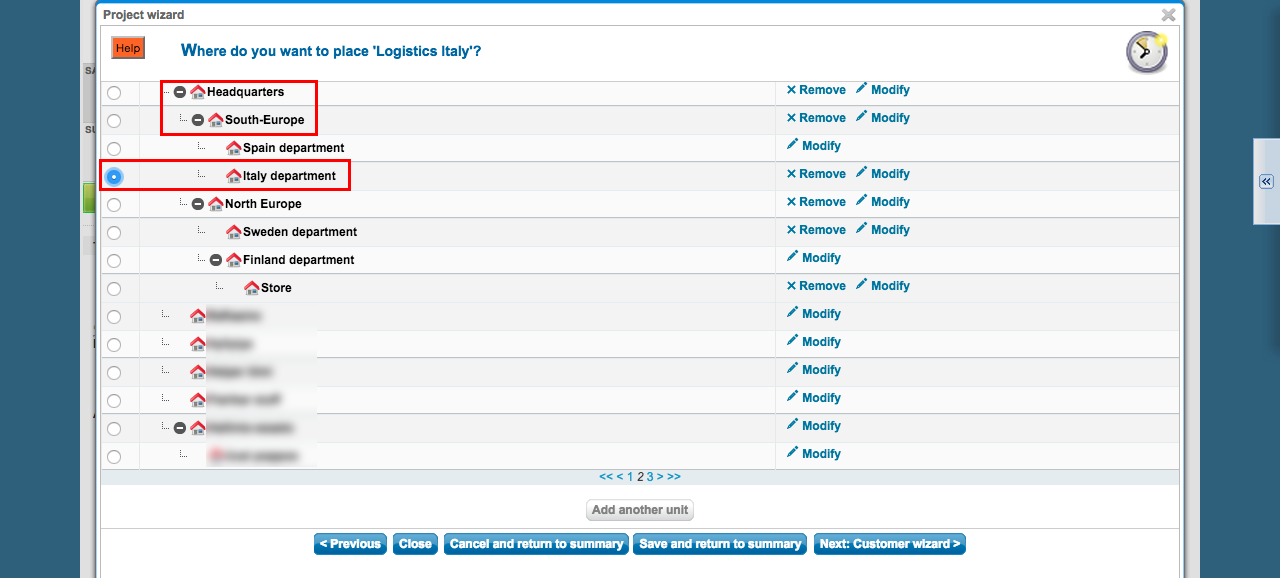
At this page you will choose the unit for the project.
The choice is made by clicking a radio button.
If you need help, call our free customer service 09-6898 8222
Lets move on by clicking the Next: Customer wizard > -button.
Customer wizard
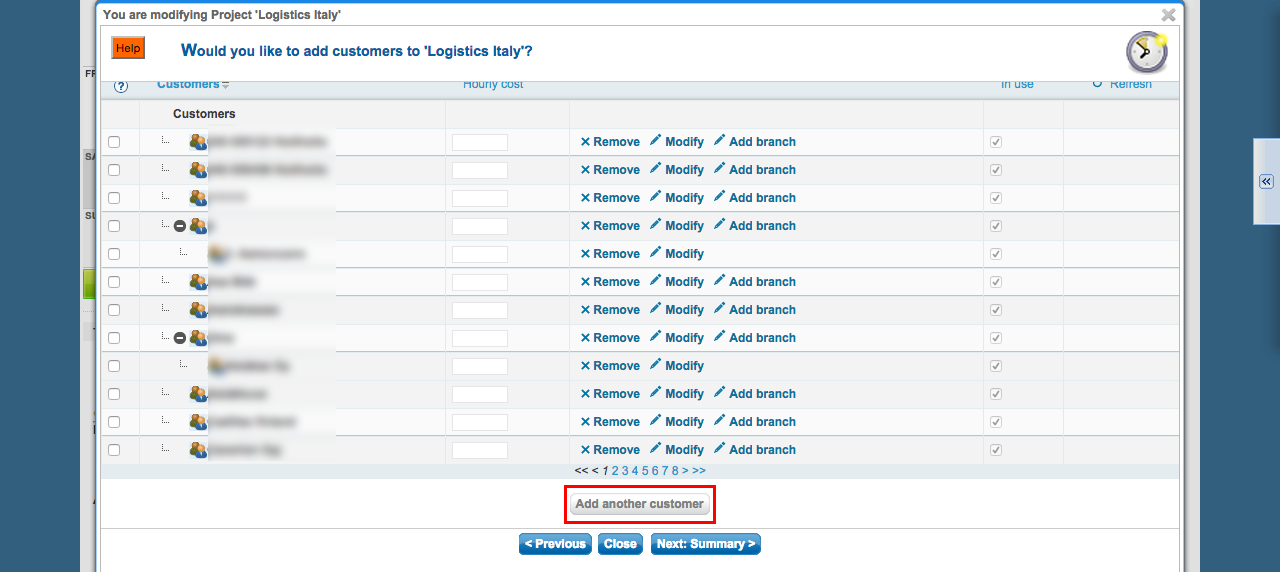
At this page you are able to place customers to the project. This should be done if the work related to the project will be billed from the customers, and the time reports on the work has to be itemized based on the customer the work was done for. You only need to create a specific customer once, after which you can associate the customer to other projects as needed.
Choose if you want to place all the customers of the unit's project to the project, the unit's sub unit's customers as well or the customers of the whole company's projects. With the first choice it is possible to place customers one by one. Lets create an example customer.
If you need help, call our free customer service 09-6898 8222
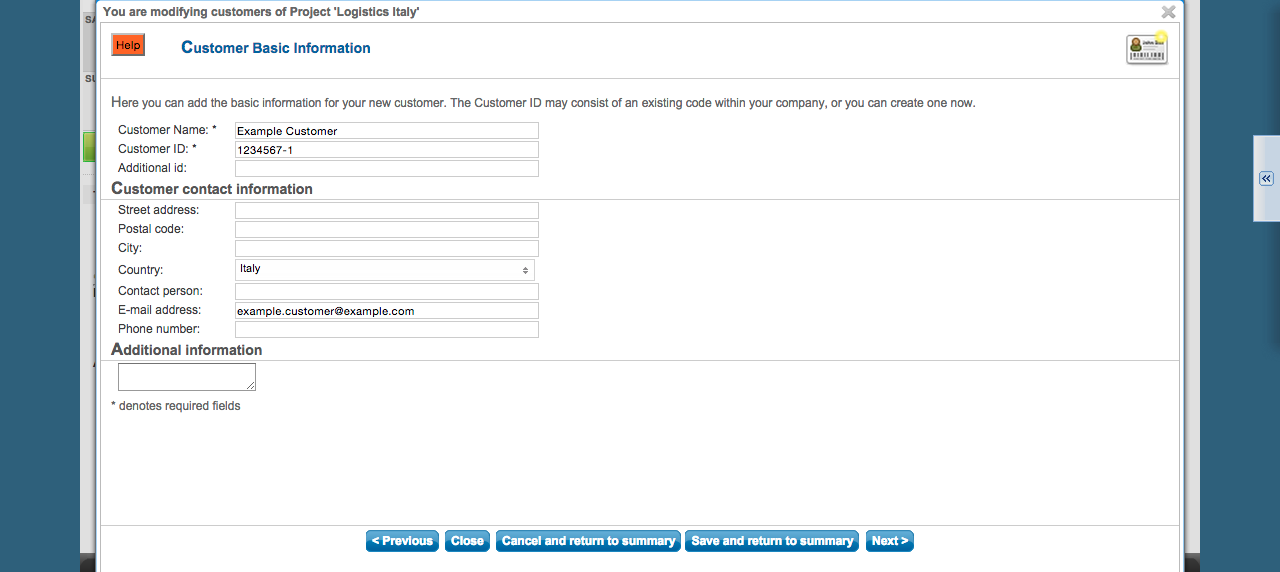
Enter the name and business ID of the customer.
Next write the email, which is required for some optional functions in Tuntinetti.
If you need help, call our free customer service 09-6898 8222
Click the Next -button to continue.
The customer can be placed to an unit of a project. The placing will structure the customer to the system, but you may still use it in any other unit or project. In this screen the customer will be placed to an unit and in the next one it will be placed to a project.
The customer is placed to an unit with a corresponging radio button.
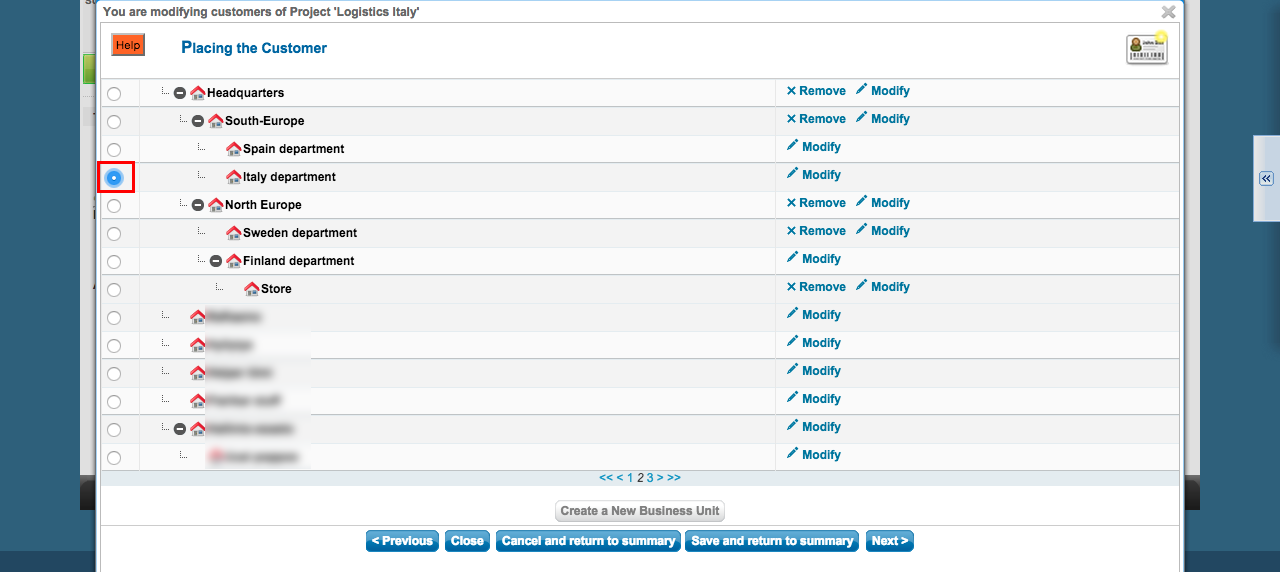
If you need help, call our free customer service 09-6898 8222
Move forward by clicking the Next -button.
The new customer can now be placed to projects. This is done by checking the check box next to the project. Customers can be placed to multiple different projects.
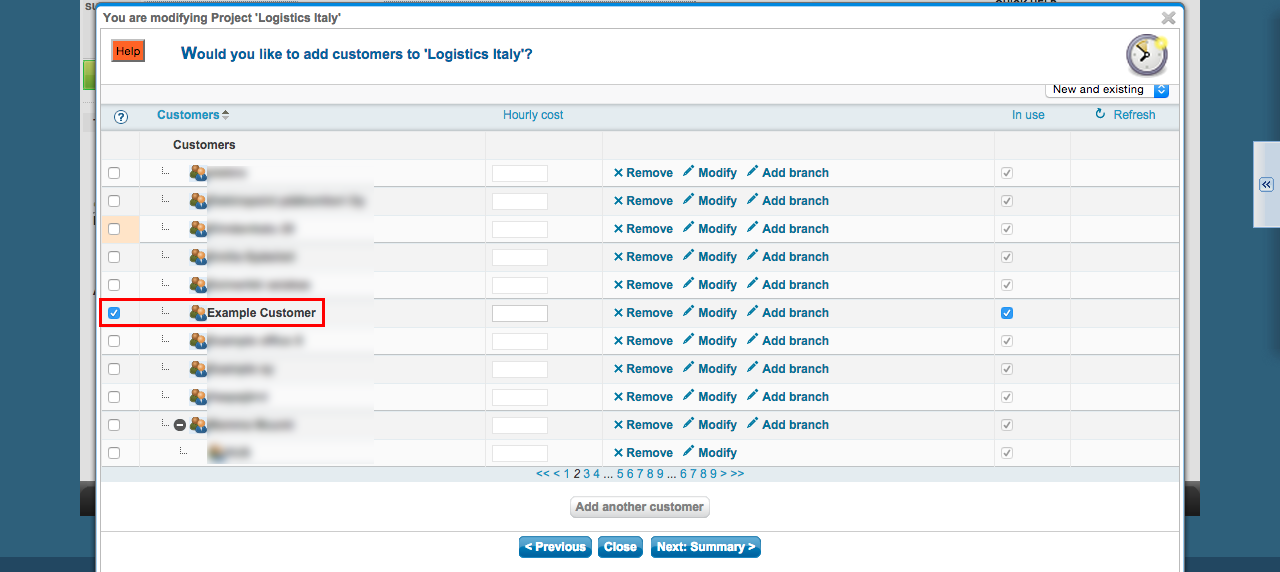
If you need help, call our free customer service 09-6898 8222
Lets move forward by clicking the Next: Summary > -button.
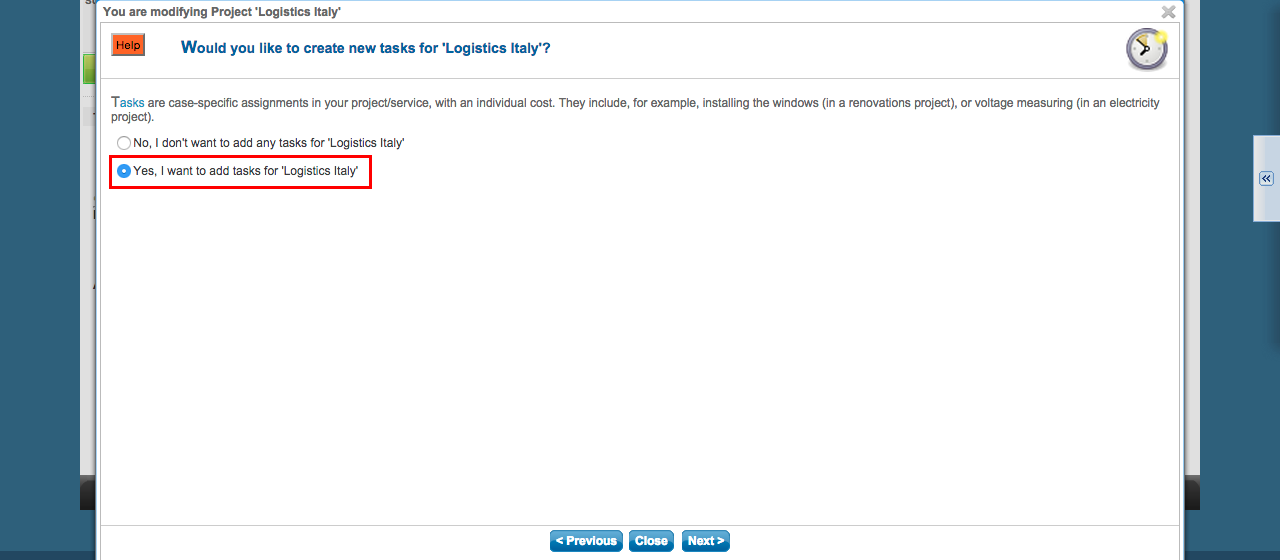
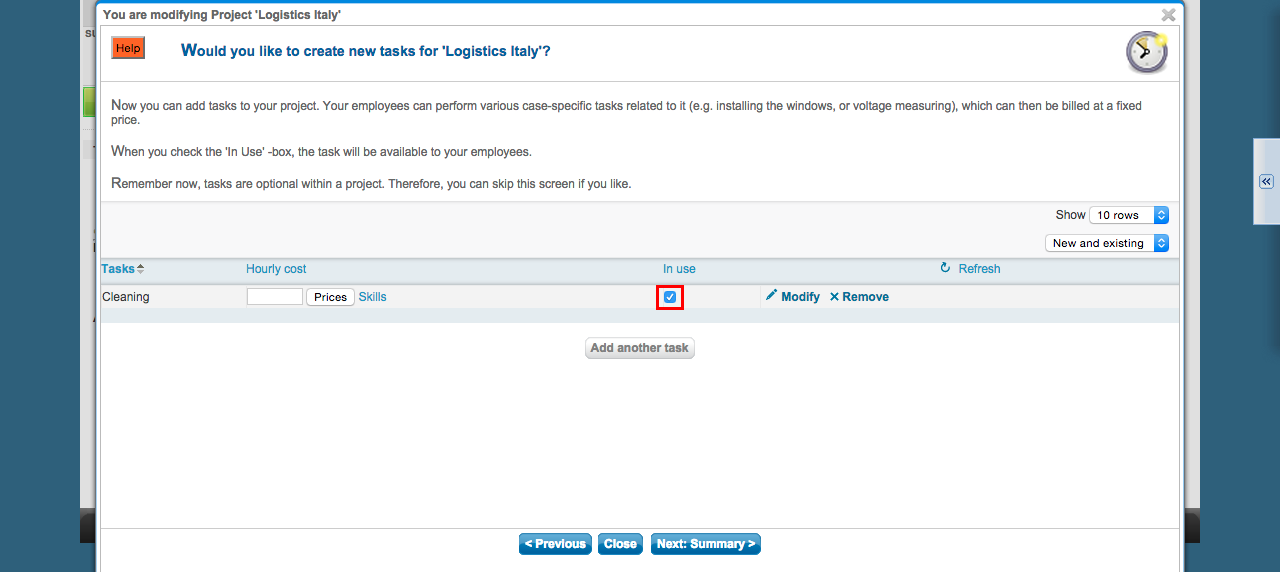
Task wizard
At this point the wizard will offer you a possibility to place tasks to projects. This should be done if you need to itemize the tasks in billing or if you want to track the amount of work done on different tasks.
Choose Yes and click the Next -button.
If you need help, call our free customer service 09-6898 8222
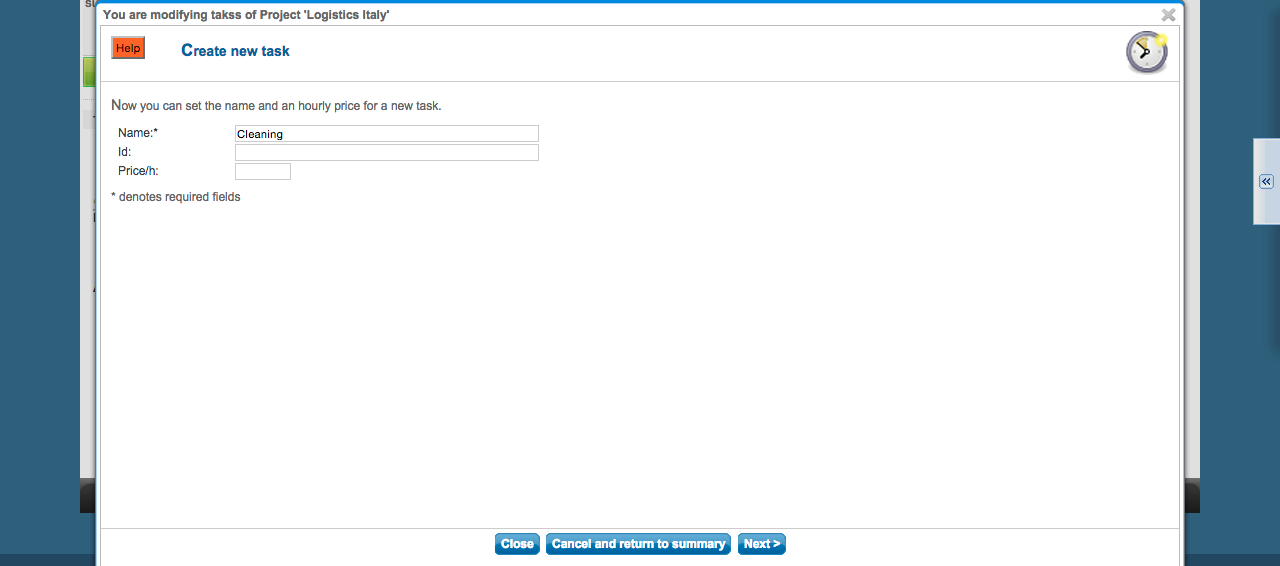
In this window you will need to write the basic information of the task:
- Name (required)
- Id (optional and free-form)
- The hourly price that is billed from the customer.
If you need help, call our free customer service 09-6898 8222
Move forward by clicking the Next -button.
In this window you are able to place the new task to a project.
The task will be placed with the check box.
If you need help, call our free customer service 09-6898 8222
Lets move forward by clicking the Next: Summary > -button.
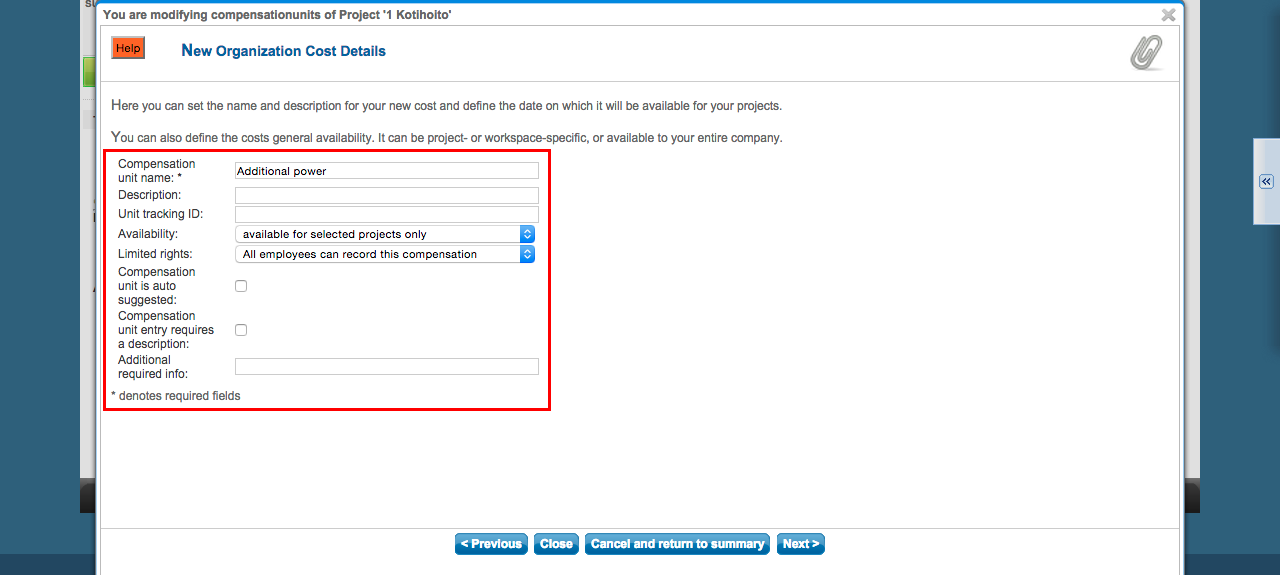
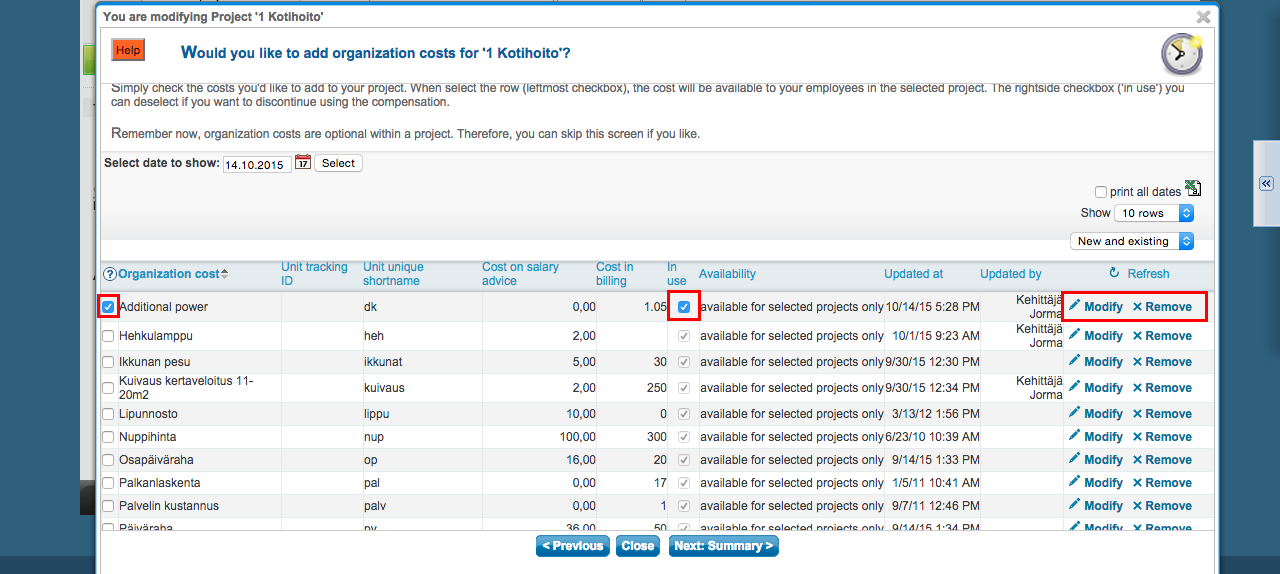
Organization cost wizard
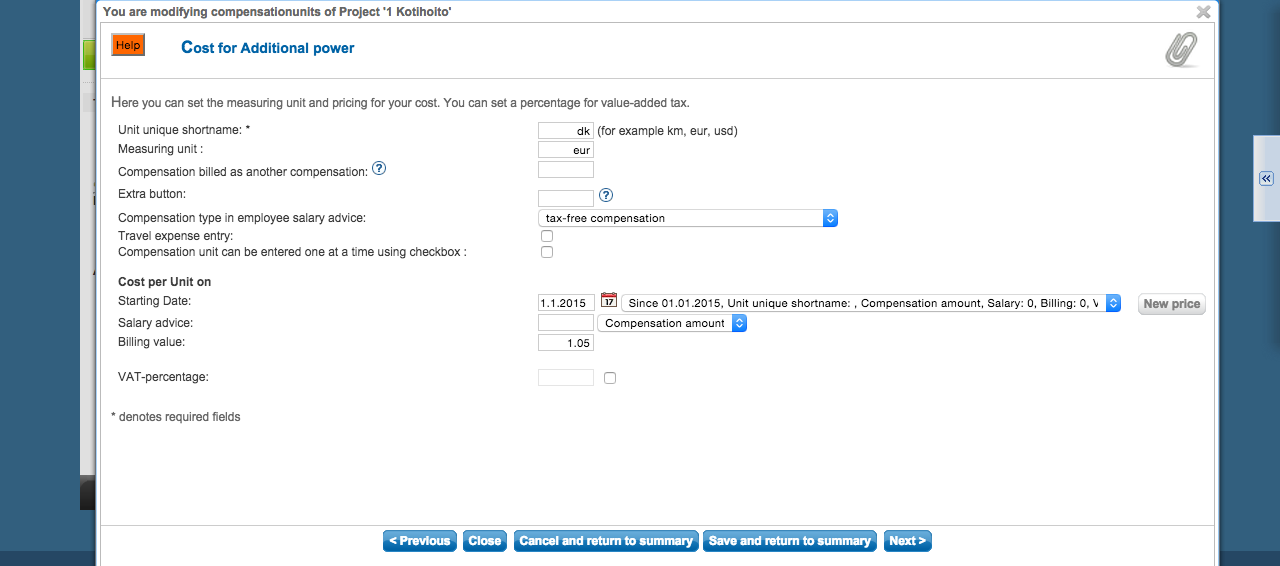
Here the wizard will offer a possibility to place organization costs to projects. Organization costs are running costs like equipment costs or mileage coverage. The organization costs that are placed to projects may be entered in time reporting and they will be taken into account in various calculations like payroll.
Choose yes and move on.
Place organization costs to projects
At this page you need to write the basic information of the cost:
- Name of the compensation unit, which is required.
- Next you may choose the availability of the cost. Lets leave it to the default now.
- Next choose who will be able record that compensation: all employees or only the supervisors. The cost can also be hidden for others than the supervisor.
- Choose whether the compensation unit is auto suggested or not.
- Lastly choose whether to require a description for the compensation unit usage or not.
If you need help, call our free customer service 09-6898 8222
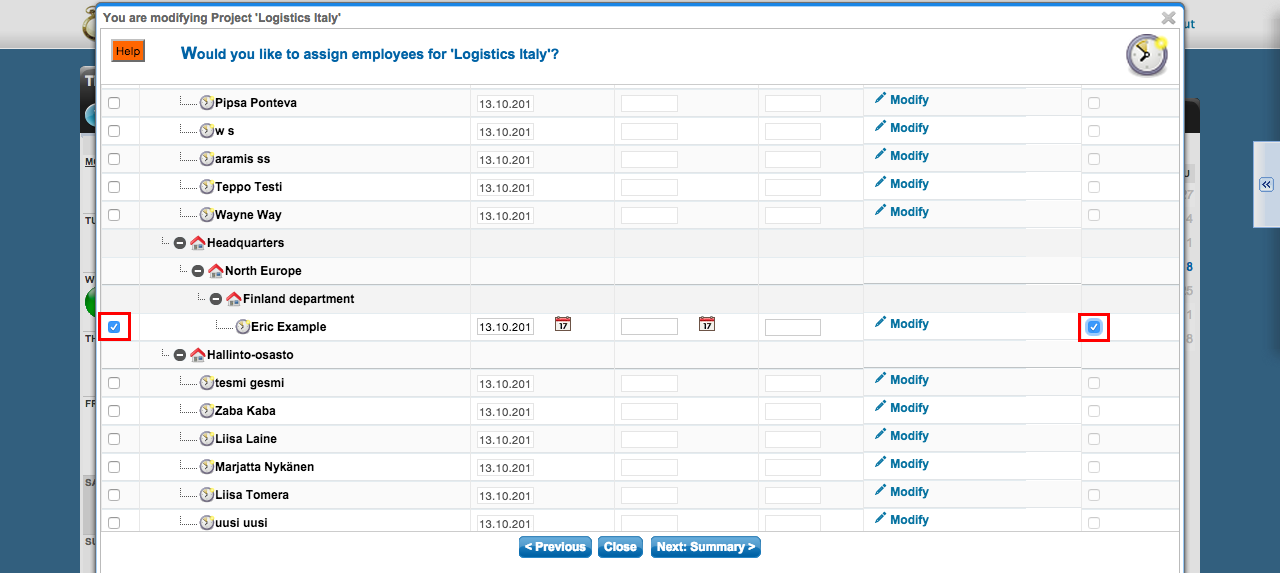
Employees to project -wizard
From the list on this page you can choose employees to a project. The list is structured based on the units.
By checking the check boxes you are able to choose the correct employees for the project.
By checking the check box on the right side you will give the employee authority to enter the hours for every employee in the project. This is useful for an employee that has a team leader role.
If you need help, call our free customer service 09-6898 8222
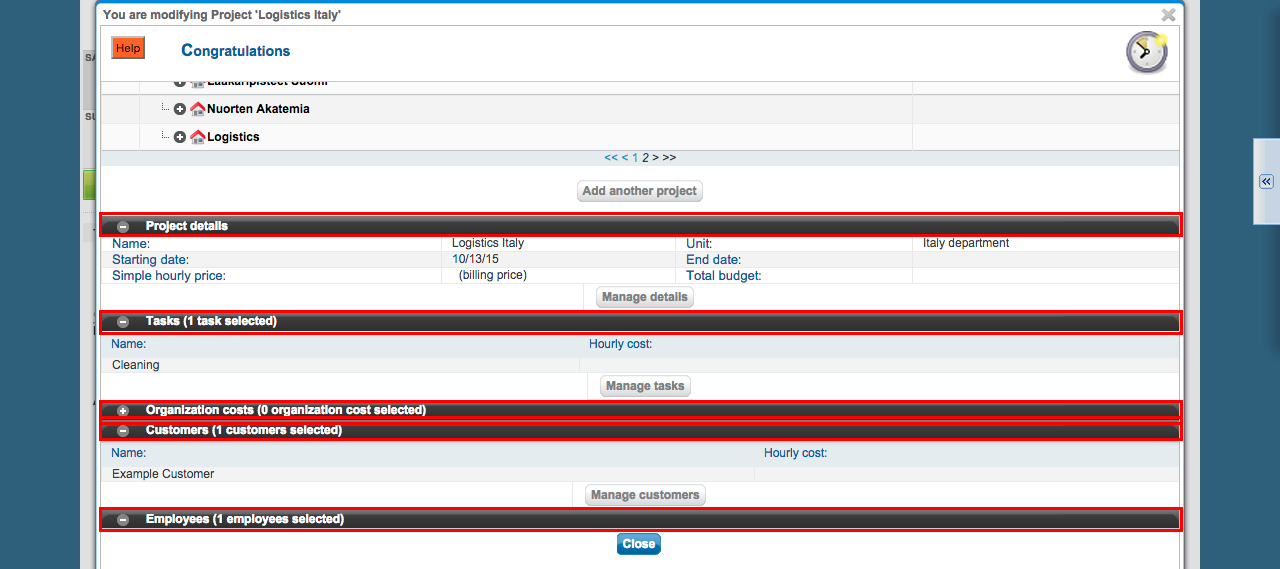
Lets get back to the summary of the employees by clicking the Next: Summary > -button.
Many things are connected to a project, but it can be viewed as a whole at the summary -page.
By clicking the sub header bars you are able to see the summary of each section.
If you need help, call our free customer service 09-6898 8222
The structure of Tuntinetti user interface
Tuntinetti is organised by themes as sections under tabs.
The program has many features, so the tabs are further divided to sub tabs.
Users
At the employees tab you are able to handle user's settings. There you may create new users and modify or remove existing ones.
The grey area has a search fields, where you can select the employee whose information is shown below in the white area.
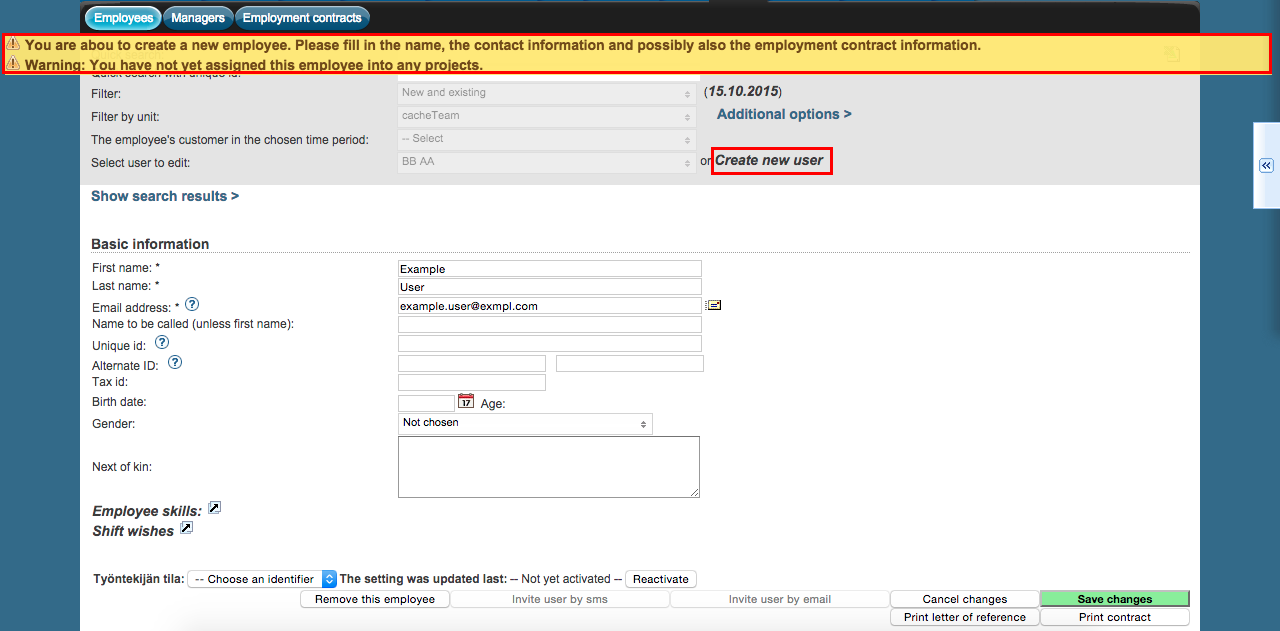
Lets create a new user by clicking the Create new user -button.
The white area is now cleared so you can enter information about the new user.
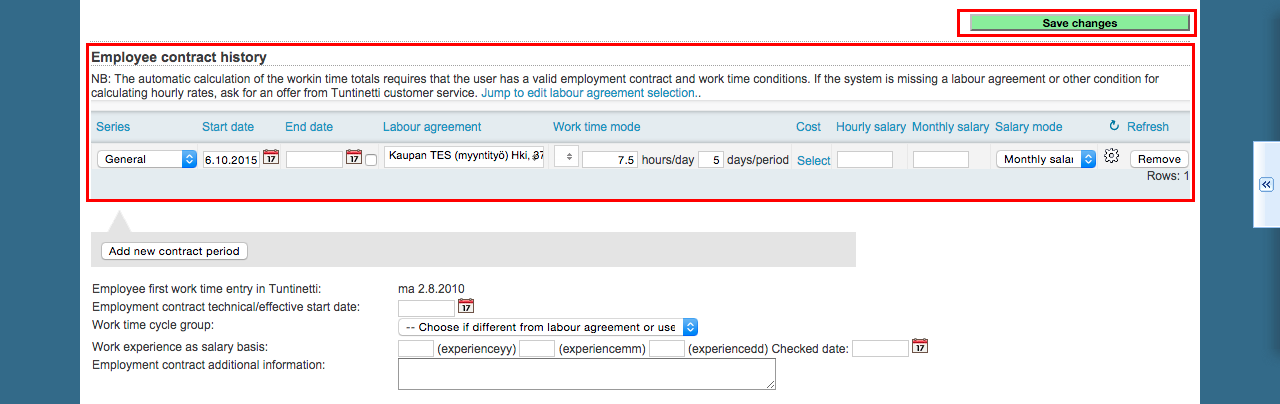
Tuntinetti gives you notifications on the top of the page whenever there is an issue you should know about. Now the notification tells you that the new user needs at least name, contact information and possible employee contract history.
Confirm the changes by clicking the Save changes -button.
If you need help, call our free customer service 09-6898 8222
If you need help, call our free customer service 09-6898 8222
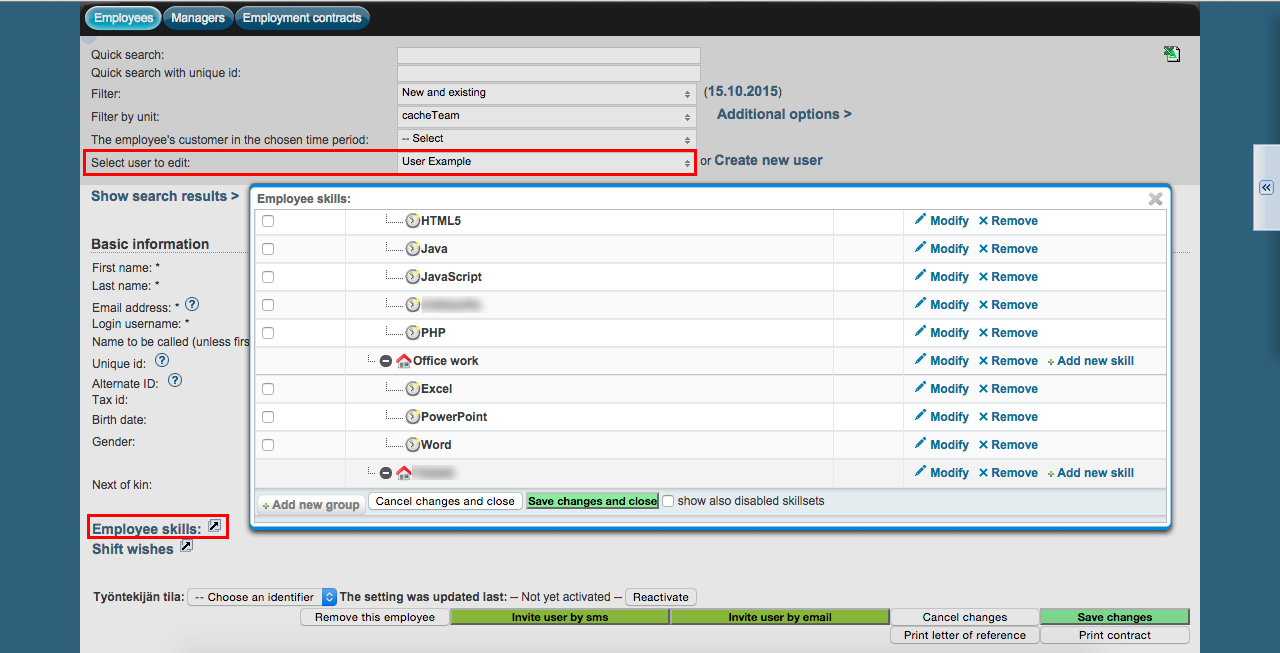
When the user has a name saved you are able to add skills to him. The skills may represent the user's ability in different jobs or more general skills, such as language proficiency. By adding skills you can make it easier to place the employees to suitable tasks.
Next click Employee skills -button.
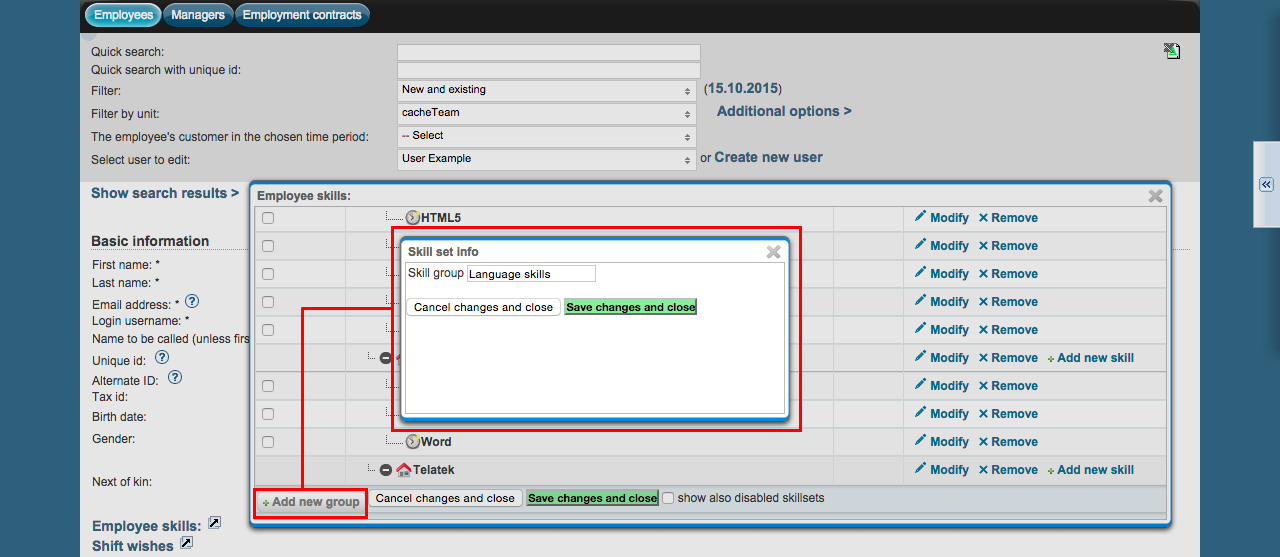
Here is a list of skills. The skills are structured under skill groups.
If you need help, call our free customer service 09-6898 8222
Lets create a new skill group.
If you need help, call our free customer service 09-6898 8222
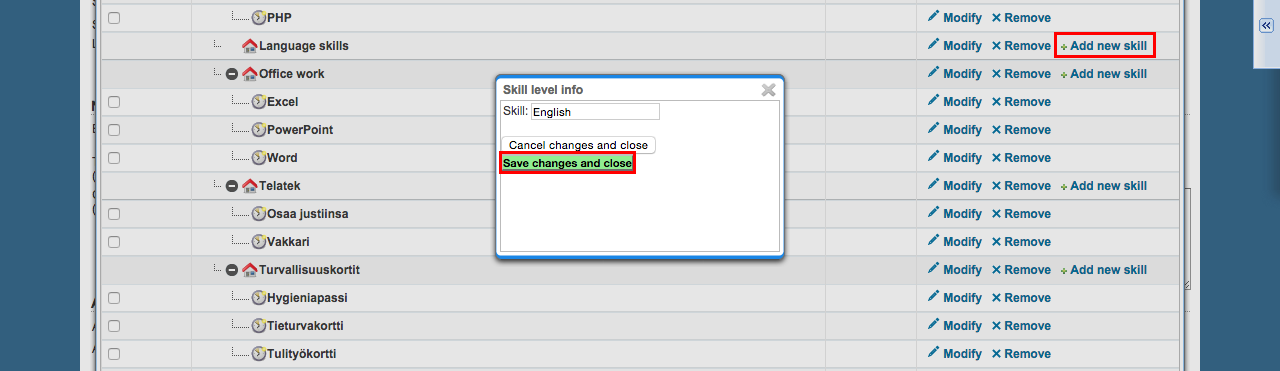
Create a new skill under the new skill group.
If you need help, call our free customer service 09-6898 8222
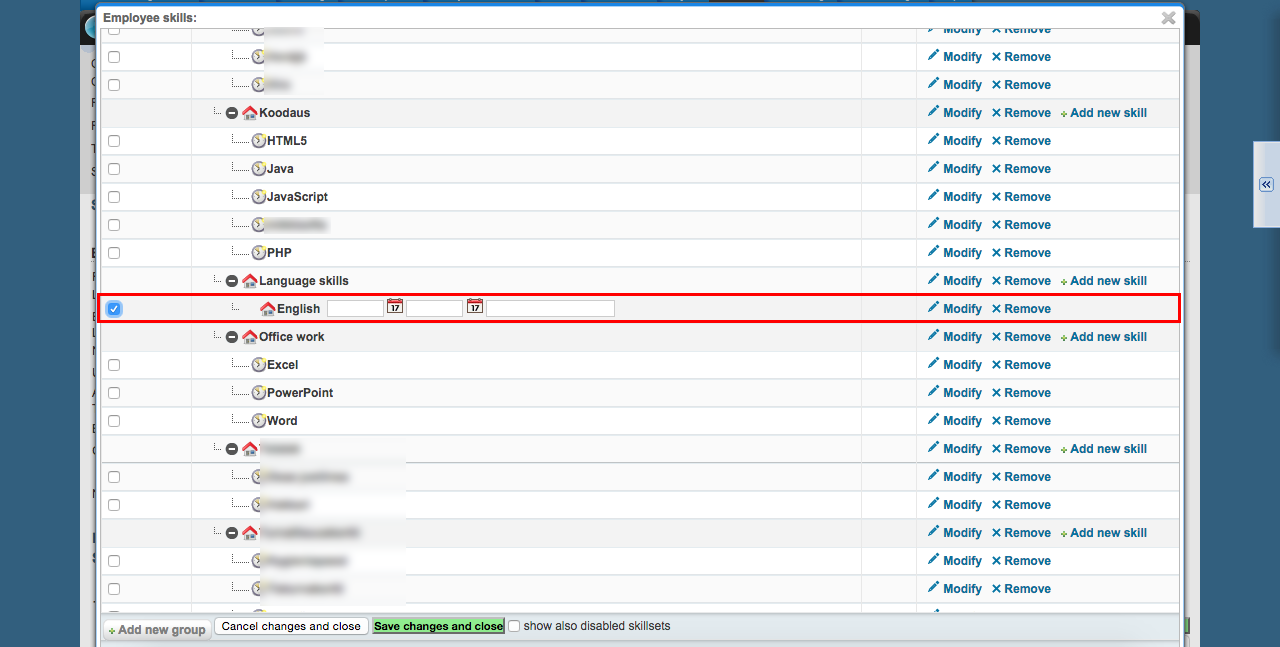
The skill can be applied to an employee by checking the check box next to the skill.
If you need help, call our free customer service 09-6898 8222
The notes contain notes about the user. They can be for example notices or repeating reminders about the user. The notices are visible and the reminders will be sent to the persons that are marked in the email field (typically the supervisors).
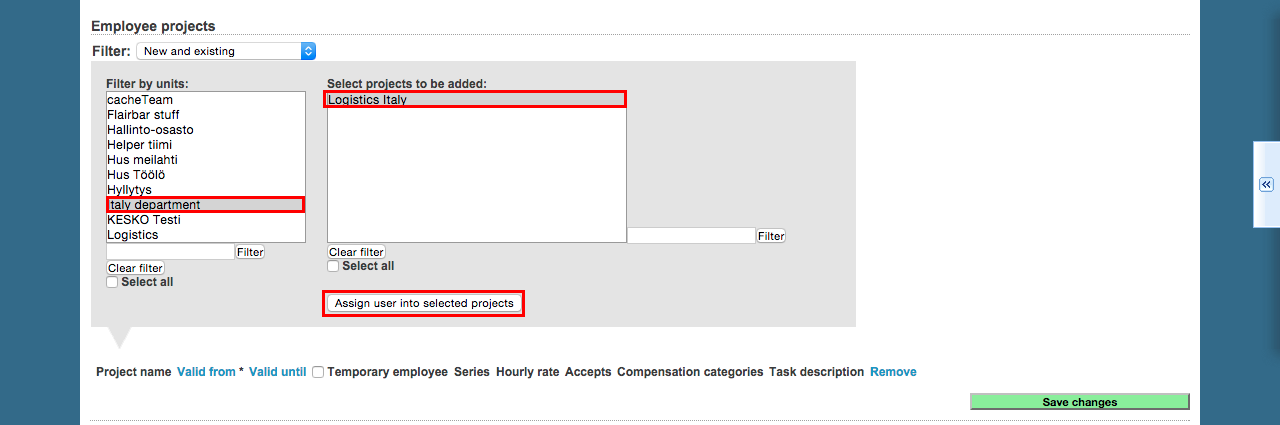
Lets place the employee to a project.
Here you can browse projects in different units. The left box contains units and the right box contains the projects inside the chosen unit. You can make multiple choices using the shift- and ctrl -buttons.
The employee will be placed to a project by clicking the Assign user into selected projects -button.
If you need help, call our free customer service 09-6898 8222
Below the selection boxes new rows appears for each of the employee's new projects. Fill in the needed information.

If you need help, call our free customer service 09-6898 8222
By clicking the Create a new tax card -button a form will open to add information about the employees tax card. Remember click save after entering required info.
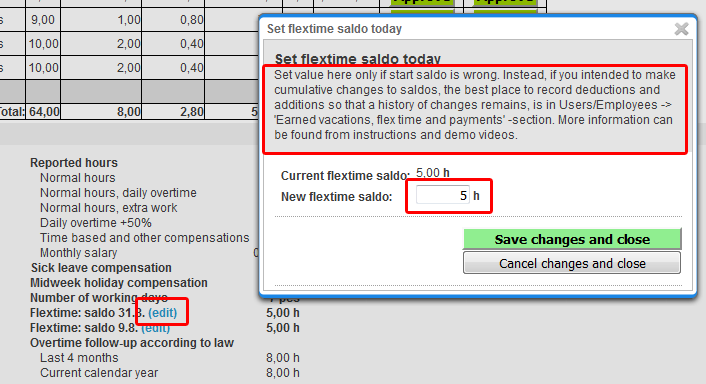
Next let's click the Earned vacations, flex time and payments > -button. The vacations that the employee has earned will be entered here. (It's recommended to also use this section for any hour balance changes after the start balance. That way the balance change history can be reviewed later from this same section).
Lets create a vacation as an example.
Remember to save the changes after filling the information.

If you need help, call our free customer service 09-6898 8222
Finally lets send an invitation to the user. You are can send the invitation by clicking the mail icon next to the Email address field.
Choose to send the user ID in the invitation and send the invitation by clicking the Perform action -button.

If you need help, call our free customer service 09-6898 8222
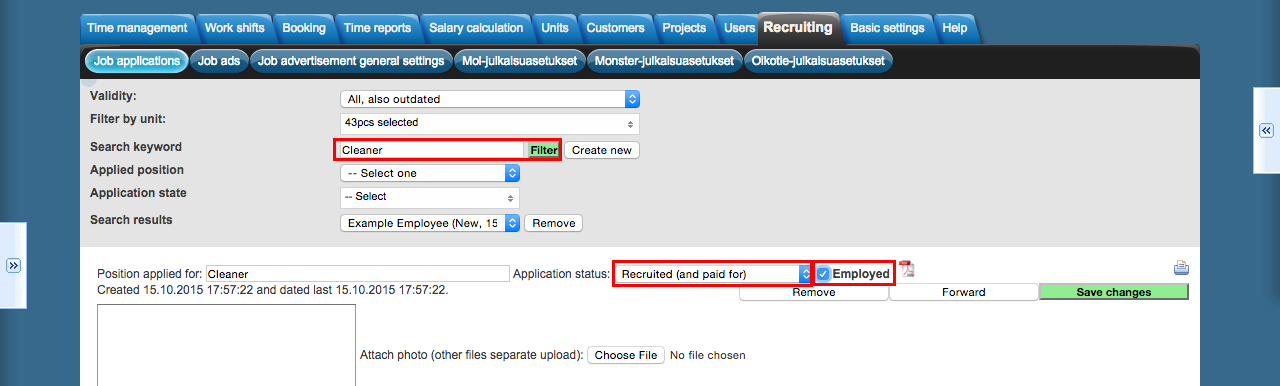
Recruiting
Lets check how to accept a job application and how to add a job seeker as an employee.
The job ads and applications are handled at the Recruiting -tab.
The database already has one application and the person has been interviewed. Lets search that application, so we are able to accept that person as an employee. (There is no need to change the search options in this case).
Lets change the application status to "Recruited".
When the Employed check box is checked, the employee is also visible on the Users -tab.
If you need help, call our free customer service 09-6898 8222
Work shifts in the Work shift planning view
Creating an anonymous shift
Creating work shift in Tuntinetti is easy in the work shift planner (Work shifts > Work shift planner). Shifts can be created even when we don't yet know the employee doing them.
To create an anonymous shift, choose a day from the "nimettömät vuorot/anonymous shifts" lane in the planning view.
In the popup you are able to create an open shift with desired parameters.
The created shift will be visible in the planning view.
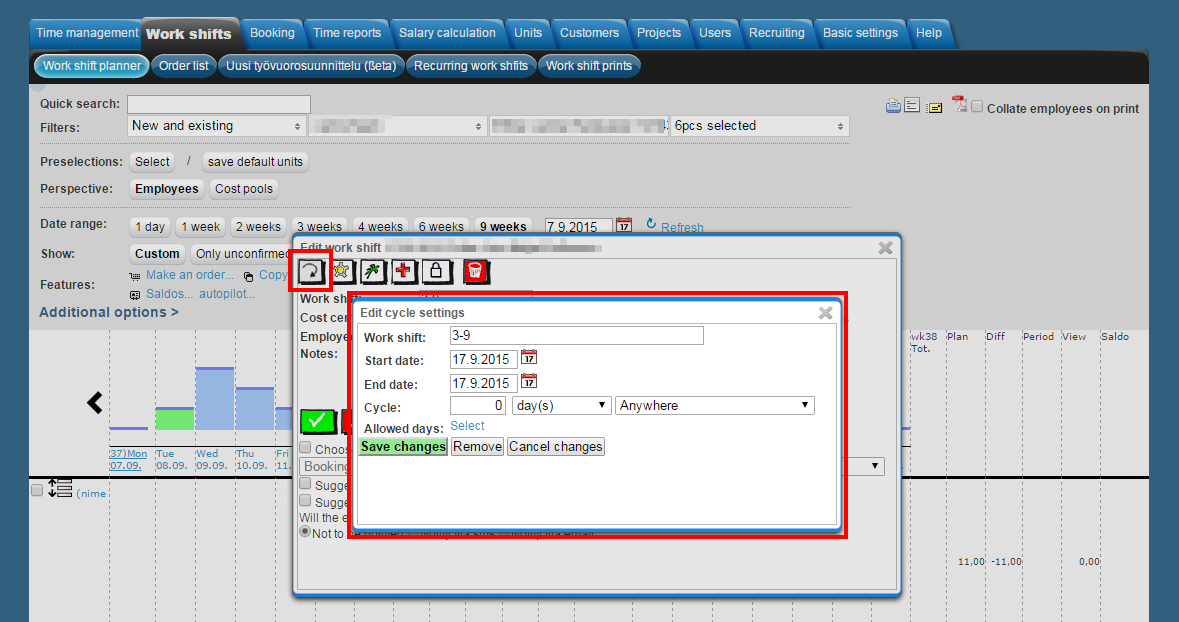
Creating a recurring shift
A shift can be set as recurring in the shift's recurrence settings.
Click the recurrence settings-button in the shift's basic settings. The basic settings view can be entered by clicking a shift in the planning view.

If you need help, call our free customer service 09-6898 8222
In the cycle setting window you are able to edit the details of the recurring cycles.
- Set the Work shift. You are also able to enter notes in this field, for example "8-16 Remember to lock the doors"
- Set the Start and End dates.
- Set the recurring work shift's cycle in the Cycle-section.
- In the Allowed days-window you can set the shift's exact validity.
- For example, you may define that the shift won't be on during holidays.
- Save the changes by clicking the Save changes-button
If you need help, call our free customer service 09-6898 8222
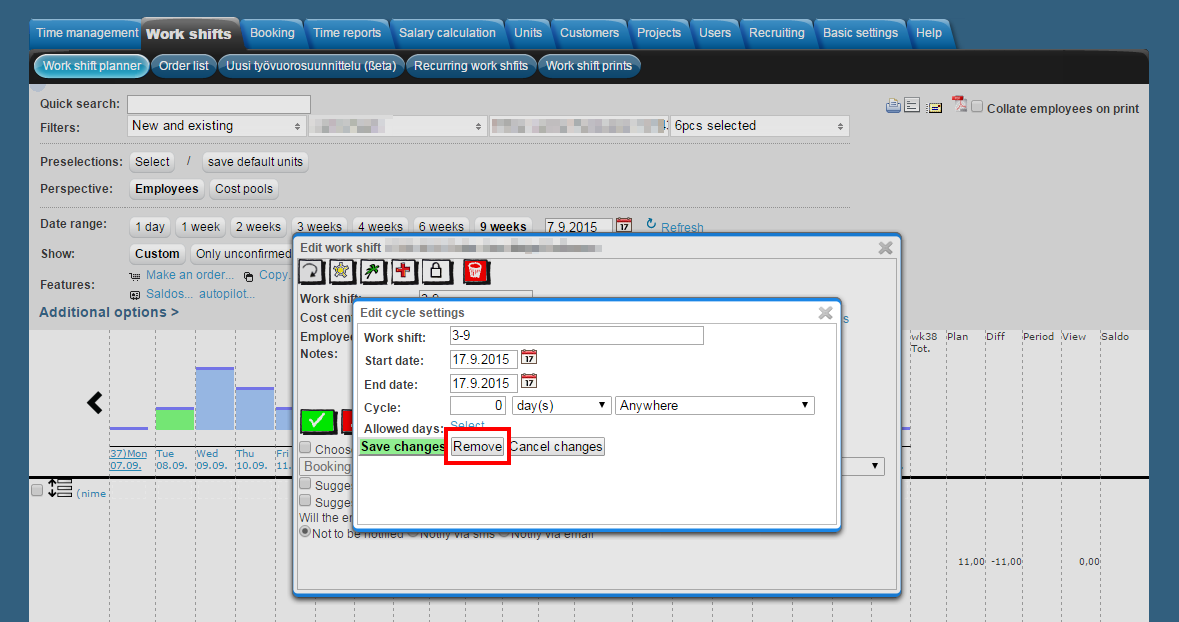
The work shift is visible on the days that it is set to be on.
Recurring shifts have an arrow-icon on them ( ).
).
Recurring shifts can be removed with the "Remove"-button in the shift's settings. Any changes to a single shift's settings affect all instances of the recurring shift.
If you need help, call our free customer service 09-6898 8222
More information about recurring shifts and another way of creating them can be found in the Recurring work shifts-guide.
Projects
In Tuntinetti work time is entered by projects. Before reporting work time, you must first create the needed projects and assign employees to them.
Creating a new project
In the following section we'll create a new project and look at the available project settings. We'll also show how you can add customers, employees and tasks to a project.
You can create new projects in the Projects tab.
After opening "Projects" tab you can search for existing projects and examine their information, or create entirely new projects. Here are the search settings found on top of the page:
- Quick search (Search for already existing projects by entering their name)
- Filter (This affects the visibility of projects. The link next to the menu allows you to filter projects by date)
- Filter by unit (Select the unit of the project you're searching for. When creating a new project, select the unit you want the project to be part of)
- Select project for working hours control (After selecting a project, it's information appear on the page for you to examine)
To create a new project, select a unit that it is joined to. Every project must be joined to a unit. This is not necessary if the company is not divided into units.
There are three ways to create a new project. The links to each of these can be found next to the search tools:
- Create new (Creates an entirely new project)
- Copy as base (Copies the information of currently selected project as a base for a new one)
- Create new project and private customer (Creates a new project along with a new private customer. The link opens a window to create the customer and then allows you to fill the project information)
Let's create a new project by selecting "Create new". This brings up a notification indicating that a new project has been created. After this you can fill in the basic information.
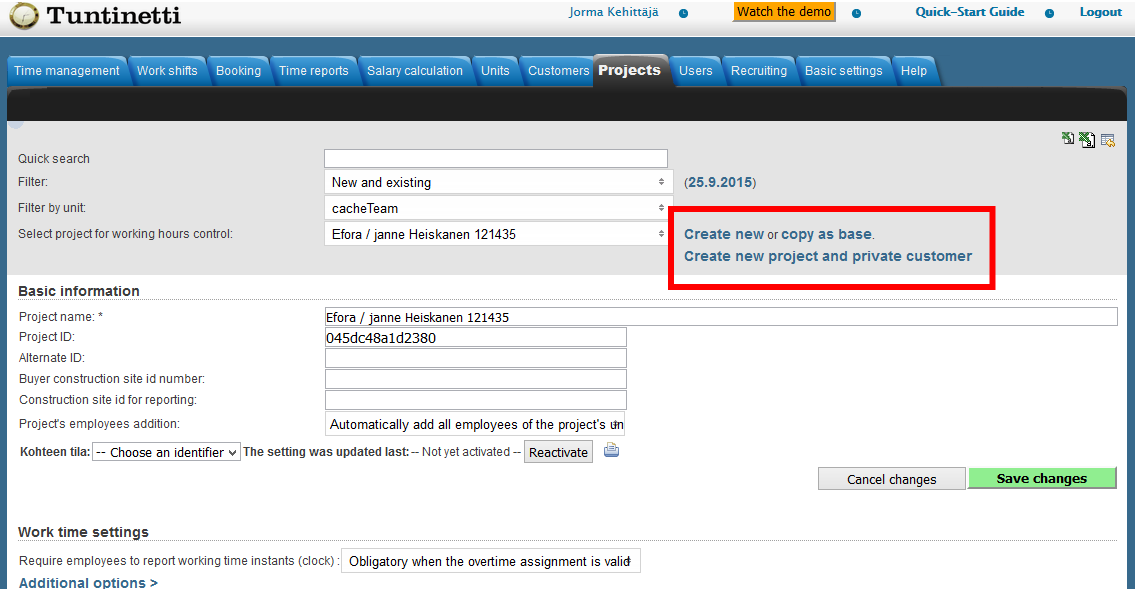
If you need help, call our free customer service 09-6898 8222
Basic information of a new project
Creating a new project brings up a notification indicating that a new project has been created. After this you can fill in the basic information:
- Project name (Mandatory information)
- Project ID (Here you can fill in the time card ID)
- Alternate ID
- Buyer's construction site number
- Construction site id for reporting
- Adding employees to the project
- To be selected one by one
- Automatically add all employees of the project's unit
- Automatically add project's unit's and subunits all employees
- Add all employees automatically (This means all the employees in your company)
"Cost center's state" selector allows you to choose if the project uses timecards or work time buttons. You can press "Reactivate" -button to activate the setting. The printer icon opens up a window, that contains all of the project's work hour control IDs.
Save the new project by clicking "Save changes" button. After doing this the program might give you a notification indicating that there are no employees attached to the project.
Adding an employee to a project
Next we'll go through the employee settings and how to add employees to a project.
This can be done under the "Project employees" title where you'll also find all the employees that are already attached to the project. If there are no employees added to the project, the field is empty.
To add new employees, simply select them from the list in the gray box below the project's employees. You can filter employees by their unit and use keywords to find the employees faster. You can select multiple employees simultaneously by dragging them with the left mouse button pressed down or clicking them with shift or ctrl button pressed down.
After selecting the employee(s) press the button below to confirm and add them to the project. After doing this the employees will show up on the list above. Now you can fill in their information.
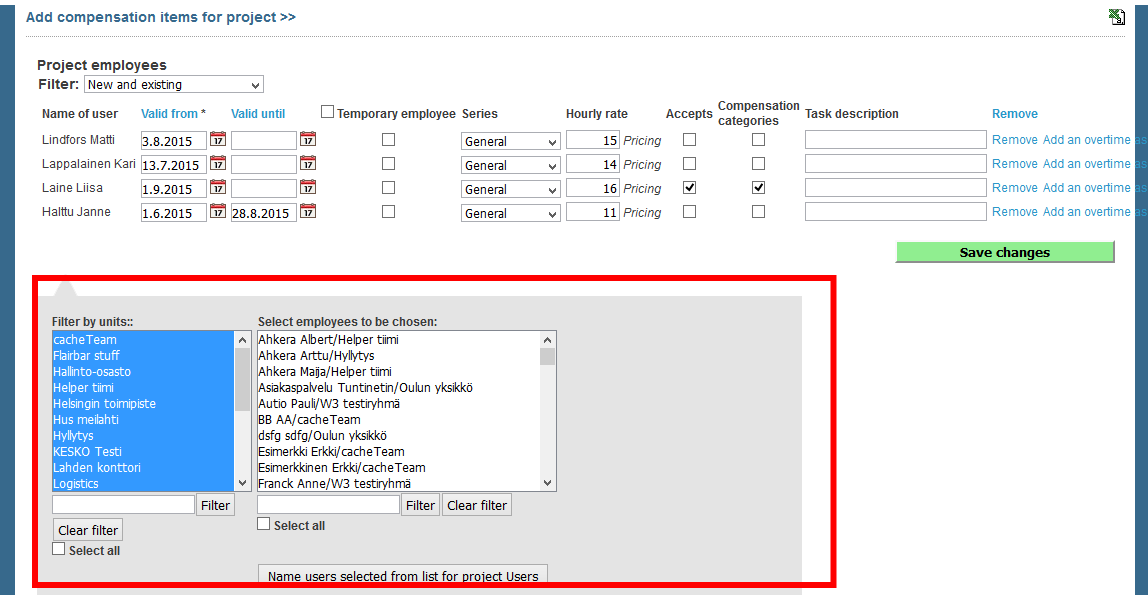
If you need help, call our free customer service 09-6898 8222
Employee information
You can get more information about some of these by moving the mouse over the titles.
- Valid from (The date from which the employee is able to log work hours for the project. Mandatory information)
- Valid until (The date from which the employee is no longer able to log work hours for the project. By pressing the title above you can invalidate all employees at once)
- Temporary employee (Crossing this marks the employee as temporary. Crossing the box next to the title does the same for all employees on the list)
- Series (This setting is useful if the employee has multiple ongoing contracts with the same employer)
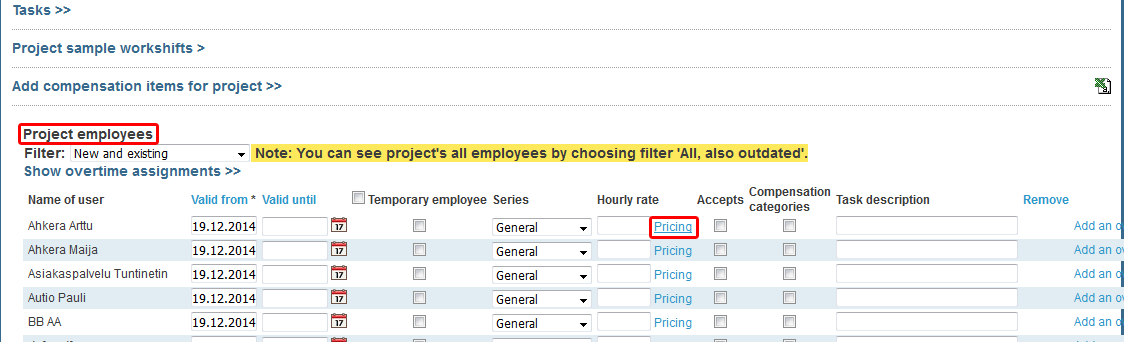
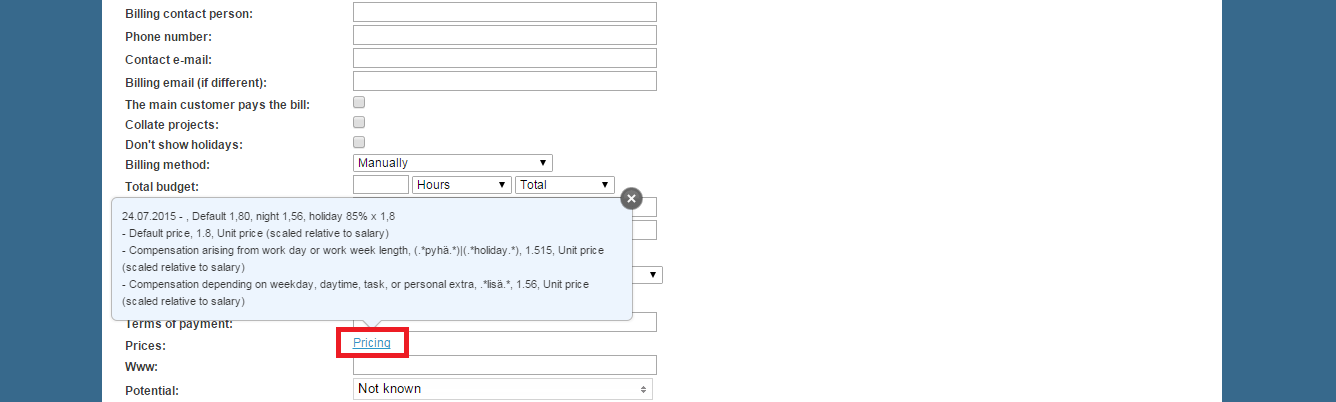
- Hourly rate (Hourly price for the work conducted by the employee. If you need more complex pricing, press the "Pricing" link)
- Pricing (Sets a more complex pricing for the employee. Use this if you, for example, want the price to change according to weekdays)
- Accepts (Crossing this means the employee can accept the work hours of other employees on the project)
- Compensation categories (Crossing this allows the employee to enter "only superior" -type compensations)
- Task description (Here you can add a description af the task, or other extra information)
- Remove (Removes the employee from the project. This can be done only if the employee has no hours logged for the project)
- Add an ovetime assignment (Opens up settings for adding the overtime assignment. The settings appear below the employee's settings)
The settings that appear after pressing the overtime assignment link are explained in the Overtime assignments-guide.
Adding a customer to a project
Adding an existing customer to a project
Next we'll go through customer setting and how to add customers to a project. Adding customers to a project enables you to differentiate work hours on billing reports and use the information for billing the customers.
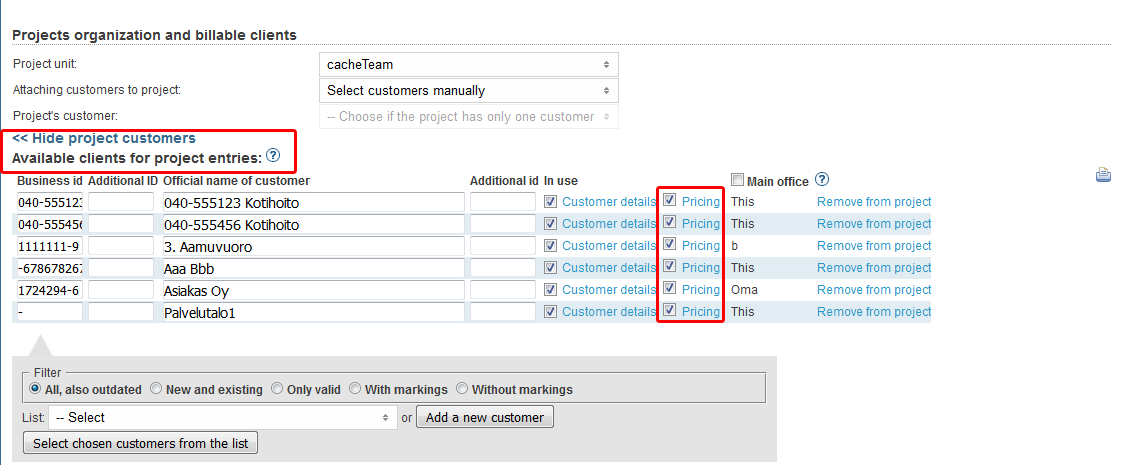
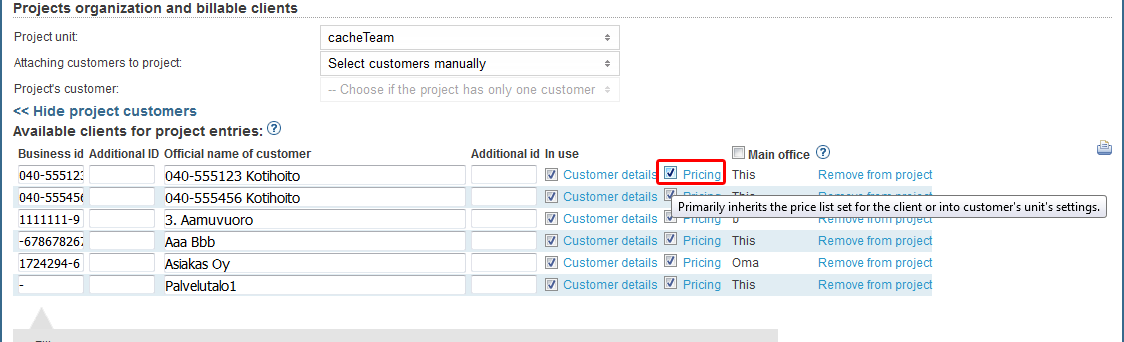
You can find customers and their settings under the "Projects organization and billable clients" -title. Pressing "Customers" -link under the title brings up all the customers that are already attached to the project. If there are no customers added to the project, the link states "Add customers for project".
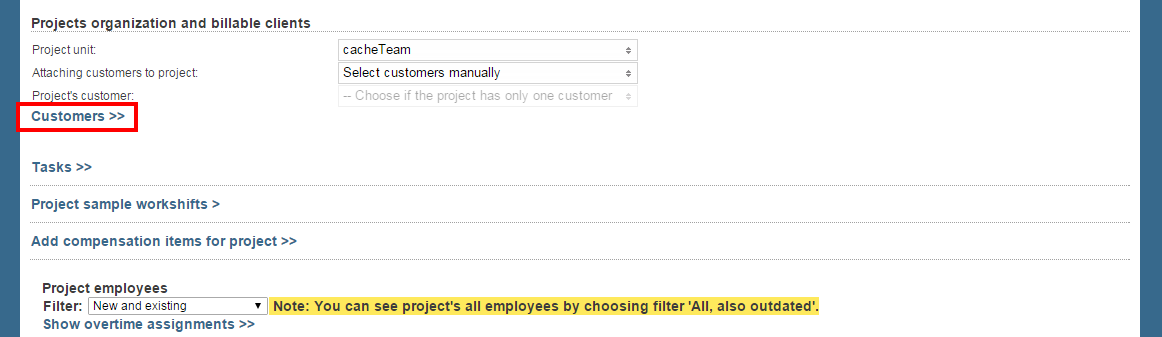
If you need help, call our free customer service 09-6898 8222
You can also choose how employees are added to the project.
If the project has only one customer, you can select the customer in the "Project's customer"-field.
You can view all of the project's customers by clicking "Customers" in the "Projects organization and billable clients"-section.
To add more customers to a project, you can select them from the customer-drop-downlist below the project's old customers. Customers can be filtered with keywords or using the filtering settings.
You can also choose multiple customers at the same time.
When you have selected the customers from the list, confirm the selection by clicking the "Select chosen customers from the list"-button.
After adding the customers, they should be visible in the project's customer-list.
Adding a new customer to a project
You can also create a new customer. For this the "Customers"-section should be opened.
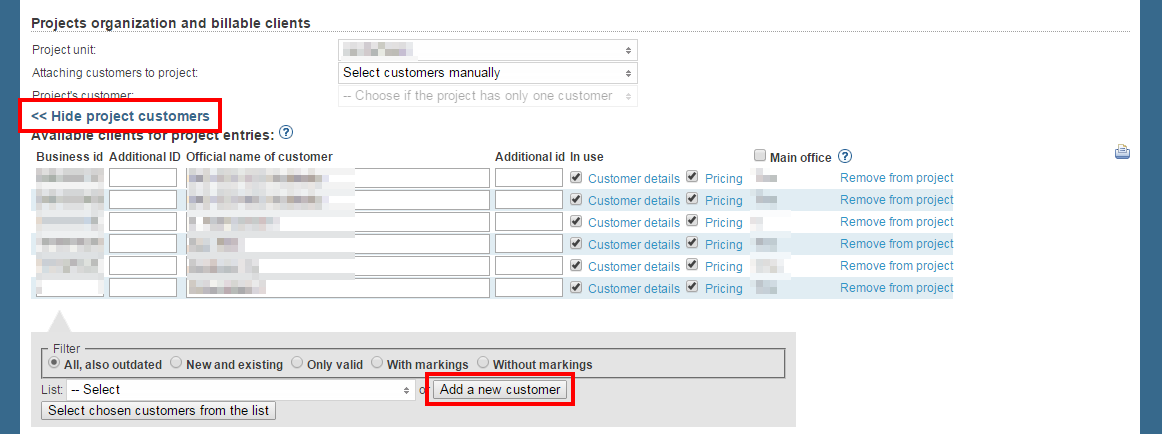
If you need help, call our free customer service 09-6898 8222
Customer ID
This field can't be empty. So if the customer doesn't have an ID, a hyphen can be entered instead. ( - )- The customer's cost center ID can be entered in the "Additional ID"-field
- Official name of the customer
- A time stamp id can be entered in the "Additional id"-field
- By default the customer is in use. A customer can also be marked as inactive by unchecking the "In use"-check-box.
- The "Customer details"-button opens up a window, where you can enter detailed information about the customer.
With the "Pricing"-button you can modify the customer's pricing.
More information about pricing can be found in the Billing and pricing-guide.- Main offices can be modified if the check box next to the heading is checked.
Adding a task to a project
Let's add a task to a project. Defining tasks is helpful when reporting work time.
Tasks can be viewed by clicking the "Tasks"-button. If the project doesn't have any tasks yet, the button says "Add tasks for project".
A new task can be created by clicking the "Add a new task"-button.
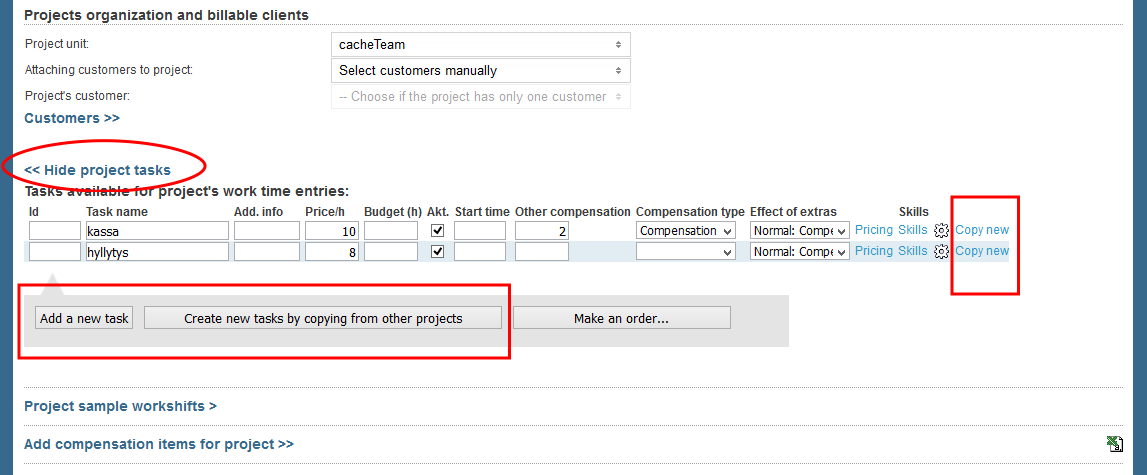
- You may also copy the skills and qualifications that are joined to the task.
- Confirm the selection.
The added tasks should be visible in the task list.
Adding a compensation item to a project
You can add compensation items in the "Add compensation items for project"-section. However it is recommended that you use the Project wizard to edit the compensation items. Project wizard can be found in the right side of the page, under the button "<<".
In order to modify compensations, open the Project wizard.
If you need help, call our free customer service 09-6898 8222
- After opening the wizard, select the unit of the project and press the plus -icon next to it.
- Press "Select" -link next to the project you wish to add the compensations to.
- Project information is now visible below the unit list. Select "Organisation costs".
- Press "Manage organization cost".
- Now you can see all the compensations that are already created. You can add these to the project by crossing the square under "Organization costs" -title. Another option is to create new ones by pressing "Create a new organization costs".
Creating new organization costs
- Press "Create a new organization costs".
- Enter the information to the opening page. Name is a mandatory field. After doing this, press "Next".
- In the next page, fill in the pricing information. Short name is a mandatory field. It allows the program to identify the compensation based on it's short name, thus making it easier to enter the compensations.
- Press "Next" again. This saves the organization cost and you can now add it to the project like any other cost.
More information about organization costs can be found in the Compensation items-guide.
Units
Adding a manager to a unit
Managers can be added to a unit in the "Units"-tab. First you must select a unit in the top part of the page.
A list of the current managers is visible in the unit's information in the "Managers and users' rights"-section. New managers can be named from the selection boxes below the manager-list.
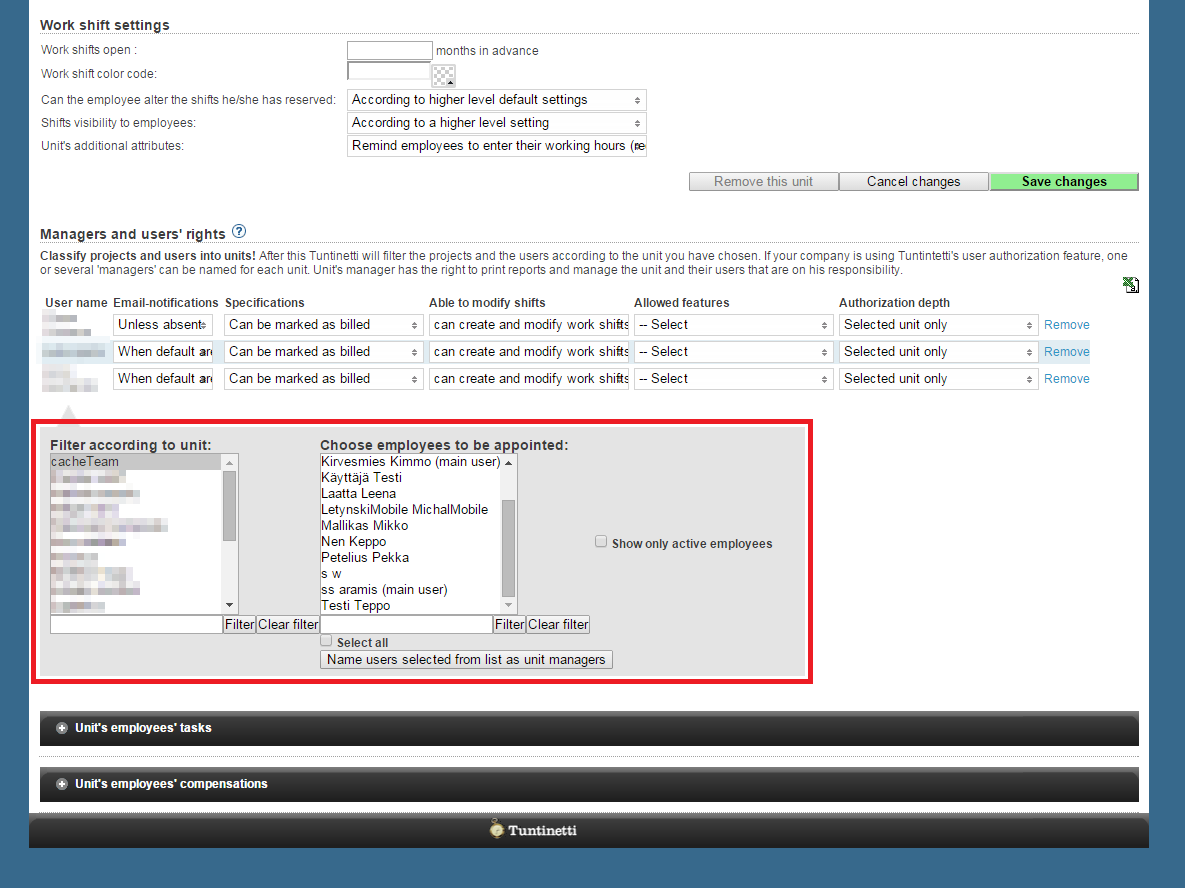
If you need help, call our free customer service 09-6898 8222
You can filter desired employees according to unit and then choose them in the right side selection box. You can select more than one employees with the CTRL-button and consecutive rows with the SHIFT-button. The selected employees can be named as managers by clicking the "Name users selected from list as unit managers"-button.
You can also remove managers with the "Remove"-button.
More information about units can be found in the Units-guide.
Customers
With the Client Relationship Management of Tuntinetti you can archive customized documents, customer data and detailed contact information of customers of your company. More about Tuntinetti's CRM can be found in the Customers-guide.
Adding a new customer
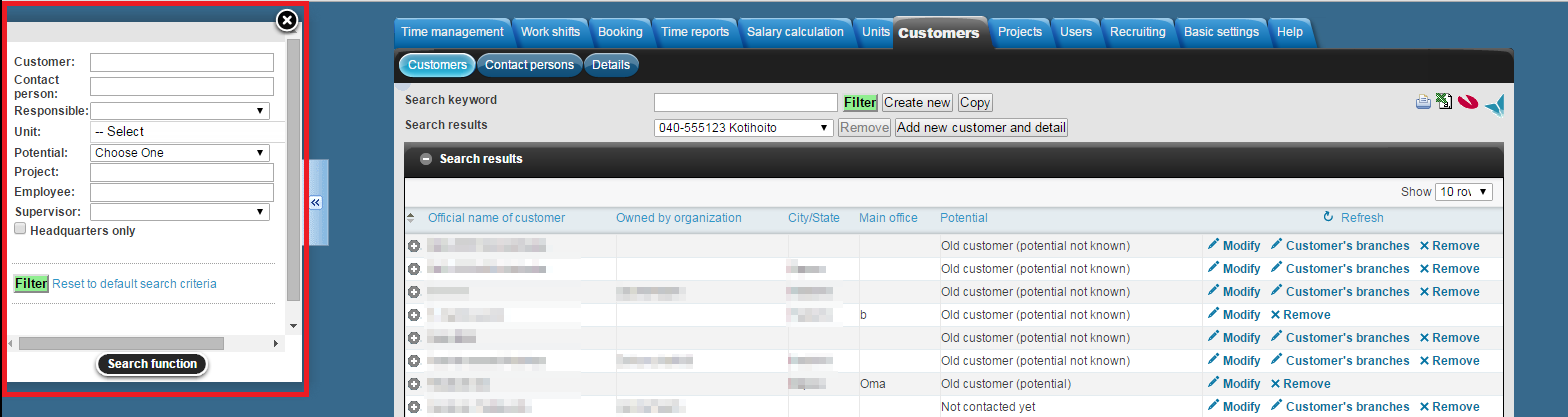
You can search customers in the Customers-tab. You can use the Search field in the top part of the page and select the desired customer in the "Search results"-drop-downlist. Another way to search customers is to use the search function leaflet. The leaflet can be accessed by moving your mouse on the arrow marks ( >> ) on the left side of the page. This opens up a window where it is possible to search customers by detailed information.
If you need help, call our free customer service 09-6898 8222
Adding a new customer starts with clicking the "Create new"-button next to the keyword search. "Add new customer and detail" creates a new customer with a detail at the same time. If you know that you're going to add a detail to the new customer you're creating, that is a simple way to create both at the same time. Even if you click "Create new"-button, you may still add details to customers at any time.
When creating a new customer Tuntinetti informs that the official name of the customer and the business id are the only obligatory fields. We recommend to enter all the information about the customer at the beginning. However, you can always come back and fill in or modify the customer's information by selecting it in the search result list. Detailed help about customer information can be found in the Adding a customer-guide.
The pricing setting can be modified by clicking the "Pricing"-button. More information about pricing can be found in the Billing and pricing-guide.
Adding a contact person to a customer
Adding a contact person to a customer in the Customers > Contact persons-tab.
You can add a contact person by clicking "Add a contact person". This opens up blank user contact information and customer information. The mandatory fields in user contact information are first name, last name and personal e-mail address.
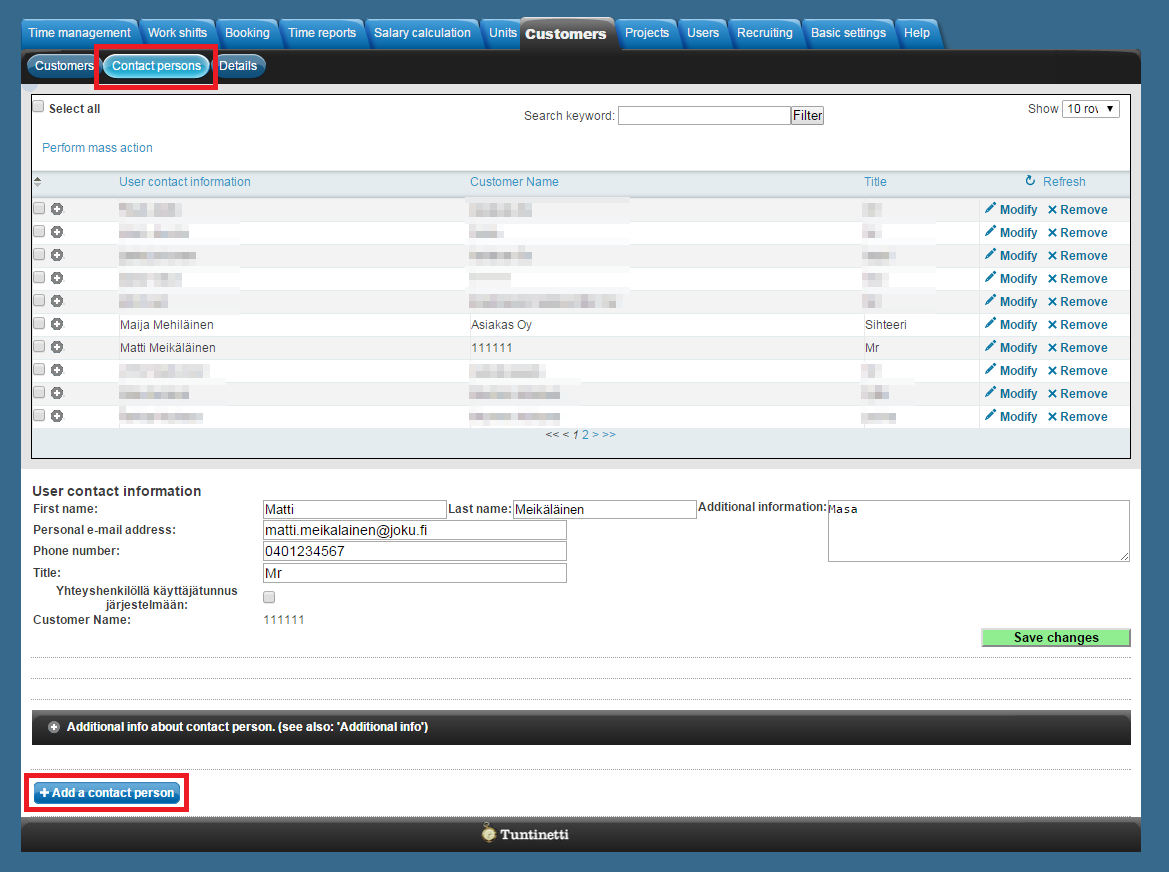
When you have added the contact person's information you can add the customer info. Write the official name of the customer and choose it from the list that appears under the field. By choosing the customer its information is automatically updated to the page.
More information about Contact persons-tab's functions can be found in the Contact persons-guide.
Adding a detail to a customer
Adding a detail to a customer in the Customers > Details-tab.
To add a new detail you must click "Add" on the bottom of the page. This opens up a section where you are able to write down the information of the new detail. Details are customer-specific and it is possible to add alarms and topic related notes.
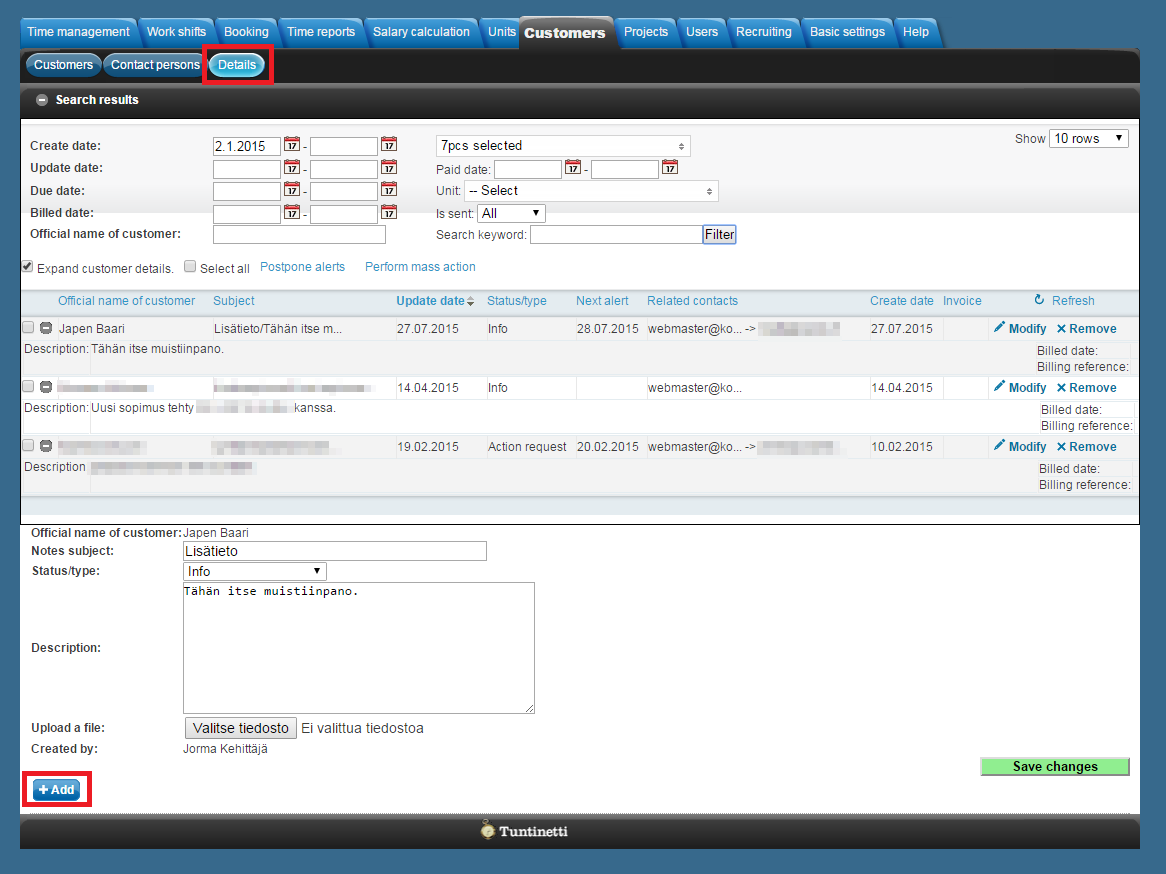
More information about Details-tab can be found in the Details-guide.
Salary calculation
With Tuntinetti you can handle the salary calculation easily and Tuntinetti can factor in the terms of collective labor agreements automatically. More information about salary calculation can be found in the Salary/Wages calculations-guide.
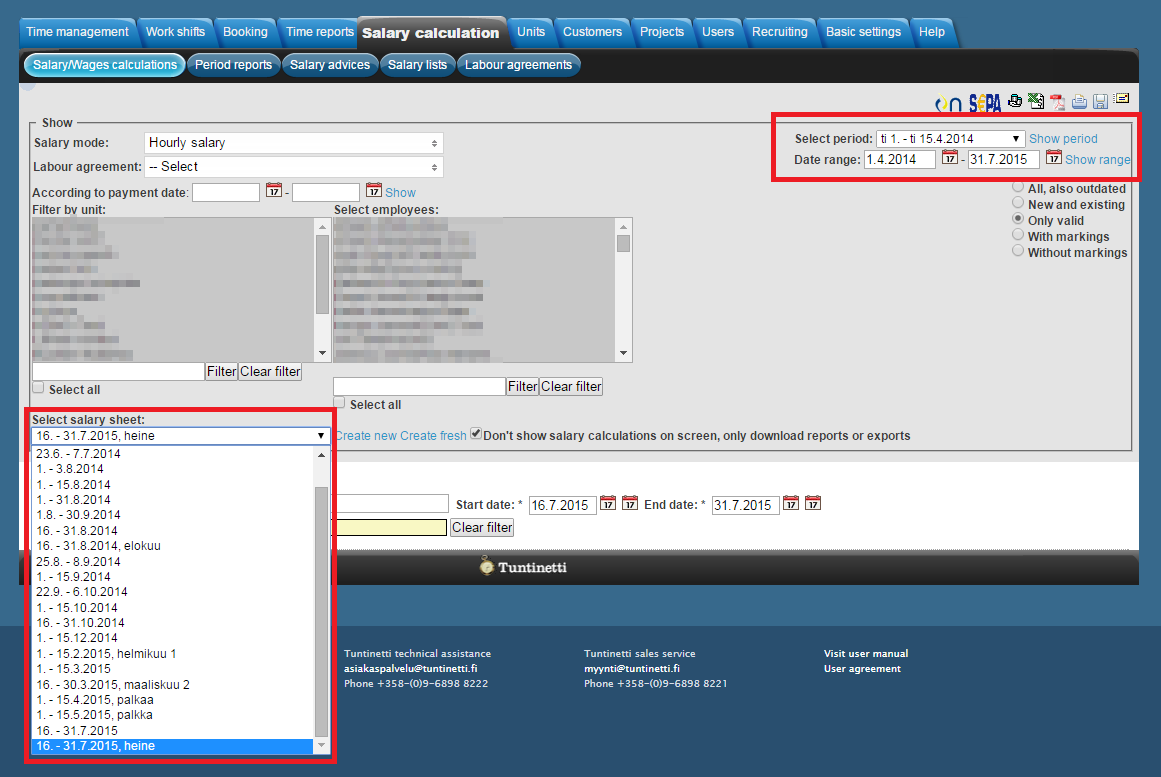
Browsing salary sheets
You can browse salary sheets in the Salary/Wages calculations-tab. Next we'll go through how you can select the parameters for a salary sheet.
First you must select a time period and desired employees. When these have been selected the "Select salary sheet" drop-down list will be updated to have the desired salary sheets. There you can choose a specific salary sheet.
You can filter employees by their salary mode, collective labour agreement, or payment date. "Create Payslip/Paystub for monthly salary employees with" -menu allows you to choose how the calculation is done for employees with monthly salary.
If you need help, call our free customer service 09-6898 8222
Creating a new salary calculation
New salary calculation can be created in the Salary/Wages calculations-tab. The following explains only the creation of the calculation. There are other operations that need to be done before this, for example the work hours must be approved so that the hours can be included into the salary calculation. More information about the salary calculation steps can be found in the Salary/Wages calculations-guide.
First you must select a time period for the calculation. Then you must select an employee in the selection window.
A new calculation can be created by clicking the "Create new"-button.
Some information that can be entered on salary calculation:
- Pay period title
- Payment date
- Salary template
- Salary period in taxation
- Tax card information (A new tax card can be added with the "Add"-button.)
- Annual reporting payment type
- Salary payment account number
- Labour union account number
- Garnishment account number
A summary of the work hours can be viewed by hovering your mouse on the question mark icon ( ). By clicking the button you can view more detailed information about the work hours.
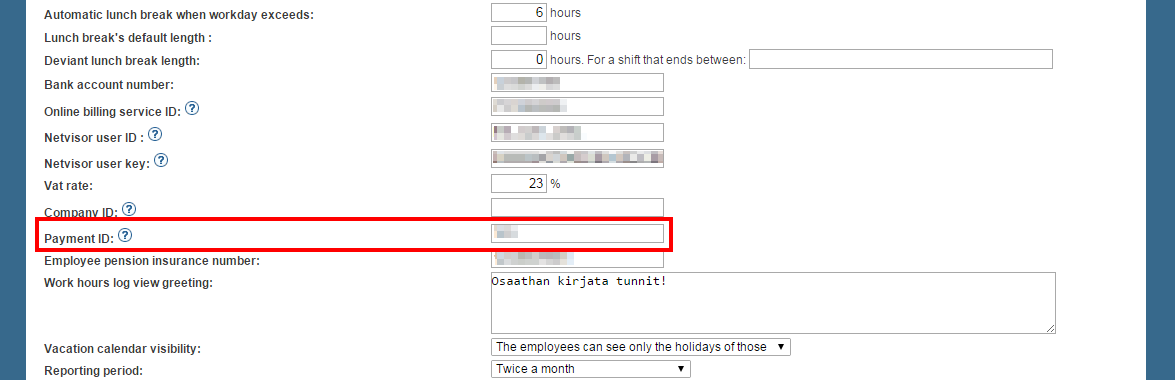
Payment data
Before you can download payment data, you must enter a payment id in the company's basic information. This can be done in the Basic settings > Company's basic information-tab in the "Payment ID"-section.
If you need help, call our free customer service 09-6898 8222
![]()
If you need help, call our free customer service 09-6898 8222
Examining period reports
When salary information has been transferred to payroll in the Salary/Wages calculation-tab, they can be formed into period reports in the Period reports-tab. The period reports can be printed or transformed into files that are useful in account programs and in taxation.
First, select period or date range, from which the salary information is fetch.
You can filter units and employees:
All, also outdated
New and existing
Only valid
With markings
Without markings
If you want, you can filter the list of employees on the basis of the collective labour agreement.
You can also filter according to employee skills.
Select check box or "Select desired skills and qualifications" link to open the skill window.
Choose the skills you want to use for filtering, by selecting check boxes next to the skill names.
This filter can be deactivated by unselecting the "Filter according to employee skills" check box.
Select unit(s)
Select employee(s)
If salaries of the selected period has been set to be paid for the selected employees, they appear under the filter menus.

If you need help, call our free customer service 09-6898 8222
With the icons on the top-right part of the page the period report can be exported or printed.
Vacation calendar
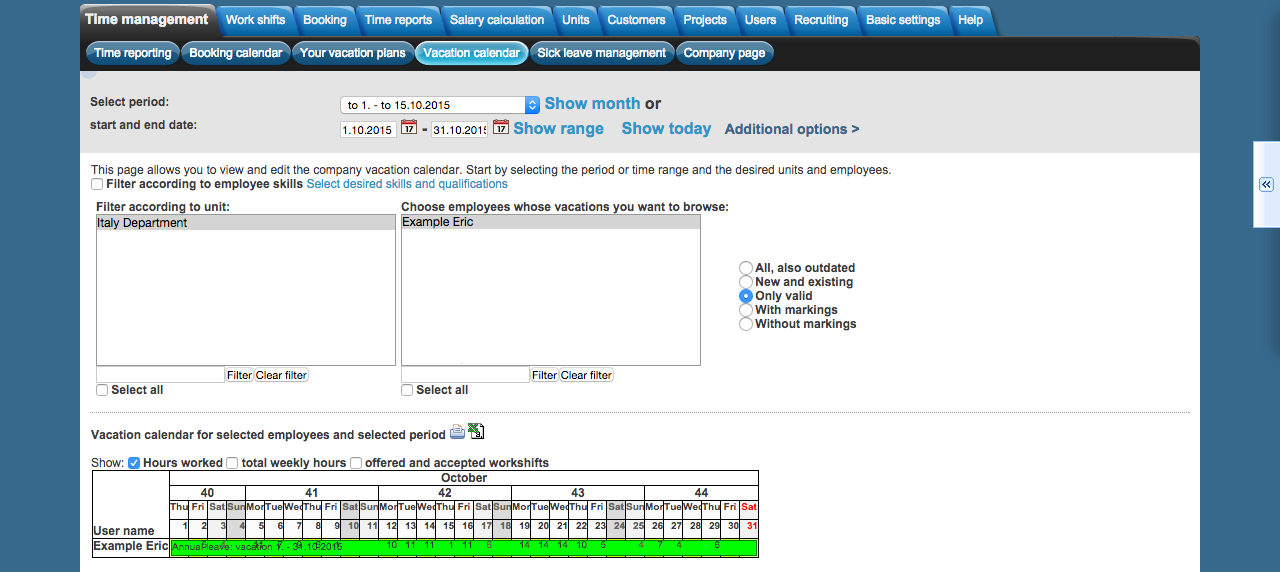
Viewing the vacation calendar
Newt we'll go through the vacation calendar of Tuntinetti. The calendar can be found in the Time management-tab on its own tab called "Vacation calendar".
If you need help, call our free customer service 09-6898 8222
Start by choosing the month which vacations you want to view.
When you have selected the month, click Show month.
Alternatively you can set the range freely for example to cover two months.
When you have set the range click Show range.
Then choose the unit or units, which vacations you want to view.
You can choose multiple units at once. Consecutive rows can be selected with the SHIFT-button and single rows with the CTRL-button.
Lastly choose the employees. You are able to view single or multiple employee's vacations.
Each employee's vacations from the chosen month or range is now shown in green in the calendar.
More information about Vacation calendar can be found in the Vacation calendar-guide.
Sick leave management
The following demonstrates sick leave management in Tuntinetti. In sick leave management administrator or superior can add, view and modify sick leaves. This can be done in the Sick leave management-tab.
If you need help, call our free customer service 09-6898 8222
Viewing and modifying sick leaves
Administrator or superior is able to view and modify every employee's sick leaves.
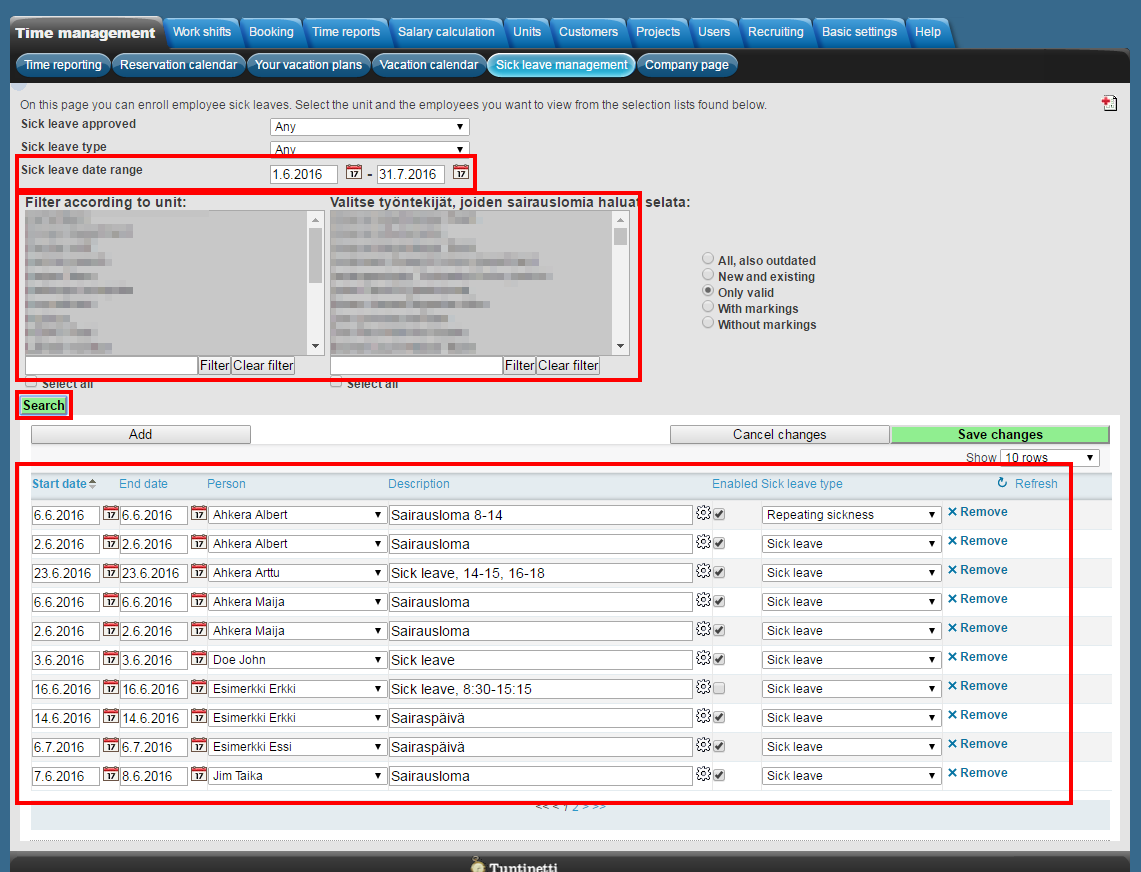
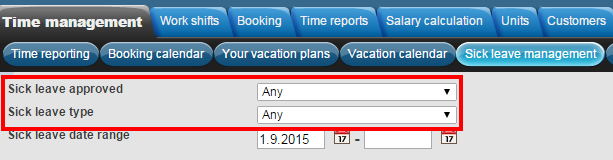
Start by setting the date range, which sick leaves you want to view.
Next click Search-button.
Now all sick leaves from the chosen date range are visible in the table.
If you need help, call our free customer service 09-6898 8222
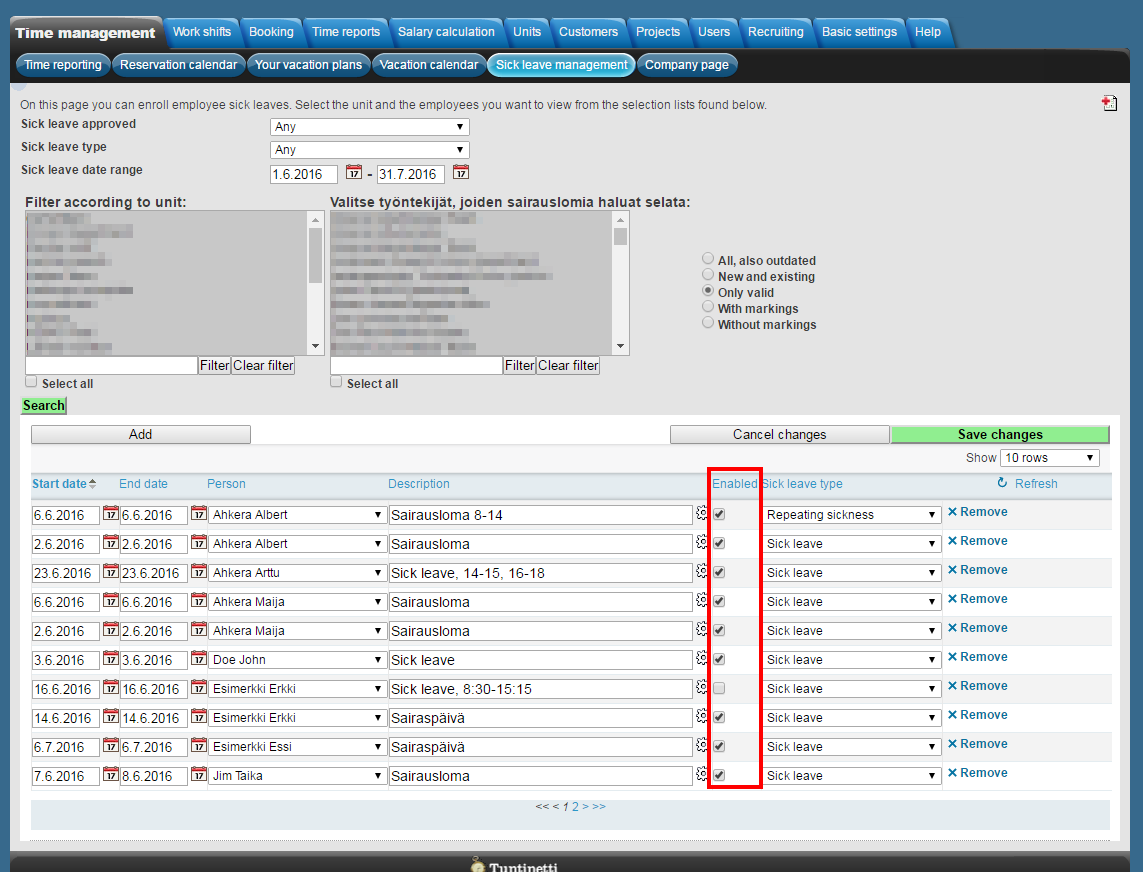
By clicking the Enabled-box for a sick leave you can accept it to be payed.
If you need help, call our free customer service 09-6898 8222
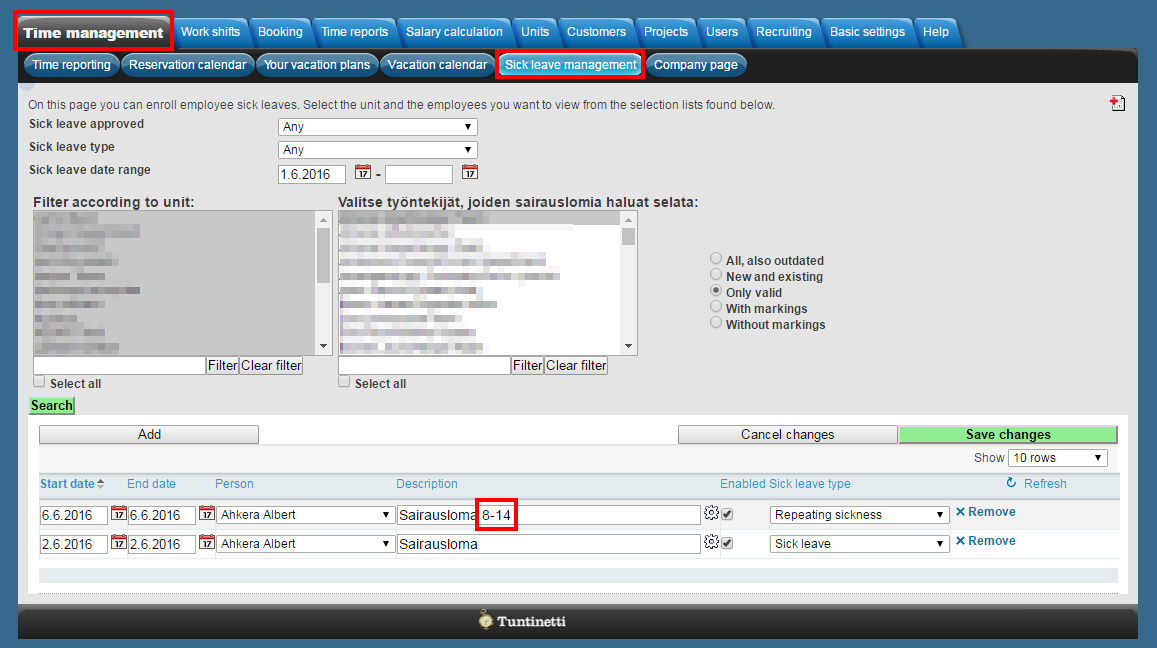
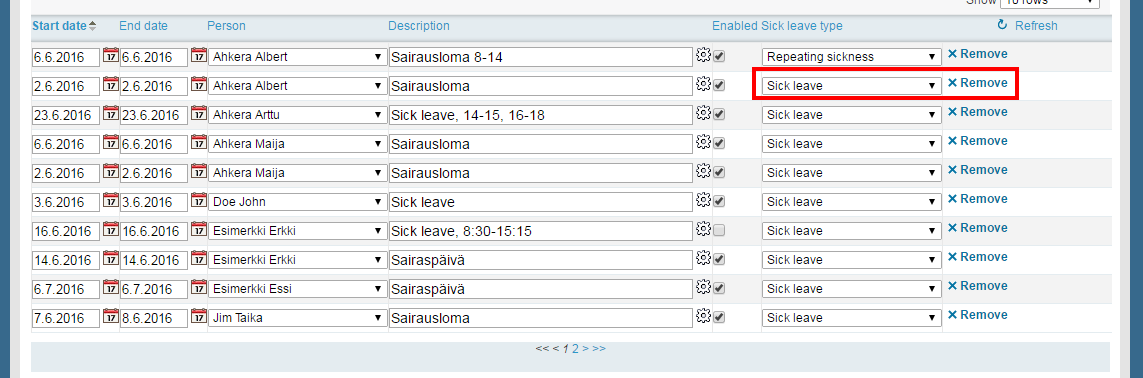
You can change the type of a sick leave and it is possible to delete a sick leave by clicking Remove.
If you need help, call our free customer service 09-6898 8222
Remember to save all the changes.
You can filter sick leaves based on the type of the sick leave and whether they are enabled or not enabled.
When you have filtered the selection the table will only show the sick leaves that mach the filter.
More information about sick leave management can be found in the Sick leave management-guide
Work shift cycles
A Work shift cycle
Next we'll go through work shift cycles. Cycles that concern the whole company can be modified in the Company's basic information-tab.
A work shift cycle must have a Valid from-date and a Start date. The length of the cycle should be entered if it is not defined in the collective labour agreement.
The default length for the workshift cycle is set by collective labour agreement. Typically, the length on the collective labour agreement level is 1, 2 or 3 weeks. When you need to set workshift cycles that differ from those set in collective labour agreement, the length of the cycle is set in: the company's basic information for company level, the unit settings for unit level and in employee's contract settings for employee level. Settings are inherited from the unit's settings to unit's employees, either on the grounds that the employee is positioned to the unit in question or that the unit has been selected in the "Work time cycle group" in the additional settings of the employee's contract.
Work shift cycle's information
Let's go through how you can modify a cycle.
Enter the Valid from-date.
Enter the Start date.
The work shift cycle's length can be entered in the "Work shift cycle weeks"-field if the check-box is checked.
The cycle's repetition settings can be modified in the "Workshift cycle repetition"-column.
You can remove a cycle with the "Remove"-button.

If you need help, call our free customer service 09-6898 8222
Time reports
Searching a time report for payroll
Selecting month or time frame
First select month or time frame you would like to see. Depending on preview mode, chosen month/start and end date will refresh automatically or you have to press "Show month" or "Show range".

Selecting units and employees
Choose first the unit(s) and then the employee(s) you want to be shown on the report.
Employee reports open automatically below selection menus, one worksheet per employee, if "Auto-refresh" Preview mode is selected. If "Refresh on-demand from show-button" is selected, remember to press "Show" after selecting the employees.
The report:
- A number in brackets is the week number.
- If employee contracts are up to date, Tuntinetti is able to check whether the employees have done overtime or not.
- If there has been overtime, and employee doesn't have overtime assignment, Tuntinetti will suggest to fill in the missing overtime assignments.
- Underlined day is the day on which the work time cycle begins.
Creating an overtime assignment
Introduction of overtime assignments
In Tuntinetti, overtime isn't recorded separately, but the program analyzes them automatically when overtime assignment is in effect. In order for the program to itemize overtime hours, the employee must have at that time a valid overtime assignment and contract.
In Tuntinetti, the overtime assignments are normally given one by one and case by case. But if it is necessary to have all the employee's hours itemized into payroll work time report according to the valid collective labour agreement, it is possible to set the overtime assignment (itemized list of work time compensations) to be always valid. These default overtime settings can be set for units, projects and employees.
- Unit level is on the bottom.
- Project level is over unit-stage but under employee-stage. This might be the reason why a change to the unit-stage's overtime assignment hasn't affected the calculation.
- Employee level is on the top, and overrides the project- and unit levels.
Adding an overtime assignment on the unit level
Adding an overtime assignment on the unit level takes place in the Units-tab.
Make sure that you have selected the desired unit in the "Choose the unit you want to edit"-drop-downlist.
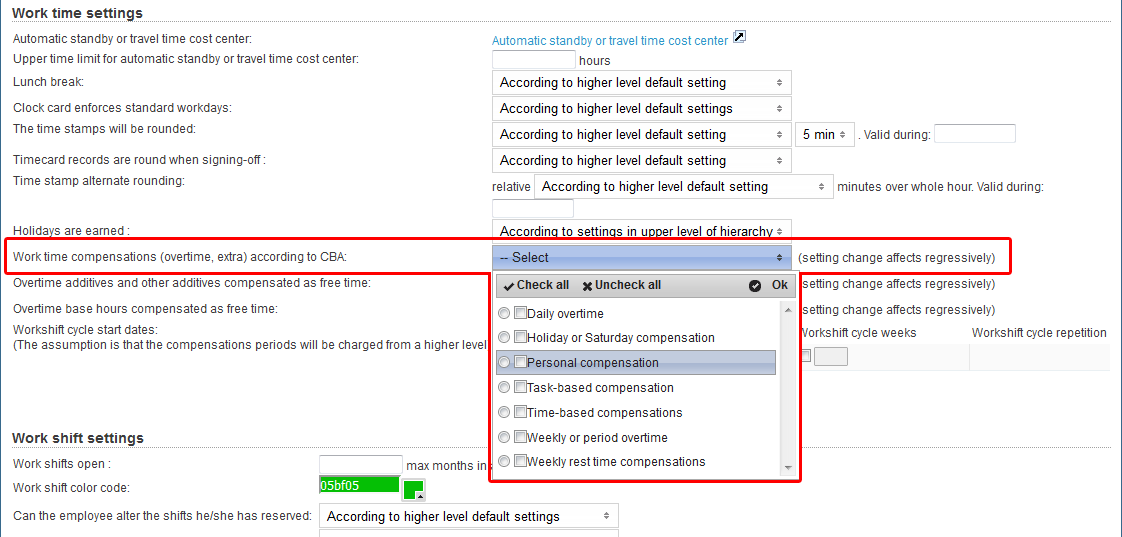
Overtime settings can be found in the "Work time settings"-section.
You can select from "Work time compensations (overtime, extra) according to CBA" menu, which overtimes and extras are going to be itemized in the time reports for payroll (Units > Work time settings). These settings apply to all employees of the unit, unless defined otherwise on project or employee level.
If you need help, call our free customer service 09-6898 8222
From "Overtime additives and other additives compensated as free time" and "Overtime base hours compensated as free time" menus you can select which overtimes and extras will be compensated as free time.
A tooltip of each field can be viewed by hovering your mouse over the headings.
Adding an overtime assignment on the project level
Adding an overtime assignment on the project level takes place in the Projects-tab.
Make sure that you have selected the desired project in the "Select project for working hours control"-drop-downlist.
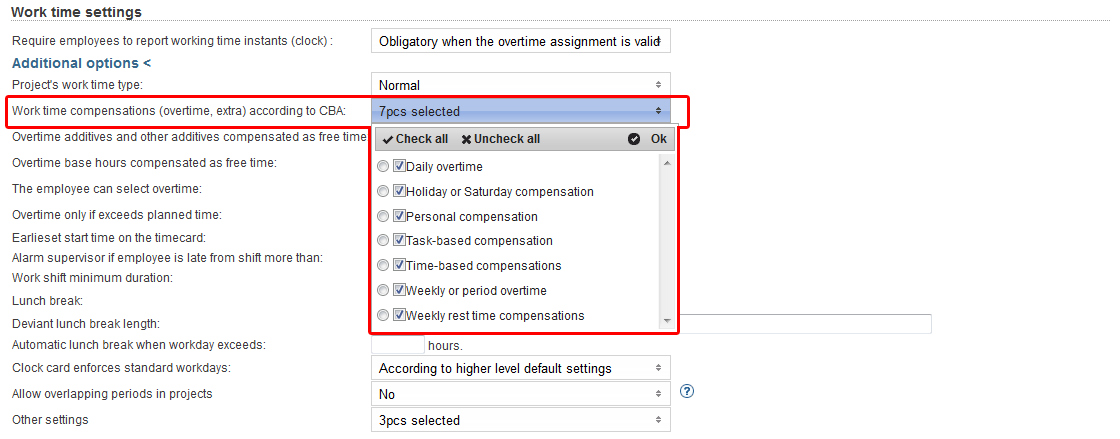
Overtime settings can be found in the "Work time settings"-section and clicking the "Additional options"-button.
You can select from "Work time compensations (overtime, extra) according to CBA" menu which overtimes and extras are going to be itemized in the time reports for payroll (Projects > Work time settings > Additional options).
If you need help, call our free customer service 09-6898 8222
From "Overtime additives and other additives compensated as free time" and "Overtime base hours compensated as free time" menus you can select which overtimes and extras will be compensated as free time.
A tooltip of each field can be viewed by hovering your mouse over the headings.
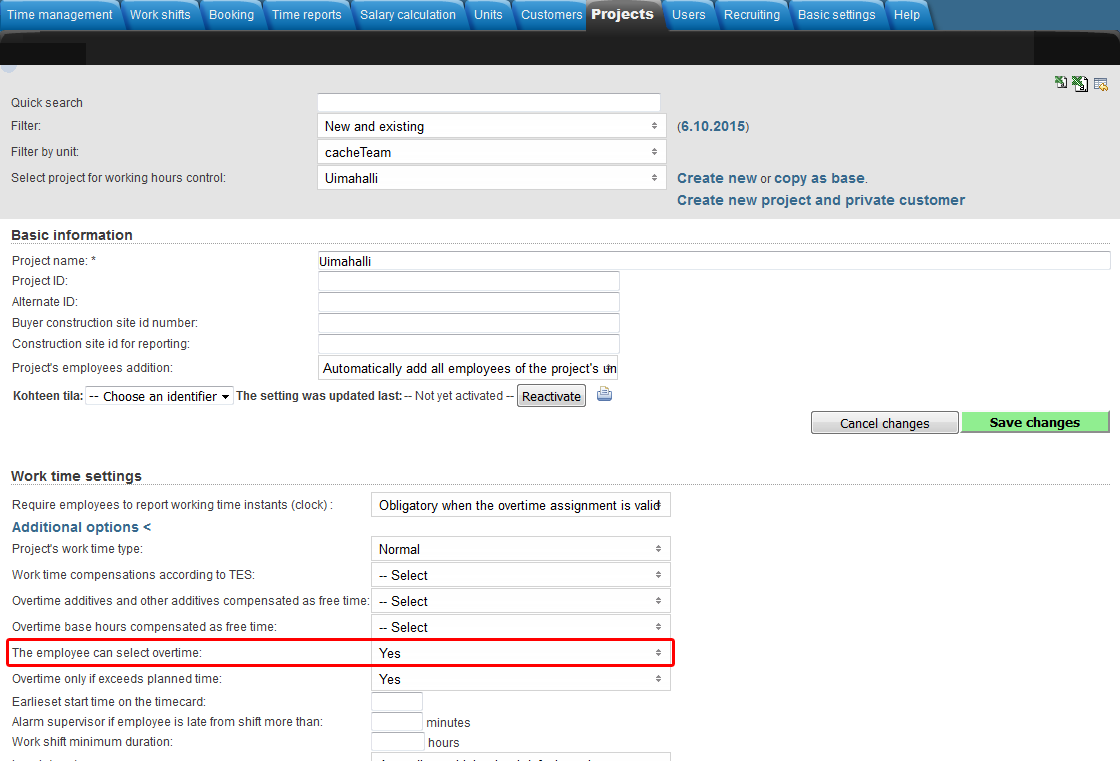
You can select "The employee can select overtime", which allows employees to set overtime assignments for themselves.
If you need help, call our free customer service 09-6898 8222
From "Other settings" menu, you can select the project work time decomposition setting to override possible employee work time decomposition settings.

Adding an overtime assignment on the employee level
Adding an overtime assignment on the employee level takes place in the Users > Employees-tab.
Make sure that you have selected the desired employee in the "Select user to edit"-drop-downlist.
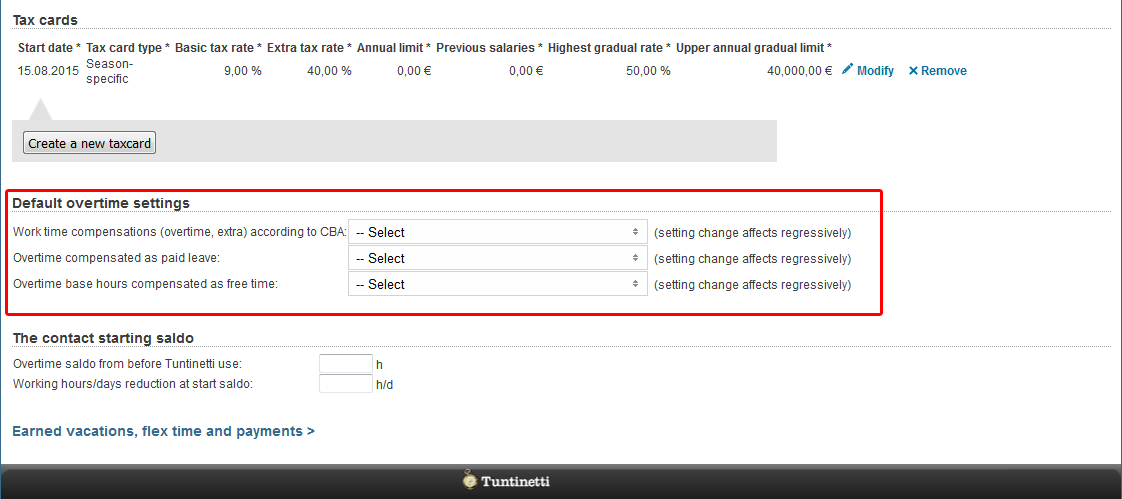
Default overtime settings can be found in the "Default overtime settings"-section.
You can select from "Work time compensations (overtime, extra) according to CBA" menu which overtimes and extras are going to be itemized in the time reports for payroll (Users > Employees > Default overtime settings).
If you need help, call our free customer service 09-6898 8222
From "Overtime additives and other additives compensated as free time" and "Overtime base hours compensated as free time" menus you can select which overtimes and extras will be compensated as free time.
A tooltip of each field can be viewed by hovering your mouse over the headings.
More information about overtime assignments can be found in the Overtime assignments-guide.
Pricing
Setting up a pricing for a project
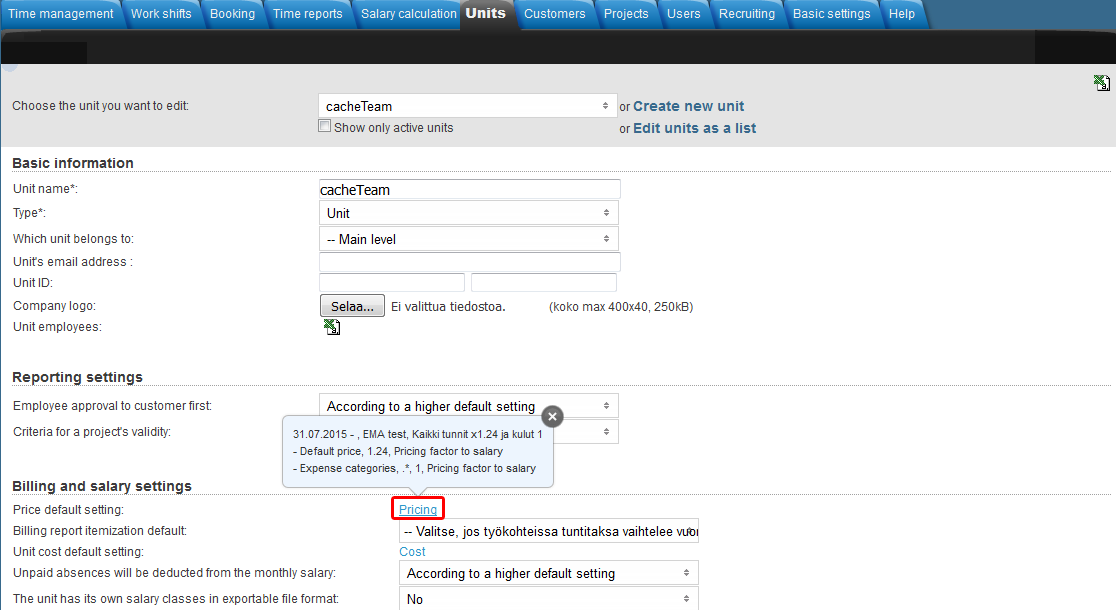
Price lists can be set in several different ways with the accuracy of customer, employee and project. This example uses project's price list. Open up "Projects" tab. Project's price list can be found in the "Basis for billing" section. Price list window opens with the "Pricing" link. Additional information about the price list can be shown by moving mouse pointer over the question mark icon ().
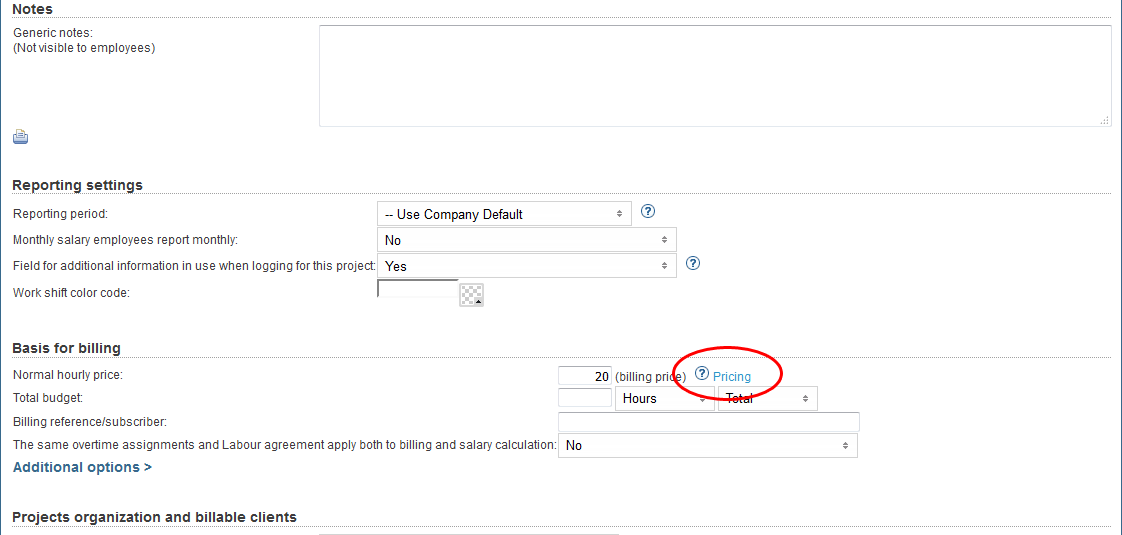
You will see the price lists set for the project in the pop-up window. If the project doesn't have a price list yet, "Price list is not set yet" text will be shown in the field. Listed price lists can be filtered with the "Show" options at the top. Tooltips for the filtering options can be displayed by hovering the mouse pointer over them.
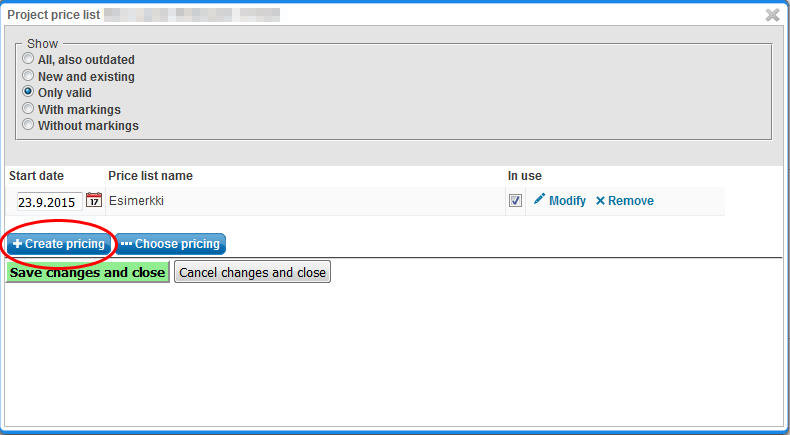
Price lists can be set in two different ways:
- Create pricing (Button opens a window for creating new price list)
- Choose pricing (Button opens a window, from where you can select a previously created price lists)
Buttons can be found below the list of price lists.
If you need help, call our free customer service 09-6898 8222
 ) icon at the upper right corner of the list. Please note that the listing will only show the price lists of the project's unit.
More information about pricing can be found in the Billing and pricing-guide.
Pricing levels
The following explains, from where the different price lists can be found and what is the imperative order of them.
The imperative order of the price lists
- Employee's price in a project
- If a project has a customer and the pricing check box for it has been selected:
- Price of the task
- Price of the project
- Price of the project's unit
Locations of the Pricing links
1. Price of the project's employee
2. Customer charges the price list
2. a) Price of the task

2. b) Price list of the customer
Can be found by pressing the "Customer details" link in the project's customers section. This opens a window, from where you can find customer's "Pricing" link. Alternatively you can also go to "Customers" tab.
Price list of the customer's headquarters
Same as the previous "Price list of the customer", but edit the price list of the customer's headquarters.
2. c) Price list of the customer headquarters' unit
2. d) Price list of the customer's unit
Same as previous "Price list of the customer headquarters' unit", but edit the price list of the customer's unit.
2. e) Price list of the project's customer
3. Price of the task
4. Price of the project
5. Price of the project's unit
More information about pricing can be found in the Billing and pricing-guide.
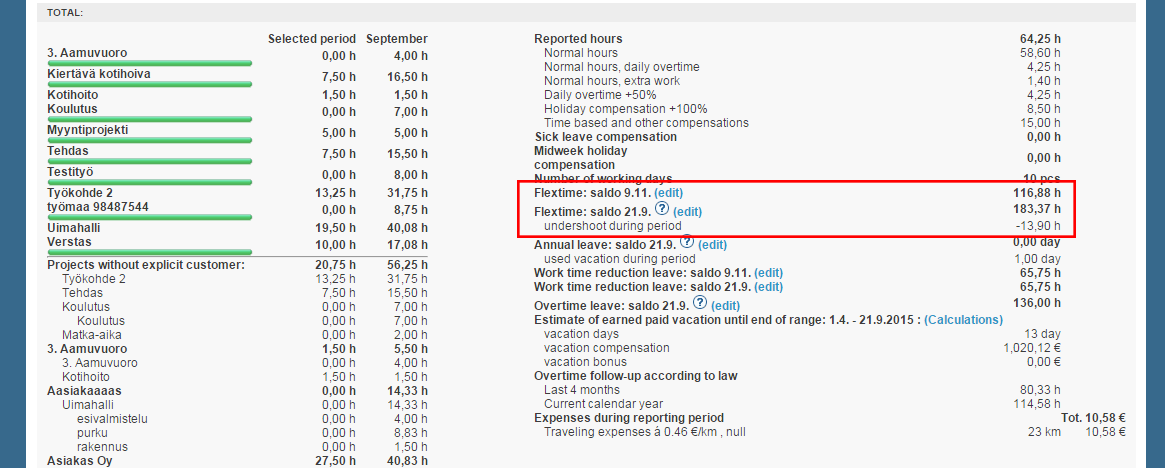
Calibrating work hour balances
Usually when you begin using Tuntinetti, employees have flextime or other hours saved in the old system (For example annual leave or overtime leave). So that the hour balances match, they must be calibrated/copied to Tuntinetti. This means that they must be set for each employee separately.
Finding the time report which is calibrated
Let's go through how it is possible to alter the balances in the Time reports for payroll-tab.
First select month or time frame you would like to see. Depending on preview mode, chosen month/start and end date will refresh automatically or you have to press "Show month" or "Show range".
And the desired employee from the according unit.
The time report will be updated below the selection windows. In the ending of the report are the balances.
If you need help, call our free customer service 09-6898 8222
Editing the balances
By clicking the "Edit"-button you are able to edit the balances.
If you need help, call our free customer service 09-6898 8222
More information about altering time reports can be found in the Time reports for payroll-guide.
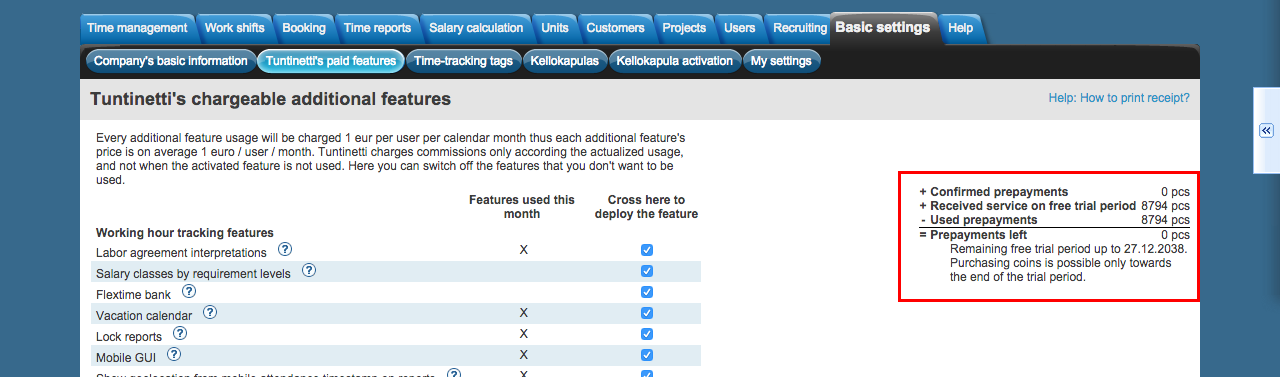
Paid features of Tuntinetti
The paid features of Tuntinetti diversifies the usage of the program concerning time management, billing and work shift planning. If you have the manager rights, you can select which additional features are activated or removed.
The management of the additional features can be done in the Basic settings > Tuntinetti's paid features-tab.
The page contains a list of the features that are available.
Each feature has a tool tip explaining the feature. You can see the tool tip by hovering the mouse cursor on top of the feature.
The second column has a mark in it, if the feature has been used in the present month.
You can activate a feature by checking the feature's check-box. If you want to deactivate one, just uncheck it.

If you need help, call our free customer service 09-6898 8222
Confirm the chosen features by clicking the "Save changes"-button in the bottom of the screen.
Tuntinetti charges only by the features used, not when a feature is activated but not used. Every feature costs one coin per service per user per calendar month.
You can see your coin balance in the right part of the page.
If you need help, call our free customer service 09-6898 8222
If your coins are about to run out, there will be a "Buy more coins"-button under the calculations.
You can also monitor the usage of features in the bottom of the page in the "Browse account logs"-section.
More information about Tuntinetti's paid features can be found in the Tuntinetti's paid features-guide
Training and remote training about using Tuntinetti
Learn to use Tuntinetti in a couple of days! Tuntinetti offers training for basic users and administrators. Contact Tuntinetti sales (+358-(0)9-6898 8221) and we'll tell you more.
By purchasing a training session, you ensure your own know-how. After training, time will not be wasted, work hours will be effective and you can set up your settings correctly.
Our instructor will come to your work place for one or more whole work days and makes sure that your administrators will learn to use all the features in Tuntinetti.
In addition to coming over, learning can be done also online. Tuntinetti offers remote training in the form of Webinars.
We arrange regularly Webinars concerning the topics that our clients wish for. Our Webinars are designed so that they can be attended by both basic users that rarely make changes and users that use Tuntinetti more regularly.
You can sign up for Tuntinetti Webinars here: Sign up for Tuntinetti Webinars.