Projects
On this page you'll be inroduced to "Projects" tab and it's features. The tab enables you to create new projects and customize their settings. This tutorial will also show you how to add new tasks, employees, customers and prices to projects.
There is an instruction video about the topic here: Creating a new project - Tuntinetti
- Creating a new project
- Work time settings
- Require employees to report working time instants
- Project's work time type
- Work time compensations (overtime, extra) according to CBA
- Overtime additives and other additives compensated as free time
- Overtime base hours compensated as free time
- The employee can select overtime
- Overtime only if exceeds planned time
- Earliest start time on the timecard
- Alarm supervisor if employee is late from shift more than
- Work shift minimum duration
- Lunch break
- Deviant lunch break length
- For a shift that ends between
- Automatic lunch break when workday exceeds
- Clock card enforces standard workdays
- Allow overlapping periods in projects
- Other settings
- Notes
- Reporting settings
- Basis for billing
- Adding customers to a project
- Archiving customers
- Creating a Main Office
- Adding tasks to a project
- Sample workshifts
- Compensation items
- Adding employees to a project
- Work time varieties
Creating a new project
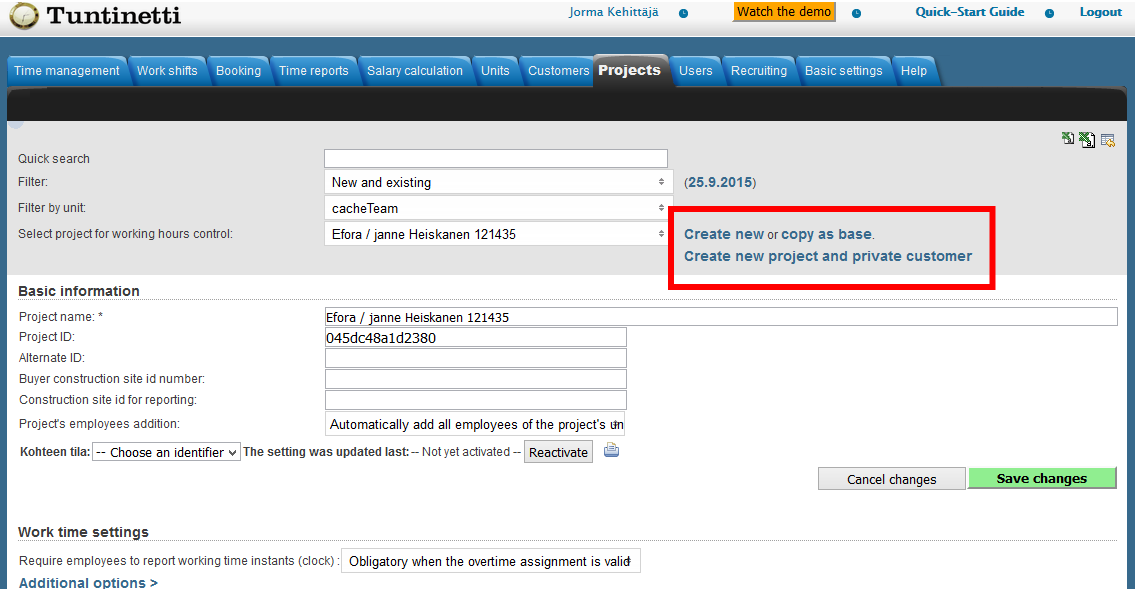
After opening "Projects" tab you can search for already existing projects and examine their information, or create entirely new projects. Here are the search settings found on top of the page:
- Quick search (Search for already existing projects by entering their name)
- Filter (This affects the visibility of projects. The link next to the menu allows you to filter projects by date)
- Filter by unit (Select the unit of the project you're searching for. When creating a new project, select the unit you want the project to be part of)
- Select project for working hours control (After selecting a project, it's information appear on the page for you to examine)
There are three ways to create a new project. The links to each of these can be found next to the search tools:
- Create new (Creates an entirely new project)
- Copy as base (Copies the information of currently selected project as a base for a new one; if you want to place the copy in another unit, you can select the target unit from project's organization settings after copying)
- Create new project and private customer (Creates a new project along with a new private customer. The link opens a window to create the customer and then allows you to fill the project information)
Let's create a new project by selecting "Create new". This brings up a notification indicating that a new project has been created. After this you can fill in the basic information.
Basic information
- Project name (Mandatory information)
- Project ID (Here you can fill in the timecard ID)
- Alternate ID
- Buyer construction site number
- Construction site id for reporting
- Project's employees addition
- To be selected one by one
- Automatically add all employees of the project's unit
- Automatically add project's unit's and subunits all employees
- Add all employees automatically (This means all the employees in your company)
"Cost center's states" selector allows you to choose if the project uses timecards or work time buttons. You can press "Reactivate" -button to activate the setting. The printer icon opens up a window, that contains all of the project's work hour control IDs.
Save the new project by clicking "Save changes" button. After doing this the program might give you a notification indicating that there are no employees attached to the project.
Work time settings
Next we'll go through the work time settings which affect the way work hours are logged for the project. These are found under the "Work time settings" -title. You can open up more settings by pressing "Additional settings" -link.
After opening additional settings you can see the following:
You can get more information about some of these by moving the mouse over the titles.
Require employees to report working time instants
- Voluntary when entering hours for this project
- Even the task decription is not required
- Obligatory always when entering hours for this project
- Obligatory when the overtime assignment is valid
- Obligatory with one minute precision
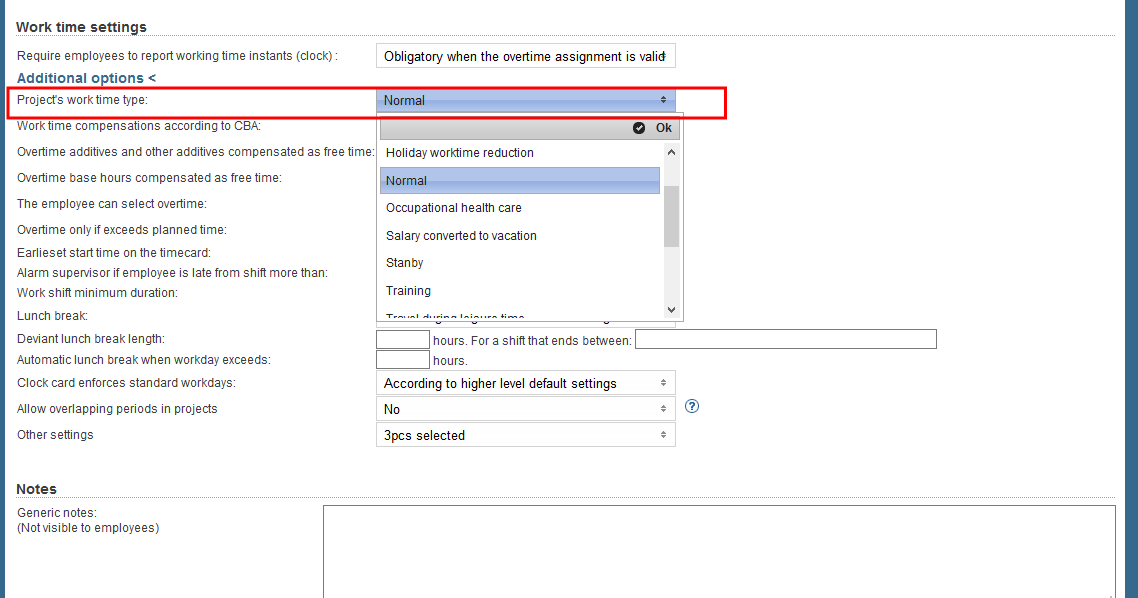
Project's work time type
- Accumulate salary converted to vacation
- Default salary type
- Holiday work time reduction
- Normal
- Occupational health care
- Salary converted to vacation
- Standby (Note that with this settings it's advisable to choose "Require employees to report working time instants" as "Obligatory always when entering hours for this project", and set "Allow overlapping periods in projects" as "Yes".)
- Training
- Travel during leisure time
- Travel time
- Wait time, non work time (for example transport sector)
- Work place steward
- Work safety
- Work time reduction
Work time compensations (overtime, extra) according to CBA
(Select which compensations are determined by the labour contract)
- Daily overtime
- Holiday or Saturday compensation
- Personal compensation
- Task-based compensation
- Time-based compensations
- Weekly or period overtime
- Weekly rest time compensations
- The next two contain overtime leave settings.
Overtime additives and other additives compensated as free time
(Select which of the compensations selected in previous setting are compensated as free time. This affects only the actual part of the over time)
Overtime base hours compensated as free time
(Select which of the compensations selected in previous setting are compensated as free time. This affects the base hours as well)
The employee can select overtime
Overtime only if exceeds planned time
Earliest start time on the timecard
(If using a timecard, this is the earliest work start time)
Alarm supervisor if employee is late from shift more than
(Supervisors are able to receive a warning, if employees are late from their shift)
Work shift minimum duration
(If using a timecard, this is the minimum leght for a work shift. You can set this setting for each task separately from the task's settings. Company's settings allow you to make this setting affect both work time and billing, or just the billing)
Lunch break
(Select a method for cutting lunch shift hours)
- According to higher level default setting
- Clipped by time attendance device
- Not clipped by time attendance device
Deviant lunch break length
For a shift that ends between
(Put here the shift that is affected by the deviant lunch break)
Automatic lunch break when workday exceeds
Clock card enforces standard workdays
(Deterines the way overtime hours are clipped by the time attendance devise)
- According to higher level default settings
- Clipped by time attendance device
- Not clipped by time attendance device
Allow overlapping periods in projects
(This allows the project to have overlapping loggings with other projects. This is useful in case you want to treat the project as a resource, for example a conference room)
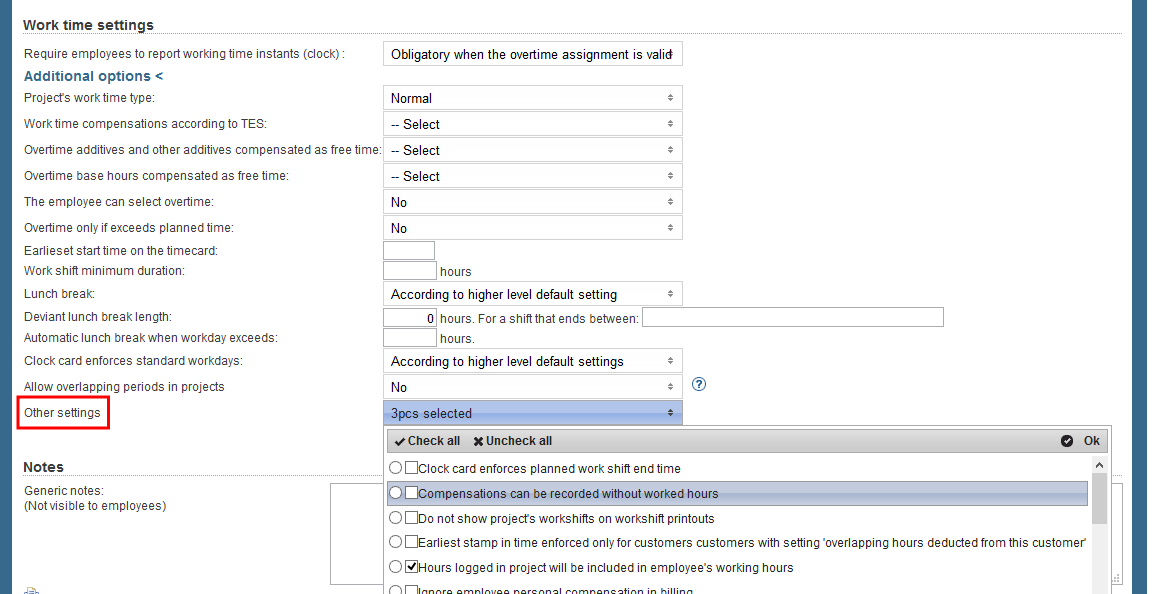
Other settings
(You can keep multiple settings selected simultaniously)
- Clock card enforces planned work shift end time
- Compensations can be recorded without worked hours
- Do not show project's workshifts on workshift printouts
- Earliest stamp in time enforced only for customers with setting "overlapping hours deducted from this customer"
- Hours logged in project will be included in employee's working hours
- Ignore employee personal compensation in billing
- Ignore employee's project start date for period overtime
- Ignore task specific compensation in billing
- Payroll will count hours only from customers with setting "overlapping hours deducted from this customer"
- Prevent employee from entering hours; only supervisor can record hours
- Project work time decomposition setting overrides possible employee work time decomposition settings
- The employee cannot enter working hours over previously agreed amount
- The new employees' default status in temporary
- The permanent employers can confirm/and select planned shifts (You can set how many months in advance the employees can select the shifts from unit settings. The setting is named: "Work shifts open")
- The work shift list tells the target to the time card
- The work shift plans require a time range
- Work shifts use simple automatic state update logic
After adjusting the settings, save the changes by pressing "Save changes".
Notes
Notes are found under the work time settings. Here you can write down your own notes about the project. The notes are not visible to the employees. You can print the notes by pressing the printer icon. Note that the notes have to be saved in order to for them be visible on the print.
Reporting settings
Next we'll go through the reporting settings which affect the project's behaviour in work time reports. The following settings are found under "Reporting settings" -title.

- Reporting period (Default time span for work time reports)
- Use company default (company's "Default salary period") or select one of company's salary periods. "Edit salary periods" -link can be used to add or modify salary periods to be used as reporting period.
- Monthly salary employees report monthly
- Field for additional information in use when logging for this project (Adds an extra field for logging where you can put additional information related to the shift)
- Work shift color code (You can select a color by writing a six digit hexadecimal number, or using the selector next to the field. Adding colour makes the task stand out when planning work shifts)
After adjusting the settings, save the changes by pressing "Save changes".

Basis for billing
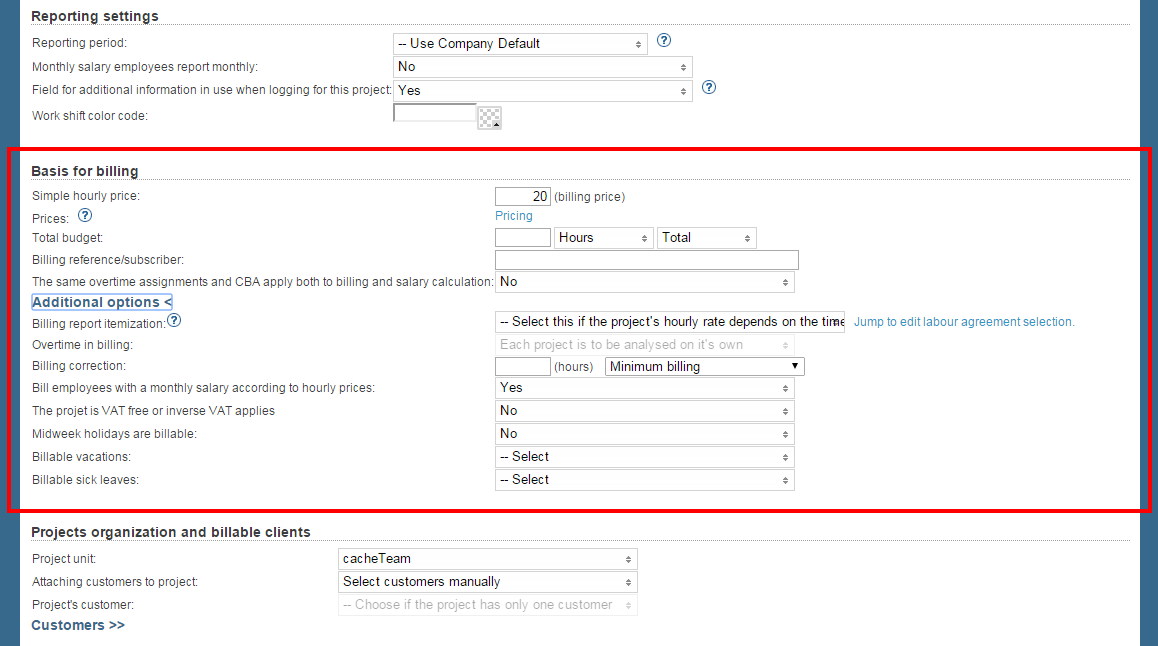
Next we'll go through the billing settings which affect the project's behaviour in work time reports and billing reports. You can open up more settings by pressing "Additional options" link.
You can get more information about some of these by taking your mouse over the question mark icon.
- Normal hourly price (Pressing the "Pricing" -link next to the field opens a window where you can create more detailed pricing)
- Pricing (Here you can determine the pricing for the project)
- Total budget (You can select the type and time span of the budget from the selectors next to the field)
- Billing reference/subscriber
- The same overtime assignments and collective labour agreement apply both to billing and salary calculation
The following options are visible after opening additional settings:
- Billing report itemization (Select the collective labour agreement for the project)
- You can only modify this field if "The same overtime assignments and collective labour agreement apply both..." -setting is set to "NO".
- The link next to the field takes you to "Salary calculation > Collective labour agreements" -tab where you can modify collective labour agreements
- Overtime in billing (Select the way overtime hours are handeled in billing)
- You can only modify this field if "The same overtime assignments and collective labour agreement apply both..." -setting is set to "YES".
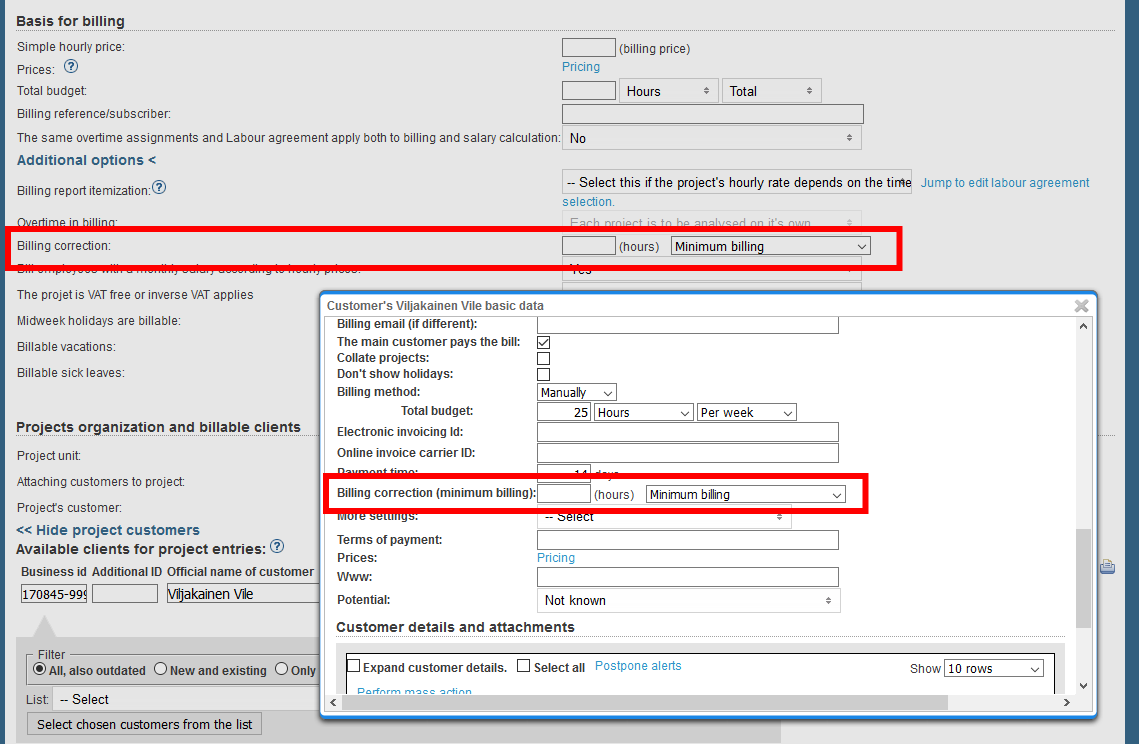
- Billing correction (This setting can also be found from customer's settings. If both settings are defined, customer's setting is the one that the program uses)
- Fixed billing
- Minimum billing
- Round up each time range (rounds up every part of work time for this project, for example both parts before and after lunch)
- Round up whole task (round up the total working hours for the day for this project)
- Bill employees with a monthly salary according to hourly prices (More detailed information on how this setting affects on employee's monthly salary in the How to calculate monthly salary including midweek holidays -section.)
- The projet is VAT free or inverse VAT applies
Billable absences
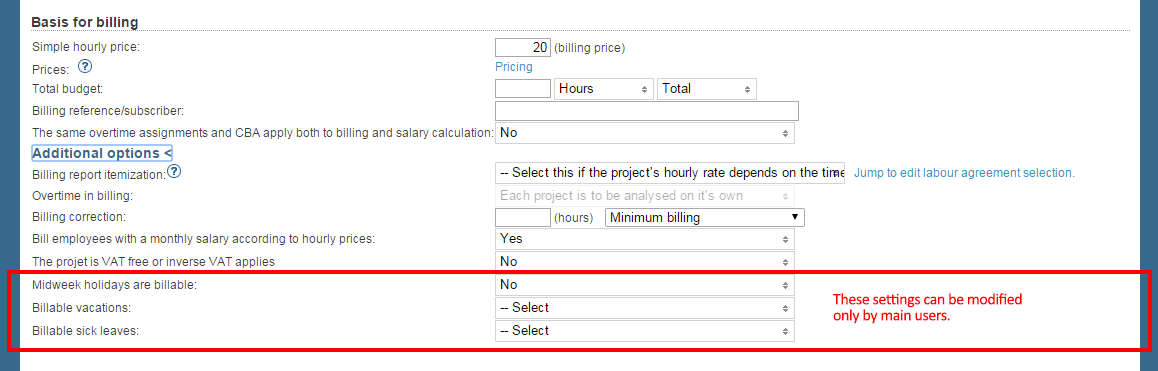
The next three settings affect billable absences and only the main user can modify them.
- Midweek holidays are billable (More detailed information on how billable midweek holidays affect on employee's monthly salary in the How to calculate monthly salary including midweek holidays -section.)
- Billable vacations (You can have multiple settings selected simultaniously)
- Holiday worktime reduction
- Maternal leave paid
- Paid absence
- Paid social absence
- Paternal leave paid
- Percent based worktime reduction compensation
- Scheduled free day
- Work place steward's work time compensation
- Work safety work time compensation
- Work time reduction leave
- Billable sick leaves (You can have multiple settings selected simultaniously)
- Leisure time accident
- Sick leave
- Sick leave own notification
- Work induced illness
- Work time accident
How to calculate monthly salary including midweek holidays?
Let's go through how the settings Midweek holidays are billable and Bill employees with a monthly salary according to hourly prices in the Creating new projects#Basis for billing section affect on an employee's monthly salary.
In this example John's monthly salary is 1000 euros and there are 20 work days in the month. If midweek holidays are removed from the compensated holidays in the collective labour agreement settings, the month can have for example 23 work days, but the monthly salary is still 1000 euros. If the employee has been absent for two of those (midweek holi)days, the salary will decrease by 2/23. If the midweek holidays are compensated in the collective labour agreement, the salary will increase, because there are fewer unpaid absences. So John will get the full salary.
The difference between billing and payment is that if midweek holidays are not marked as billable for a project, payment will not take into account any midweek holidays. Then the amount of work days in a month would be 21 in this example (March 2016). On the other hand if the midweek holidays aren't defined in the collective labour agreement, the amount of billable work days is 23 regardless if the midweek holidays are billed or not.
A new employee Jane has a one month waiting time for the midweek holidays. If the holidays are activated, they are in any case unpaid. So the amount of billable work days is decreased by two. If the activated midweek holidays are not billed, they will not affect on Jane's billable amount (the whole month will be billed). If the midweek holidays are not activated in the collective labour agreement, the amount of billable work days will drop down to 21.
Let's examine another employee, Jack. If the midweek holidays are set to be paid and billed for Jack, the divider will be 21. If the midweek holidays are paid but not billed, the divider is still 21. So his salary doesn't change wether they are billed or not, because the holidays are paid in both cases. If the midweek holidays are set to be unpaid in the collective labour agreement settings, the divider will change to 23 and his salary will decrease.
The settings that are right for you, will largely depend on do you bill a full salary for a month that has midweek holidays.
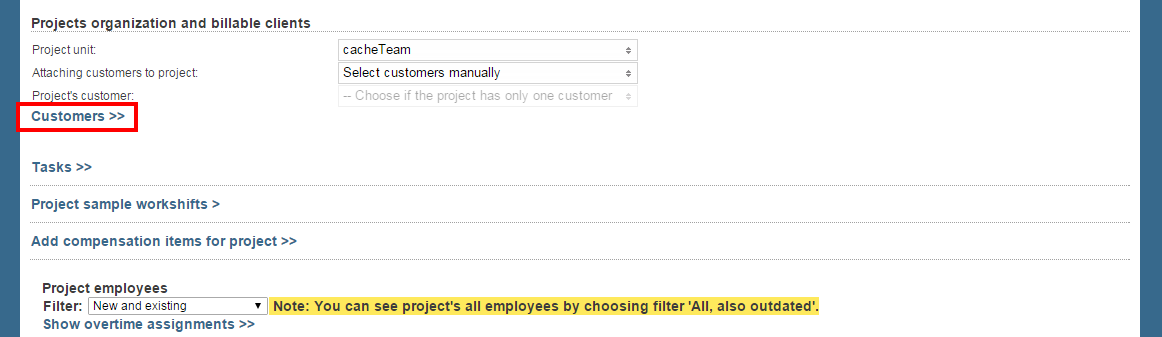
Adding customers to a project
Next we'll go through customer setting and how to add customers to a project. Adding customers to a project enables you to differentiate work hours on billing reports and use the information for billing the customers.
You can find customers and their settings under the "Projects organization and billable clients" -title. Pressing "Customers" -link under the title brings up all the customers that are already attached to the project. If there are no customers added to the project, the link states "Add customers for project".
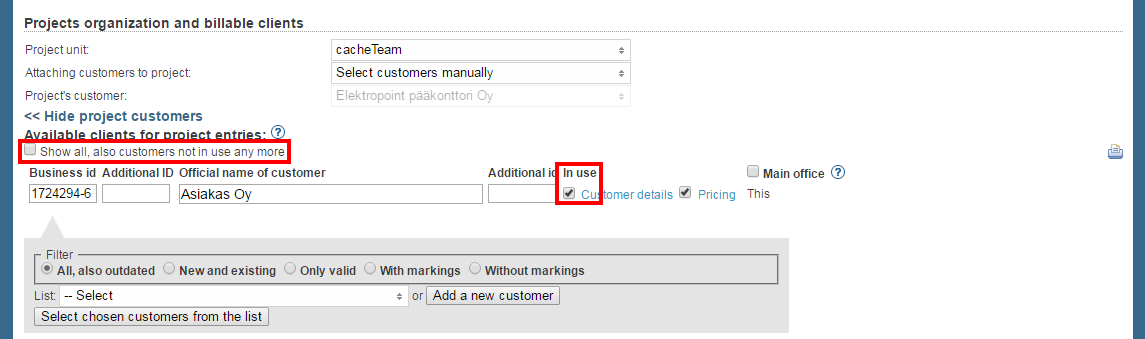
You can view all of the customers by activating the "Show all, also customers not in use any more." check-box. This updates the project's customer list to have also the customers which have markes as not in use with the "In use" column in the customer list.
Here you can also find details concerning customers. Customer details, like Main office or Payer, can be changed in the basic data windows that opens up by clicking the "Customer details" link. Payer is used besides Main office when the customer is a private customer.
Customer and organization settings
- Project unit
- Attaching customers to project (Select whether or not customers are added to the project automatically)
- Select customers manually
- Automatically add all customers of the unit of this project
- Automatically add all customers of the unit of this project and its sub-units
- Automatically add all customers of our company
- Project's customer (If the project only has one customer, you can select the customer from this list)
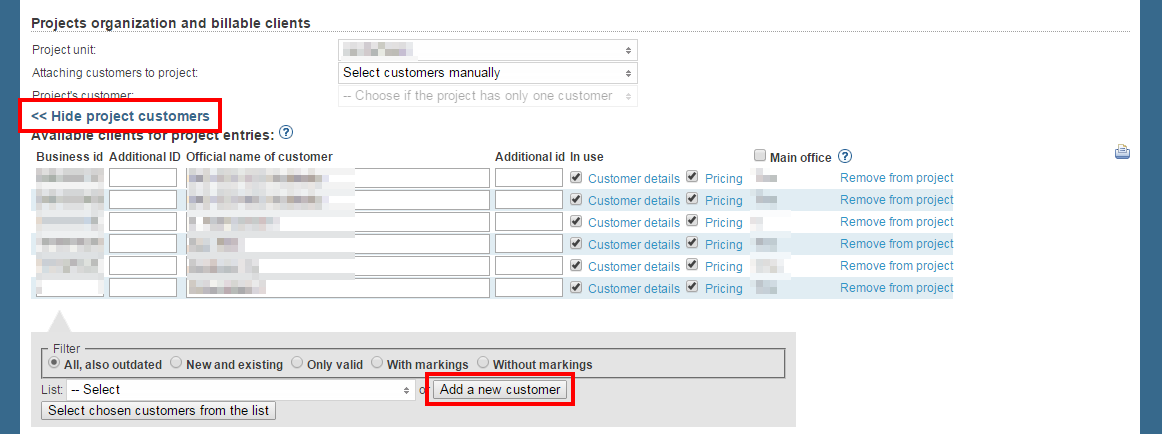
You can add customers to a project from the gray box under the client list.
There are two ways to add customers:
- Select customers that are already created. Do this by selecting the names from the list and pressing the button below. You can search for customers by using keyword search or filtering options above the list. Note that you can select several customers to be added simultaniously.
- Create an entirely new customer. Do this by pressing the "Add a new customer" -button.
After selecting the customer(s) or creating a new one they appear listed on the project's customer list above. Now you can fill in their information.
Customer information
You can get more information about some of these by moving the mouse over the titles.
- Business id (Mandatory information. If the customer doesn't have the id, you can fill in a dash)
- Additional ID (Enter cost center id here)
- Official name of customer
- Additional id (Put customer's timecard id here)
- In use (Removing the cross inactivates the customer on the project)
- Customer details (This link opens a window, where you can modify more detailed customer information)
- Pricing (The link opens up a window where you can set price lists for the customer. Crossing the box next to this makes the projects customer the price set for the customer)
- Main office or Payer (Crossing the box next to the title enables you to change the main office or payer for each customer)
- Remove from this project (Note that you can only remove customers that don't have any hours logged to the project)
Customer details are explaned below.
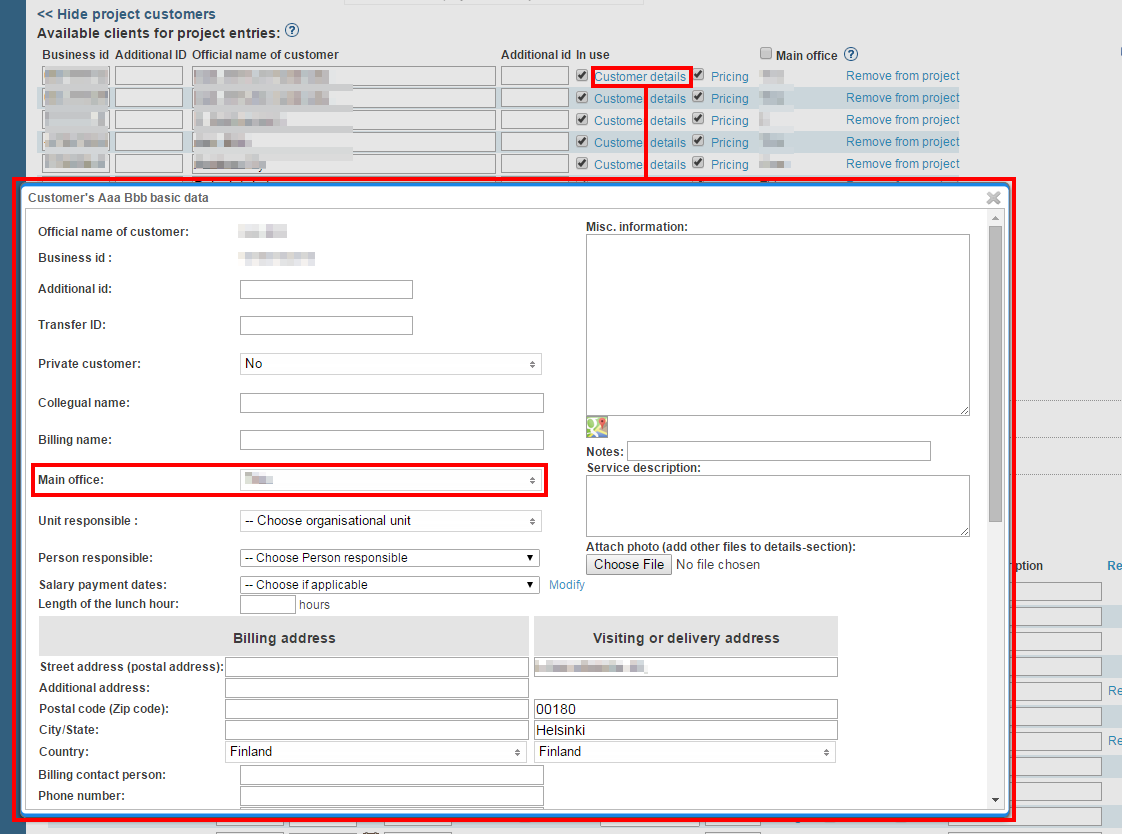
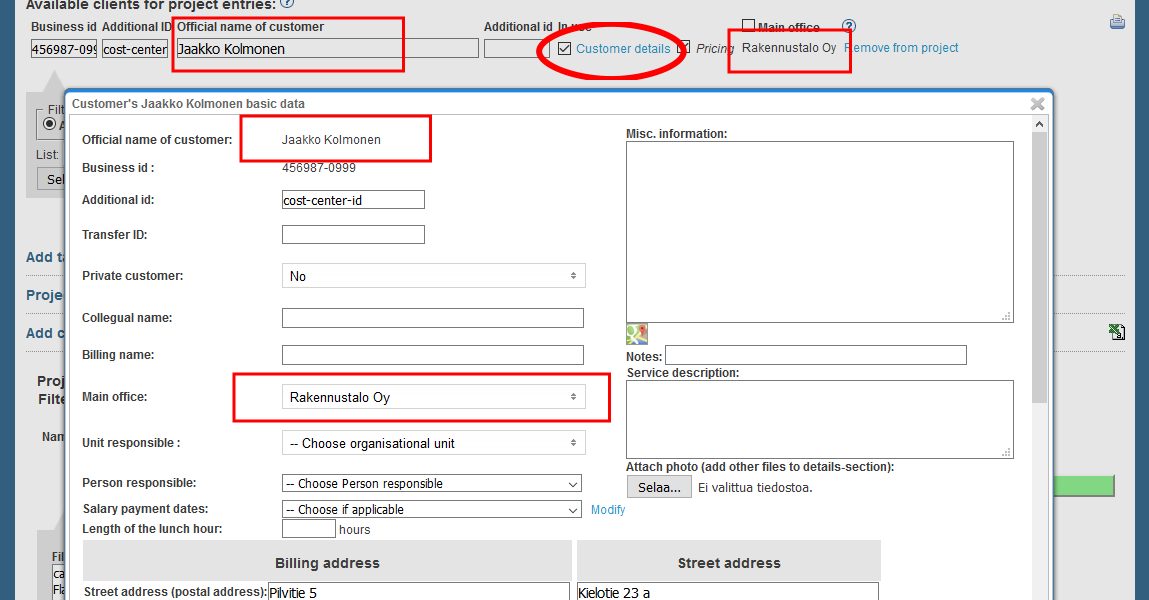
Customer details
This window contains the customer's basic information, which are explained with more detail at the Customers -page. Here are some of the settings that you can find in the window:
- Official name of customer
- Business id
- Additional id (Enter cost center id here. Same as "Additional ID" at project's customer list)
- Transfer ID
- Private customer
- Collegual name
- Billing name
Main office or Payer
Payer is used besides Main office when the customer is a private customer.- Unit responsible
- Person responsible
- Salary payment dates
- Length of the lunch hour
- Address
- Billing contact person
- Phone number
- Contact e-mail
- Billing email (if different)
- The main customer pays the bill
- Collate projects
- Don't show holidays
- Billing method
- Total budget
- Electronic invoicing Id
- Online invoice carrier ID
- Payment time
- Billing correction (minimum billing) (This setting can also be found from project's billing settings. If both settings are defined, customer's setting is the one that the program uses)
- Fixed billing
- Minimum billing
- Round up
- More settings
- Terms of payment
- Prices
- Www
- Potential
Below these settings you can find the customer file attachments.
Adding details or attachments to a customer
You can add details or attachments to customers in the Customer details window.

The detail can be selected to be visible to an employee and it can also be a detail that needs to be confirmed separately. This way you can make sure that the employee has seen the detail.
Adding an office for a customer
If you want to add a new office for a customer, you can create a new customer and name it as the new office. After that, You can fill in the information for the new office just like any other customer. Finally, set the original customer as the main office from "Main office" -menu or as the payer from the "Payer" -menu. Payer is used besides Main office when the customer is a private customer.
To change a customer to another one, create a new customer and fill in it's information. Then remove the old customer from the customer list.
After filling the customer information, save the changes by pressing the "Save changes" -button.
How can I change a customer to a project?
You can access a project's customers in the Projects tab and opening the customers list by clicking the Customers-button.
There can be two different situations when changing a customer:
- A customer can be selected not to be in use temporarily and use a different customer for that time period. This can be done by adding a new customer and deactivating the In use check-box from the old customer in the customer list.
- A project's customer can changed retroactively to another customer. This can be done by adding the project a new customer that must be saved. Then the old customer is removed and Tuntinetti asks which customer should take its place.
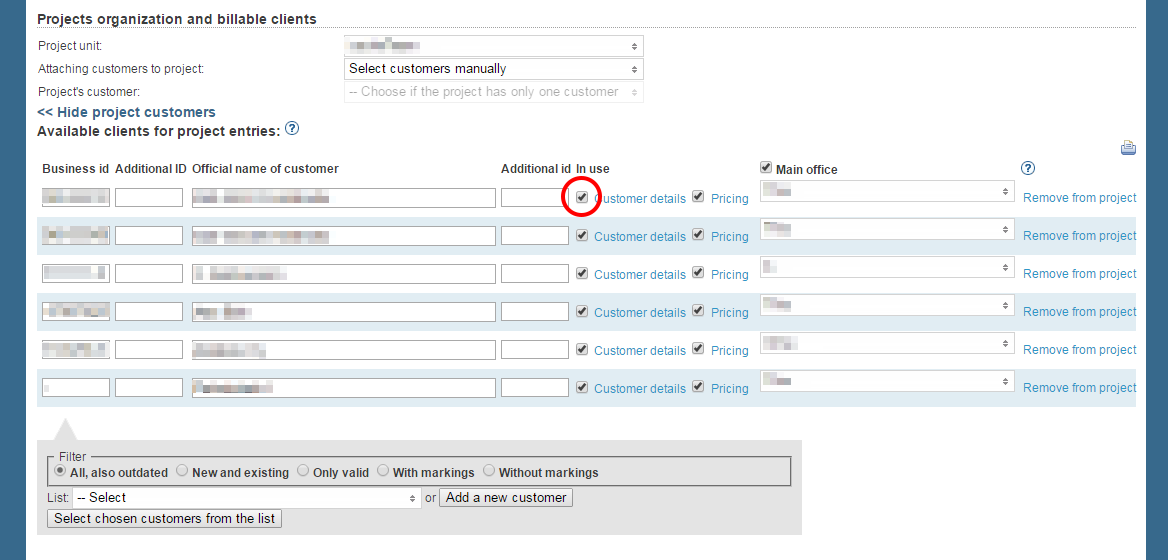
Archiving customers
Old customers which have been in use can't be removed, bet they can be archived. Archiving saves all of the customers' history information, but the customers are no longer visible in customer lists.
Old customers can be archived in the Projects organization and billable clients section. First you should open up the project's customer list by clicking the Customers button. Customers can be archived by unchecking the In use check-box and then saving the made changes with the Save changes button. Archived customers can be viewed by checking the Show all, also customers not in use any more check-box above the customer list.
Creating a Main Office
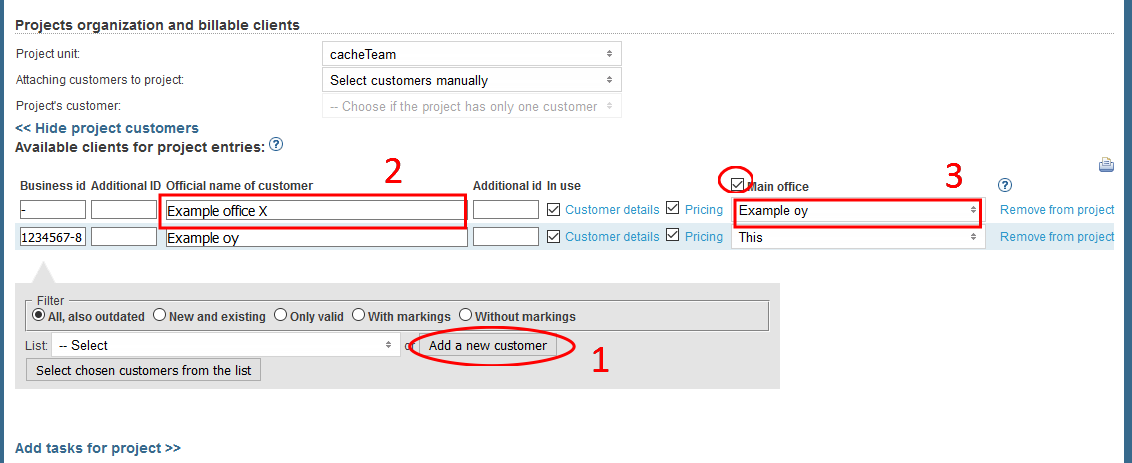
Adding a new customer
If a Main office is missing, you can create a new Main office the same way as creating a new customer to a project. You are also able to remove it from a project after saving, if you don't want it to have direct hour reports. Information about adding a new customer can be found in the Adding a customer -guide.
Creating a new branch for a customer
After a customer is added a new branch can be created directly in the project's information with the Add a new customer -button. If the needed branch is already created, it can be selected with the Select chosen customers from the list -function.
Linking branches
Linking a branch to the Main Office or Payer can be done in the Projects tab in the Customers -section. You must activate the Main Office -check-box in the customer list. After this you are able to select each customer a Main office or a Payer. Payer is used when the customer is a private customer.
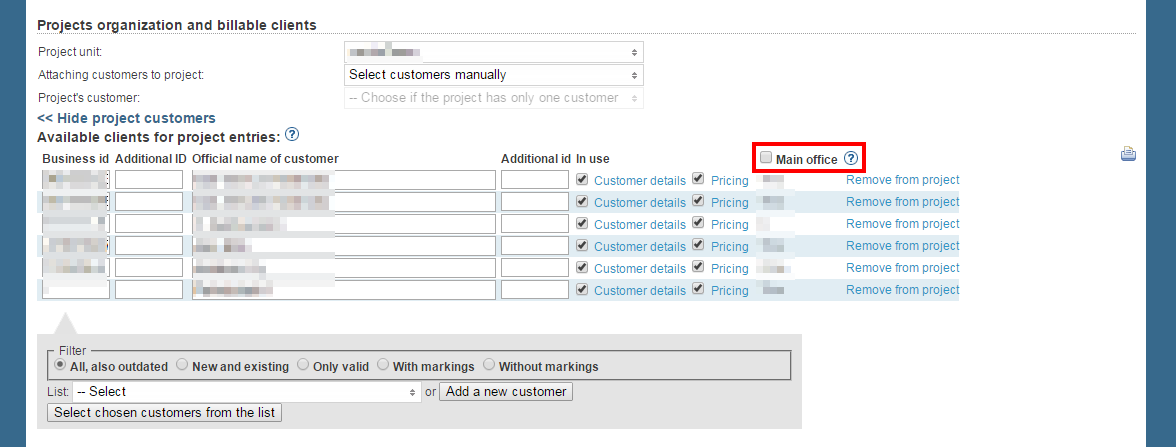
Alternatively a Main office can be selected in the Customer details -window by clicking the Customer details -button and selecting the wanted Main office there.
Viewing the Main Office's branches
You can view a Main office's branches in the Customers tab.
Adding tasks to a project
Next we'll go through task settings and how to add tasks to a project. This is useful when logging hours for the project. Tasks can be found by pressing the "Tasks" -link. If there are no tasks on the project, the link states "Add tasks for project". After pressing the link you can find the tasks that are already attached to the project listed below the "Tasks available for project's work time entries" -title.
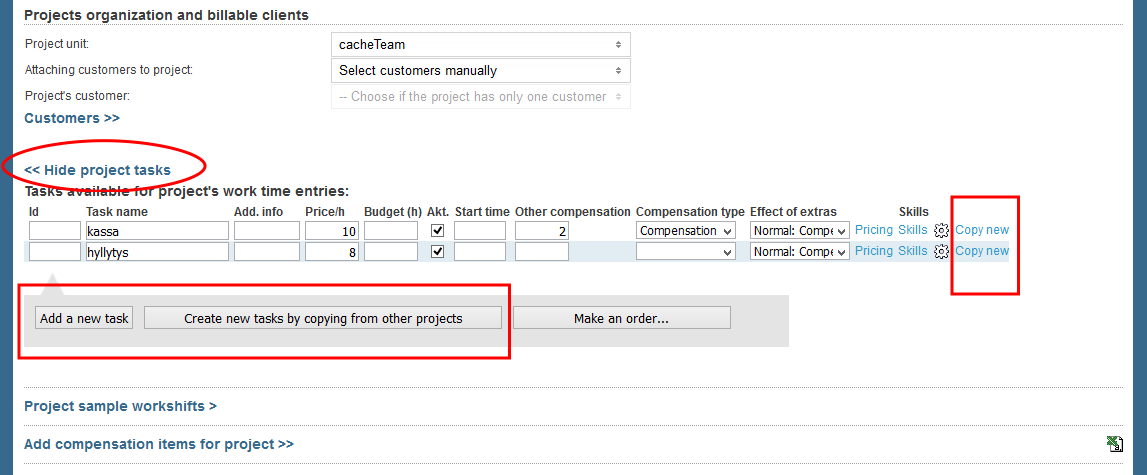
There are three ways to add tasks to a projects.The first two are found in the gray box below the listed tasks.
- Add a new task (Creates an entire new task)
- Create new tasks by copying from other projects (Opens up a window where you can choose a task from another project)
- Copy new (If the project already has tasks you can copy their information to a new one. To do this, press the link on the task you want to be copied)
In the gray box under the task list you can also find "Make an order" -button. Pressing the button takes you to "Work shifts" -tab, where you can create a shift for the project. Click here to learn more about making an order.
After creating a new task using either of these methods it appears on the list along with all the other tasks. Now you can fill in the task's information.
Task information
- Id
- Task name (Mandatory information)
- Add. info (Here you can add additional information of your choosing)
- Price/h (Sets an hourly price for the task. If you need more detailed pricing, click "Pricing")
- Budget (h)
- Akt. (Removing cross makes the the task inactive and it can no longer be used for logging work hours)
- Start time (Time after which it's possible to log workhours using the task)
The next three cover task specific increasements:
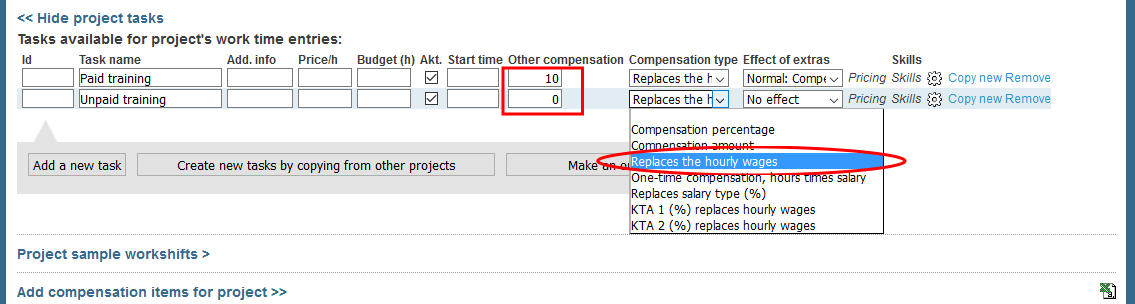
- Other compensation (Enter here the amount of the compensation. Next setting determines the type of this compensation. Note that some compensation types require that you enter percentage instead of a plain amount)
- Compensation type (Determines the type of compensation for the previous setting. Next setting specifies how the compensation acts with extras)
- Compensation percentage (Enter the percentage to "Other compensation" -field)
- Compensation amount (Enter the amount to "Other compensation" -field)
- Replaces the hourly wages (Enter the replacing wage to "Other compensation" -field)
- One time compensation, hours times salary (Enter the amount of hours to "Other compensation" -field)
- Replaces salary type (%) (Enter the percentage to "Other compensation" -field)
- KTA 1 (%) replaces hourly wages
- KTA 2 (%) replaces hourly wages
- Effect of extras during overtime or time based compensations etc. (Determines how the task is affected by extras)
- No effect
- Not paid during overtime
- Raised compensation
- Raised compentsation also on sat/sun
- Normal: compensation in addition to overtime aslo on sat/sun and time based ratio compensations
- Not scaled suring overtime, but compensate sat/sun evenings
- Overtime not paid, sat- and sun- extras are paid separately
- Pricing (The link opens up a window where you can set more detailed price for the task)
- Skills (Opens up a window where you customize the skills required for the task)
- Details (Pressing the cartwheel icon opens up additional settings)
- Copy new (Copies the task's information as a basis for a new one)
The details that open after selecting the cartwheel icon are explained below.
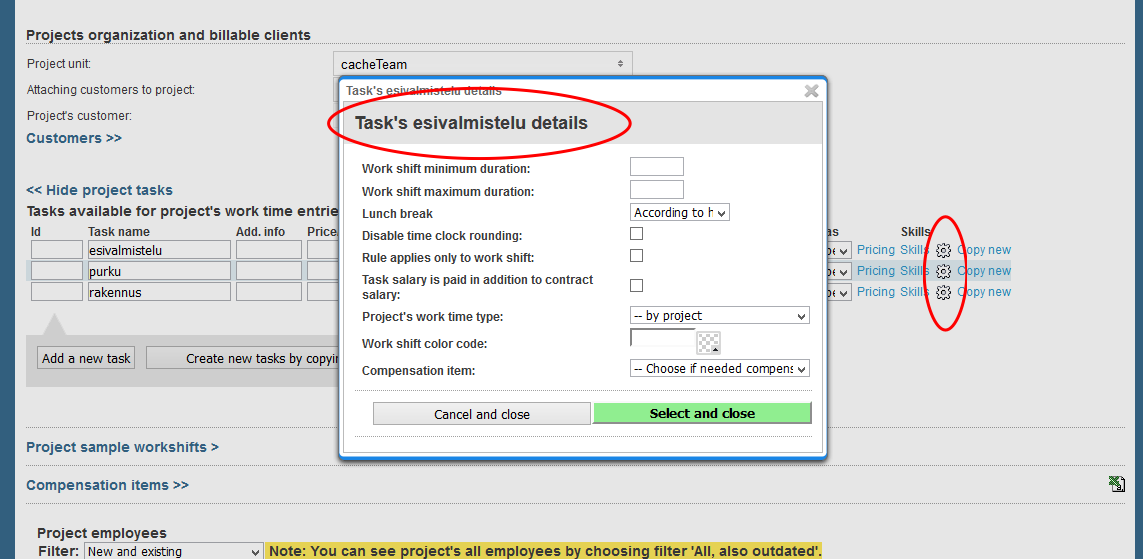
Details
- Work shift minimum duration (You can set this setting to affect the whole project from work time settings. Company's settingsallow you to make this setting affect both work time and billing, or just the billing)
- Work shift maximum duration (Will be applied for billing and payroll criteria)
- Lunch break (Choose if the lunch brake is cut automatically when using a timecard)
- According to higher level default setting
- Clipped by time attendance device
- Not clipped by time attendance device
- Disable time clock rounding
- Rule applies only to work shift
- Task salary is paid in addition to contract salary
- Task's work time type
- Accumulate salary converted to vacation
- Default salary type
- Holiday work time reduction
- Normal
- Occupational health care
- Salary converted to vacation
- Standby
- Training
- Travel during leisure time
- Travel time
- Wait time, non work time
- Work place steward
- Work safety
- Work time reduction
- Work shift color code (You can select a color by entering a six digit hexadecimal number, or using the selector next to the field. Adding colour makes the task stand out when planning work shifts)
- Compensation item
You can get more information about some of these by moving the mouse over the titles.
After filling the task information, save the changes by pressing "Save changes".
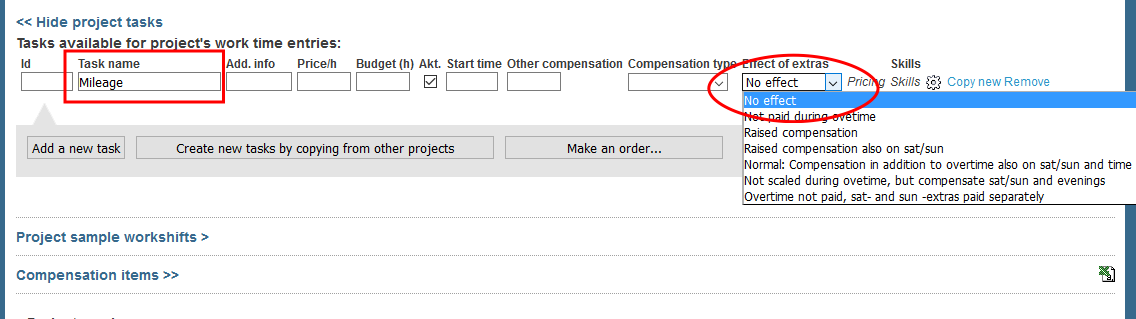
Compensation behaviour during overtime hours, time based compensations, etc.
You can control the behaviour of compensations during extras by creating a new task and naming it as the compensation of your choosing. Then enter the desired price to "Other compensation" -field and choose it's behaviour from the "Effect of extras" -menu. This way you're able to raise the compensation according to over time hours. Picture below shows you this in practice.
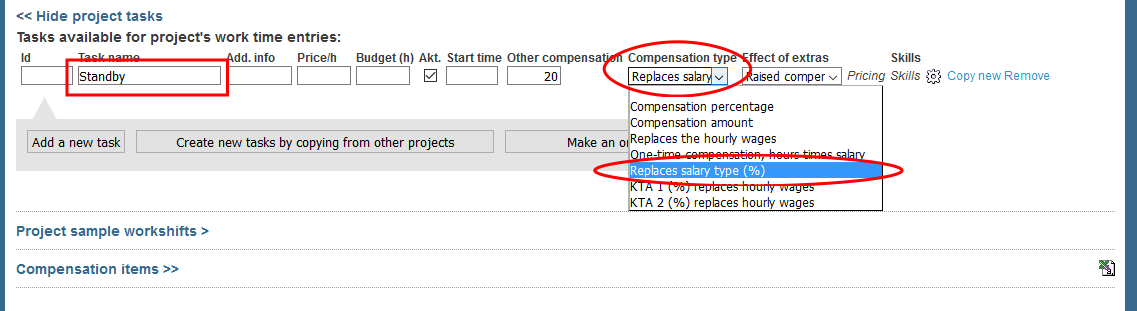
Standby price
You can set a specific price for standby by creating a new task and naming it "Standby". After this, set "Compensation type" as "Replaces salary type (%)", and put the price to "Other compensation" -field. Picture below shows you this in practice.
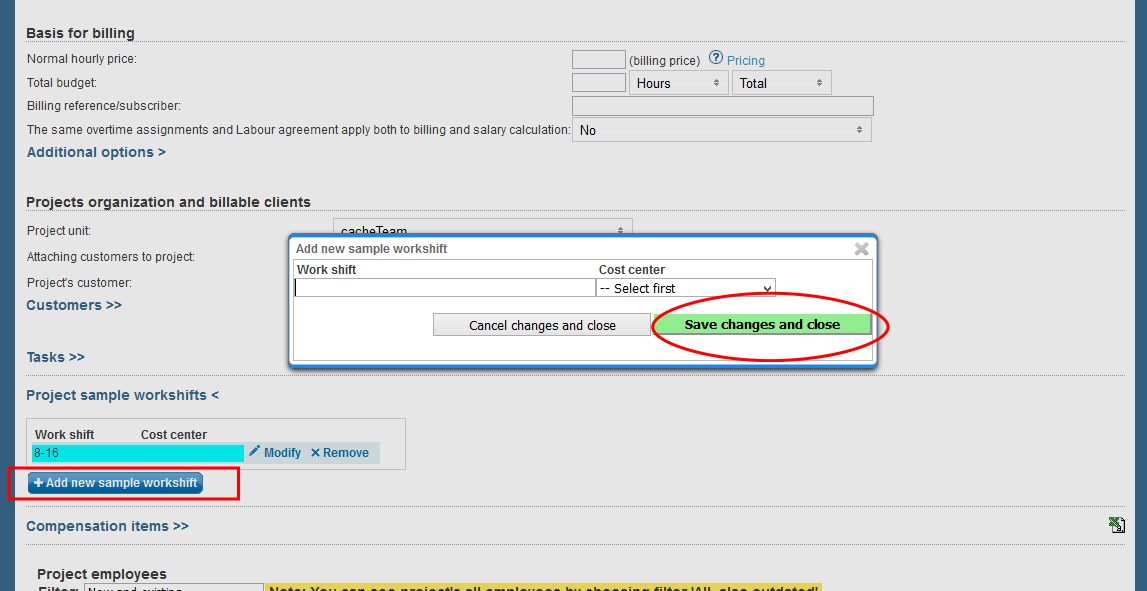
Sample workshifts
You can add sample workshifts to a project by selecting "Project sample workshifts".
- Press "Add new sample workshift" -button.
- Write the time of the shift to "Work shift" field (for example, 6-14).
- Select a customer and a task from "Cost center". These are represented as: customer/project/task.
- Press "Save changes and close".
- New sample shift can now be found from the list above. You can modify or remove it with respective buttons next to the shift.
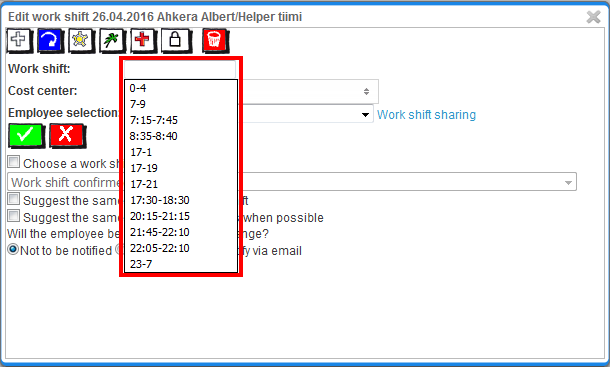
Sample workshifts will be visible in the Work shift planner tab when you create a new single shift. The shift's "Work shift" field will have a drop-down menu where are listed the most common work shifts and the sample workshifts that has been created.
You are also able to get daily saldo statistics based on the sample workshifts. These are explained in the Work shift planner guide's Additional options' Saldo section.
Compensation items
You can find compensation items for the project by pressing "Compensation items" -link. Employees can use the items listed here when reporting their hours for the project. Note that you can only customize compensation items by using Project wizard.
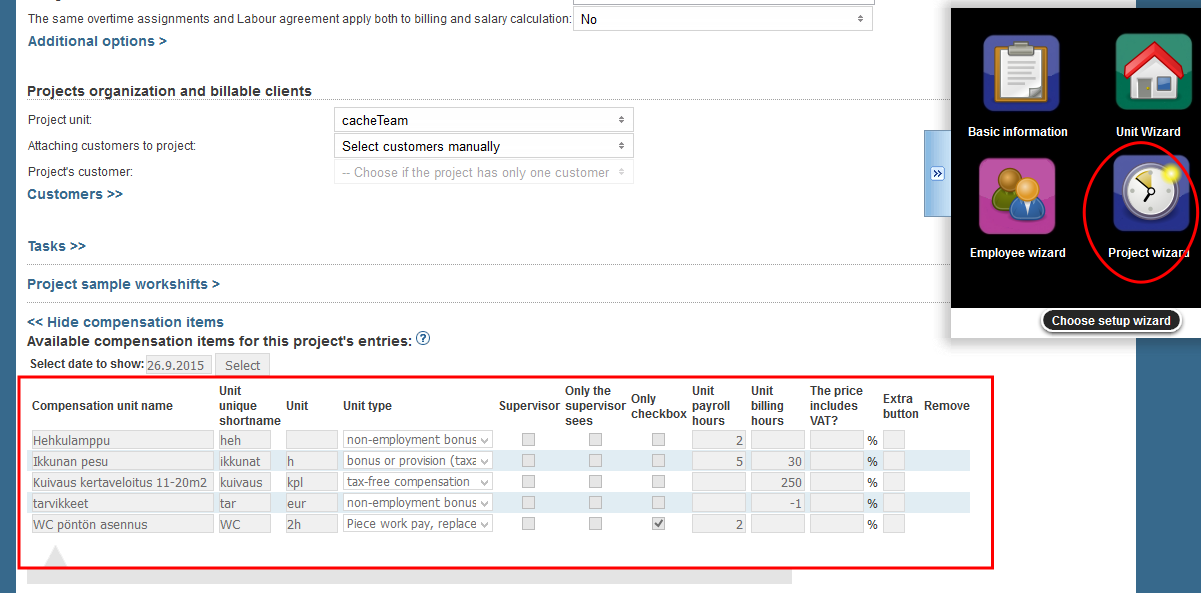
Compensation item information
You can get more information about some of these by moving the mouse over the titles.
- Compensation unit name
- Unit unique shortname (Short names can be used when entering the compensations. The program is able to recognise the compensation by it's short name)
- Unit
- Unit type
- Supervisor (When crossed, only supervisor can log the compensation)
- Only the supervisor sees (When crossed, only supervisor can see logged compensations)
- Only checkbox (Use this if the compensation has no numerical value. This way it is counted as one or zero)
- Unit payroll hours
- Unit billing hours
- The price includes VAT? (Enter VAT as percentage)
- Extra button (Extra button in timecard)
- Remove
Modifying compensation items
In order to modify compensations, open the Project wizard.
- After opening the wizard, select the project's unit and press the plus -icon next to it.
- Press "Select" -link next to the project you wish to add the compensations to.
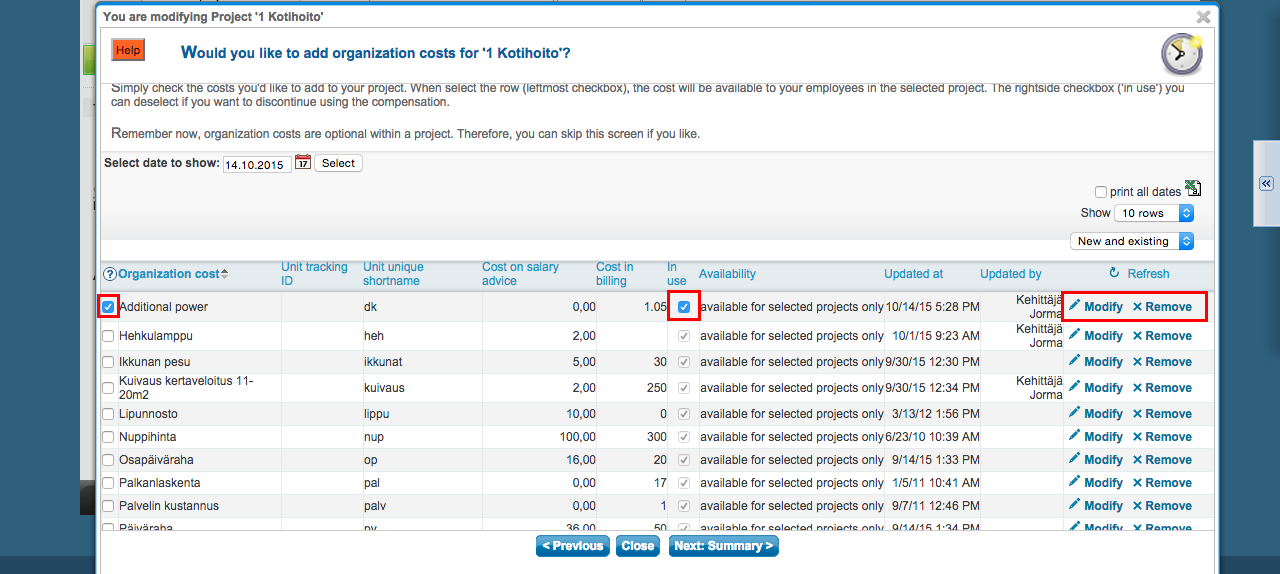
- Project's information are now open below the unit list. Select "Organisation costs".
- Press "Manage organization cost".
- Now you can see all the compensations that are already created. You can add these to the project by crossing the square under "Organization costs" -title. Another option is to create new ones by pressing "Create a new organization costs".
Creating new organization costs
- Press "Create a new organization costs".
- Enter the information to the opening page. Name is compulsory. After doing this, press "Next".
- In the next page, fill in the pricing information. Short name is compulsory. It allows the program to identify the compensation based on it's short name, thus making it easier to enter the compensations.
- Press "Next" again. This saves the organization cost and you can now add it to the project like any other cost.
Adding employees to a project
Next we'll go through the emloyee settings and how to add employees to a project. This can be done under the "Project employees" title where you'll also find all the employees that are already attached to the project. If there are no employees added to the project, the field is empty.
To add new employees, simply select them from the list in the gray box below the project's employees. You can filter employees by their unit and use keywords to find the employees faster. You can select multiple employees simultaniously by dragging them with the left mouse button pressed down or clicking them with shift or ctrl button pressed down.
After selecting the employee(s) press the button below to confirm and add them to the project. After doing this the employees will show up on the list above. Now you can fill in their information.
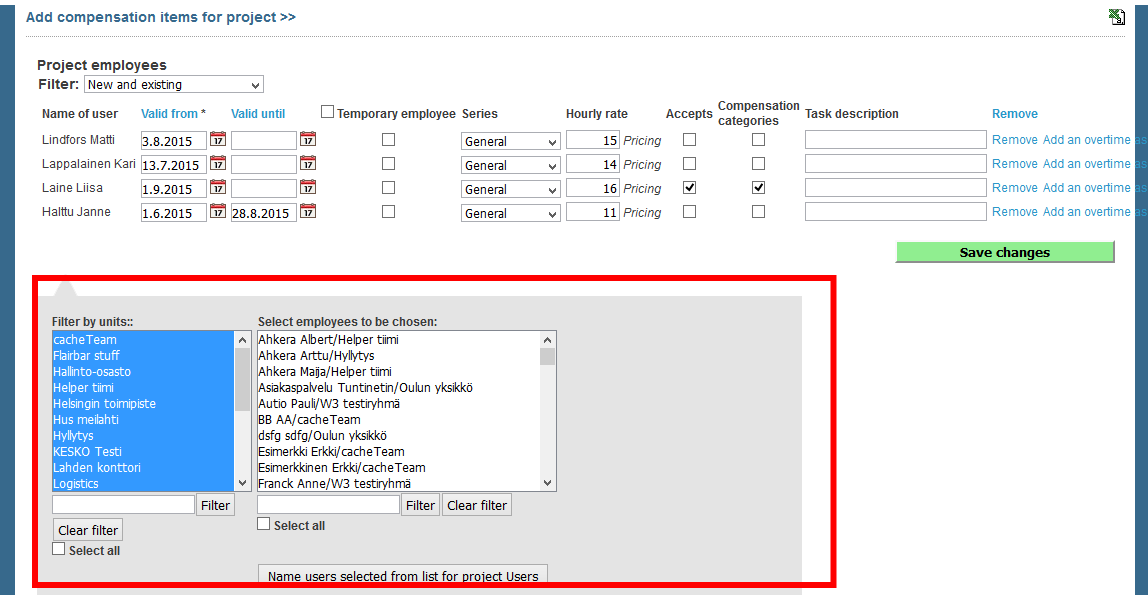
Employee information
You can get more information about some of these by moving the mouse over the titles.
- Valid from (The date from which the employee is able to log work hours for the project. Mandatory information)
- Valid until (The date from which the employee is no longer able to log work hours for the project. By pressing the title above you can invalidate all employees at once)
- Temporary employee (Crossing this marks the employee as temporary. Crossing the box next to the title does the same for all employees on the list)
- Series (This setting is useful if the employee has multiple ongoing contracts with the same employer)
- Hourly rate (Hourly price for the work conducted by the employee. If you need more complex pricing, press the "Pricing" link)
- Pricing (Sets a more complex pricing for the employee. Use this if you, for example, want the price to change according to weekdays)
- Accepts (Crossing this means the employee can accept the work hours of other employees on the project)
- Compensation categories (Crossing this allows the employee to enter "only superior" -type compensations)
- Task description (Here you can add a description af the task, or other extra information)
- Remove (Removes the employee from the project. This can be done only if the employee has no hours logged for the project)
- Add an ovetime assignment (Opens up settings for adding the assignment. The setting appear below the employee's settings)
The settings that appear after pressing the overtime assignment link are explained below.
Overtime assignment settings
- The overtime assignment applies to (You can get more information by taking the mouse over the question mark icon)
- Applies to the employee's salary only
- Applies to the invoice report only
- Applies to the salary and the invoice report
- Overtime billing agreement
- Work time decomp. (Choose the decomposable compensations from the menu. The other menu allows you to specify the decompositions)
- Daily overtime
- Holiday or Saturday compensation
- Personal compensation
- Task-based compensation
- Time-based compensations
- Weekly or period overtime
- Weekly rest time compensations
(The next two can be found from the other menu) - Consider all hours until regular work day length
- Consider all of the period's working hours until regular work time
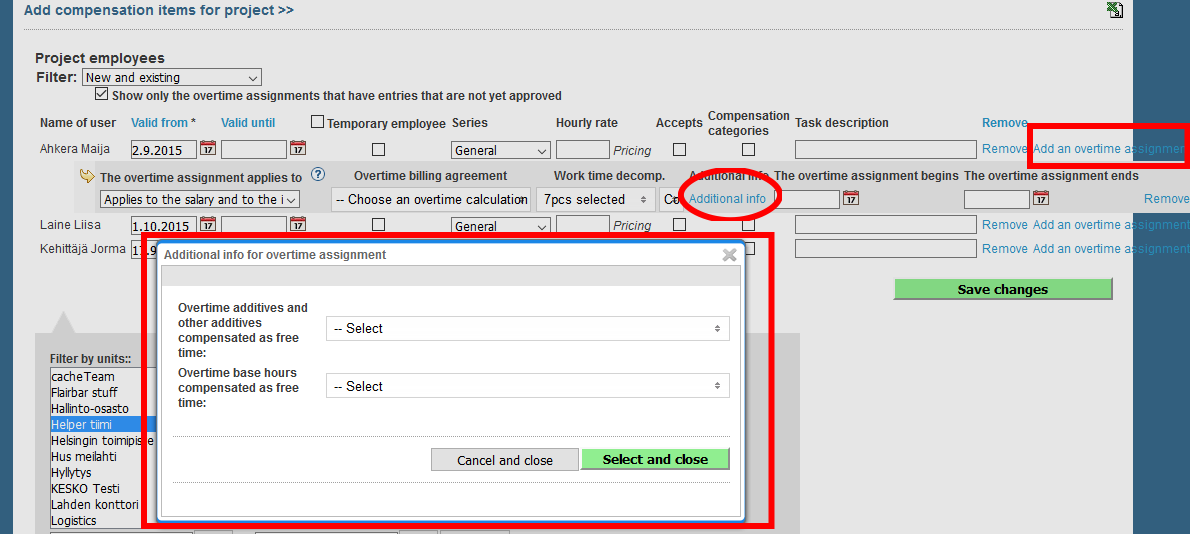
- Additional info (Link opens up a window where you can find the following settings)
- Overtime additives and other additives compensated as free time (Choose the additives to be compensated as free time from the menu)
- Overtime base hours compensated as free time (Choose the base hours to be compensated as free time from the menu)
- Overtime additives and other additives compensated as free time (Choose the additives to be compensated as free time from the menu)
- The overtime assignment begins (Start date of the overtime assignment. You can also choose the date by pressing the calendar icon)
- The overtime assignment ends (End date of the overtime assignment. You can also choose the date by pressing the calendar icon)
After filling the employee information, save the changes by pressing the "Save changes" -button.
Work time varieties
In this section we'll go through separately how to utilize different work time varieties. Settings allow you to set the work time for a project as training, standby, travel time ect. Sometimes, however, it's necessary to set different prices for different types of training and there could be the need to follow the training attendace as well. The next example wil show you how to achieve this.
Example
There's a need for different types of training: paid, non-paid, and apprenticeship training. The duration of these wary as well, and it's also necessary to know how many people attend each session.
- As a solution, you can create a entire project dedicated for training. Create a new project according to this page's intructions ("Creating a new project").
- After creating a new project, find "Work time settings" and open "Additional options".
- Set "Project's work time type" to "Training". This setting can also be used to determine other work time types besides training. The setting can also be determined individually for each task, as shown later in this example.
- Next, find "Tasks" and open the link.
- Press "Create a new task" and enter the name of the training. By using tasks as different trainings you're able to affect their settings individually.
- Open the details window by pressing the cartwheel icon. Here you can find "Project's work time type". Set it to "Training". This setting sets the work time type for the individual task(training).
Next, you need to set the prices for each tasks:
- Pick the task(training) you want and set "Compensation type" as "Replaces the hourly wages". This makes the training compensation to be determined by the amount you enter in next.
- Fill the amount you want into the "Other compensation" -field. If you want no compensation for the training, enter 0.
- You can utilize other settings as well. For example, "Effect of extras" enables you to specify the training compensation even further and task details allow you to set both minimum and maximum duration for the training.
Don't forget to take into account the pricing levels when setting prices for the tasks.
When you're done, press "Save changes".