Using clock card devices need to have certain settings in Tuntinetti, but despite of which device or devices you are using, the settings are pretty similar. When a time stamp can be associated to a single employee and a certain project (or projects), there should be no problems. If a same code is used for multiple employees, a time stamp can't be associated to a single employee and attendance tracking doesn't work. Same code can be used for multiple projects, but then the employee should choose the project that time stamp applies to (unless the employee has a default project selected).
Defining Stamping ID (IMEI/NFC/QR code) for projects
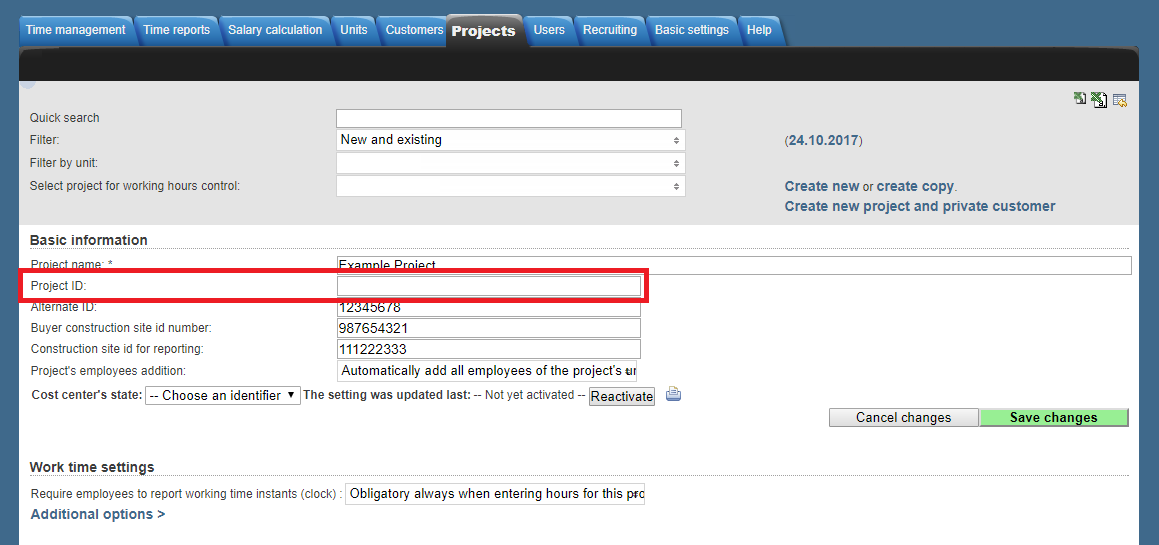
"Project ID" field
If a project has a unique IMEI/NFC/QR code, it should be entered to the "Project ID" field in the Project settings. Then the code can only be used in a single project. This way it can be made sure that the same code can't be used for another project by mistake.
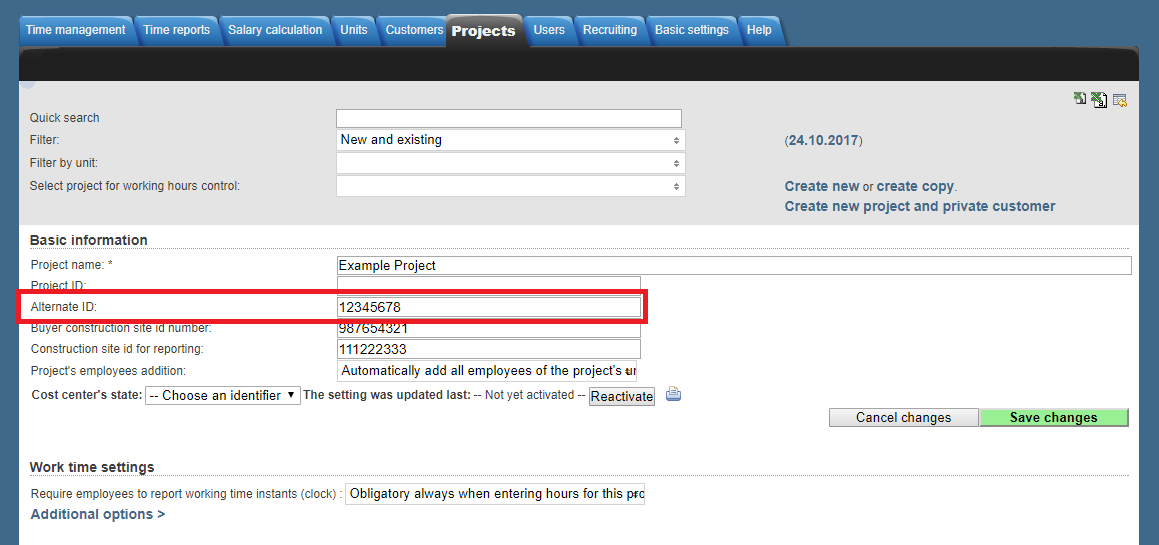
"Alternate ID" field
If a single project has multiple IMEI/NFC/QR codes, they can be entered to the "Alternate ID" field in the Project settings and should be separated by commas. This way it is possible to direct time stamps with different IMEI/NFC/QR codes to the same project.
If the same IMEI/NFC/QR code is used with multiple projects, the "Alternate ID" field can also be used. The code in the "Alternate ID" field isn't unique, so the same code can be used with multiple projects. This means that the time stamp must be directed in another way (for example select a project from a list or direct the time stamp to a project with a code). If an employee has a default project, time stamps will be directed to this project by default (an another projects should be selected during the stamping procedure).
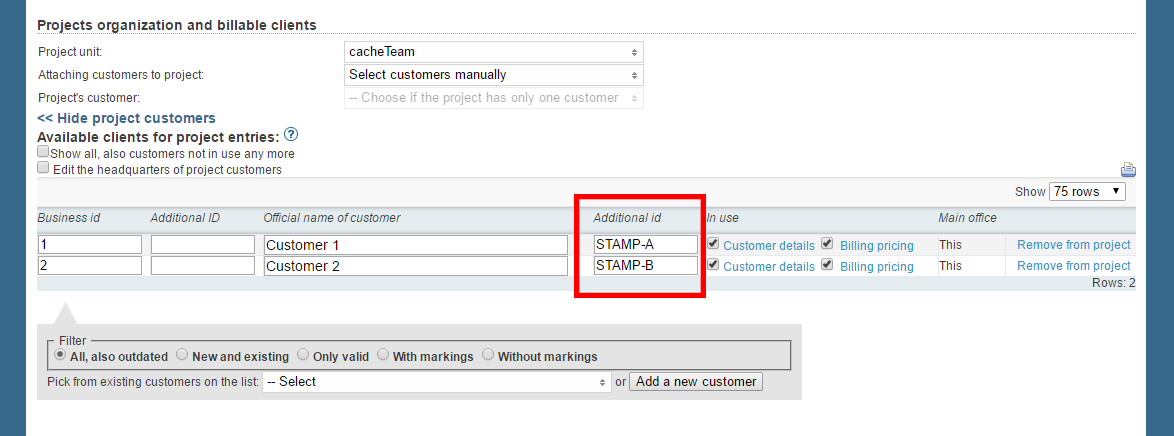
Customer's "Additional ID" field
If a customer has IMEI/NFC/QR code, it can be entered to the "ADditional ID" field and time stamps with this code are directed to that customer.
Work task "ID" field
If a work task ha IMEI/NFC/QR code, it can be entered to the "ID" field and time stamps with this code are directed to that work task.

Defining a direction code to a project
With a direction code or a command it is possible to direct a time stamp to a project, a work task or a customer, when IMEI/NFC/QR code isn't directed to the desired target.
Tuntinetti identifies a project in the following way:
- IMEI/NFC/QR + direction code form a search string for example 123456789ABC (IMEI + ABC). The software uses this string to identify the right project, task and customer.
- The search string is compared to all of the possible strings formed from different project, work task and customer combinations. For example Project code + Customer + Task (Project IMEI is "123456789", the same project's customer's Additional ID is "AB" and a work task ID is "C". So the string is "123456789ABC".)
- If the seaxh strinf matches this string, the right target to the time stamp is found.
The search string is compared to the direction codes found in the following places:
- Tuntinetti settings
- Project ID
- Alternate ID
- Project's customer's Additional ID
- Project's work task's ID
Direction code in the "Project ID" field
If the same IMEI/NFC/QR code is used for multiple projects, but the right project is identified using a command that the employee enters, you can enter the IMEI/NFC/QR code to the "Project ID" field and add the project's unique code after that.
Direction code in the "Alternate ID" field
The direction code can be added after the IMEI/NFC/QR code in the "Alternate ID" field in the same way as in the "Project ID" field.
Direction code in the customer's "Additional ID" field
A customer's direction code is entered to the "Additional ID" field. If a project has IMEI/NFC/QR code in the "Project ID" or in the "Altrenate ID" field, employees can direct time stamps to specific customer using the customer's "Additional ID" code.
Direction code in the work task's "ID" field
A work task's direction code is entered to the "ID" field. If a project has IMEI/NFC/QR code in the "Project ID" or in the "Altrenate ID" field, employees can direct time stamps to specific work task using the task's "ID" code.
Two different kinds of clock card devices in the same project
If a project has clock card devices which have numbers and devices which have letters, they work together better if the setting Basic settings → Company's basic information → Timecard's numpad is interpreted as alphabets is activated in the Basic settings.
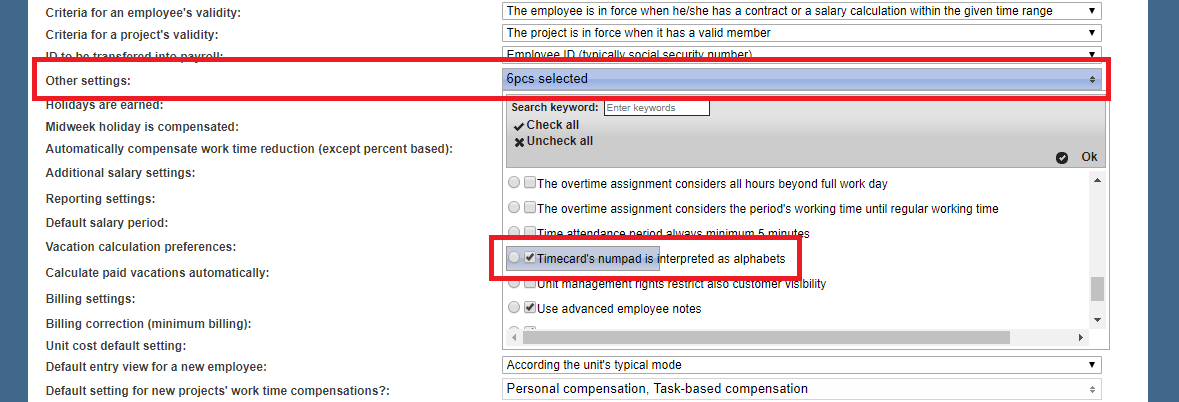
This changes clock card's letters to numbers (1=A and 2=B...). In stead of teaching employees to stamp AB, they should be teached to stamp 12.
Adding IMEI/NFC/QR code to an employee
You can add IMEI/NFC/QR code to an employee in the Employees tab in Tuntinetti. Select the desired employee and enter the right code in the "Alternate ID" field. If the employee works in a single project, this is enough.
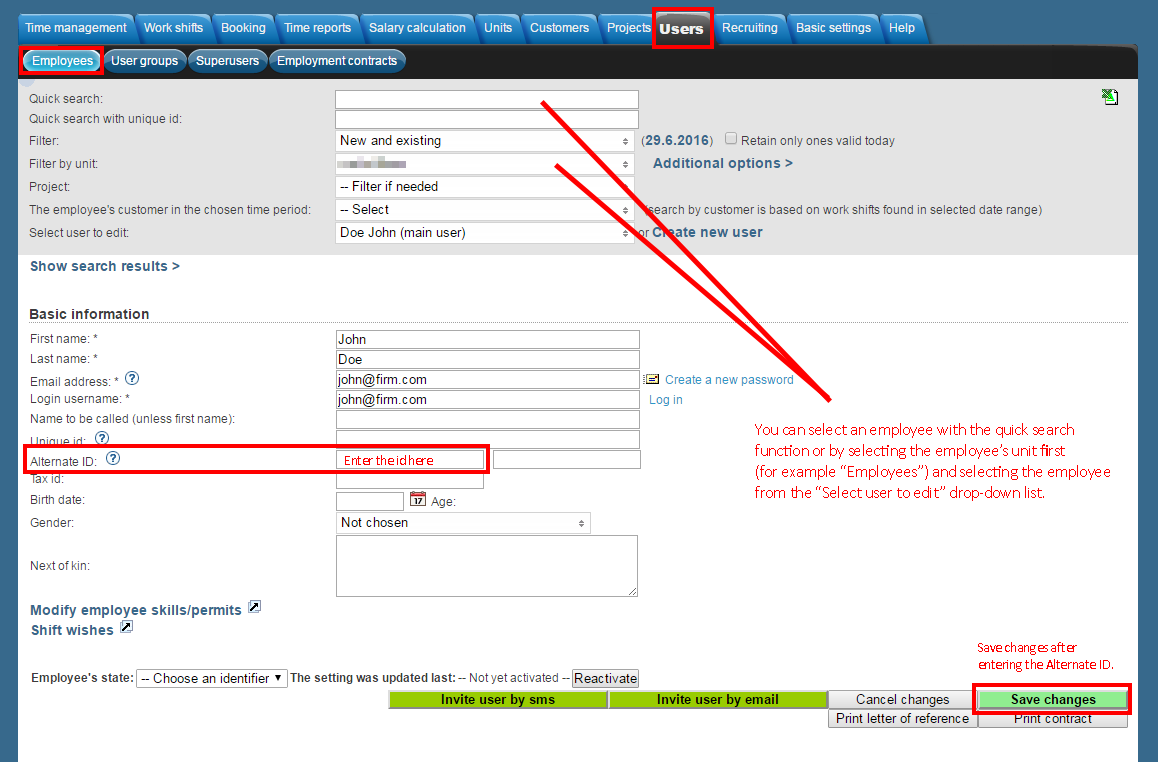
Employee's default project
If employee works in multiple projects, it can be useful to add a default project (if the employee works in a certain project most of the time). Adding a default project can speed things up, when employee works in a certain project and can the project is selected by default and doesn't need to be selected every time. After a default project is selected every time stamp is directed to the default project unless the employee selects a different project during stamping.

Selecting project and expenses from a list during stamping
During stamping with a Mobile clock card project and expenses can be selected from a list. This requires that the setting is activated in the Project settings.
Selecting target for time stamp from a list
The time stamp targets can be set visible in mobile clock card with the setting "Show in mobile time clock app: task reporting options" in the Project settings. In the list the only visible options are the ones that have this setting activated.
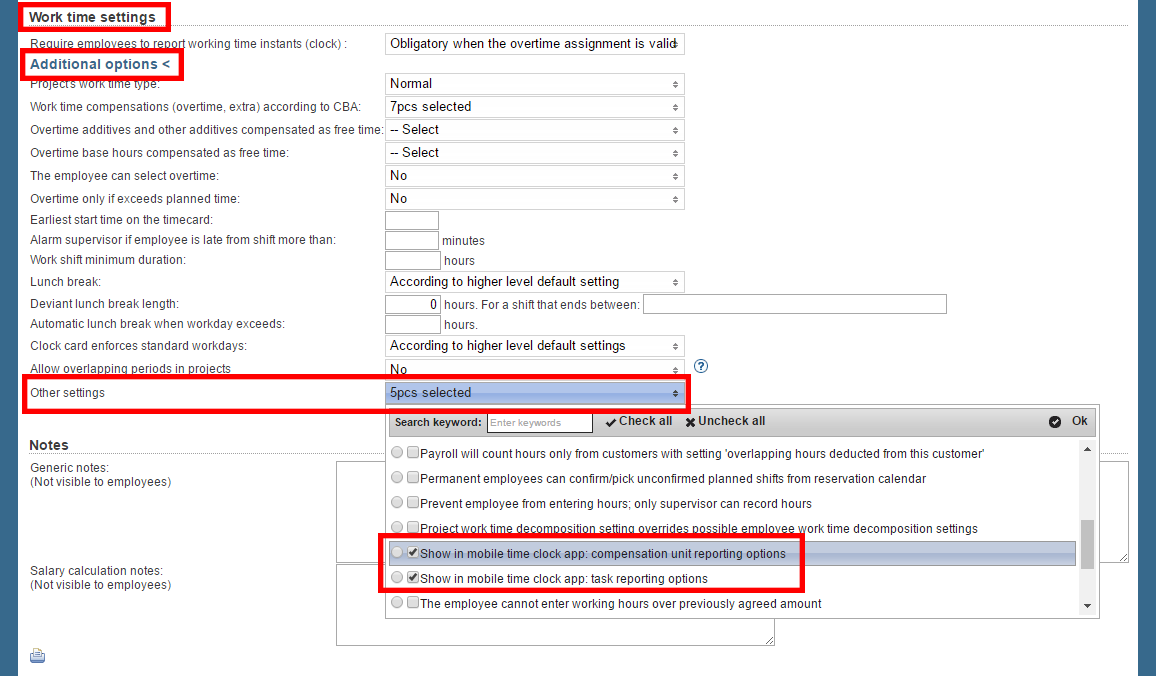
Selecting expense from a list
If you want to make it possible to add expenses during time stamping, it can be activated with the setting "Show in mobile time clock app: compensation unit reporting options" in the Project settings. The list includes only expenses that have this setting activated.
Codes and where to find them
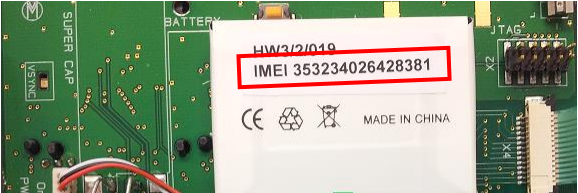
IMEI code
All mobile devices use an IMEI code which usually isn't visible and can be accessed by opening up the device or launching the program.
Wall mounted NFC clock card
The IMEI code is located inside the device.
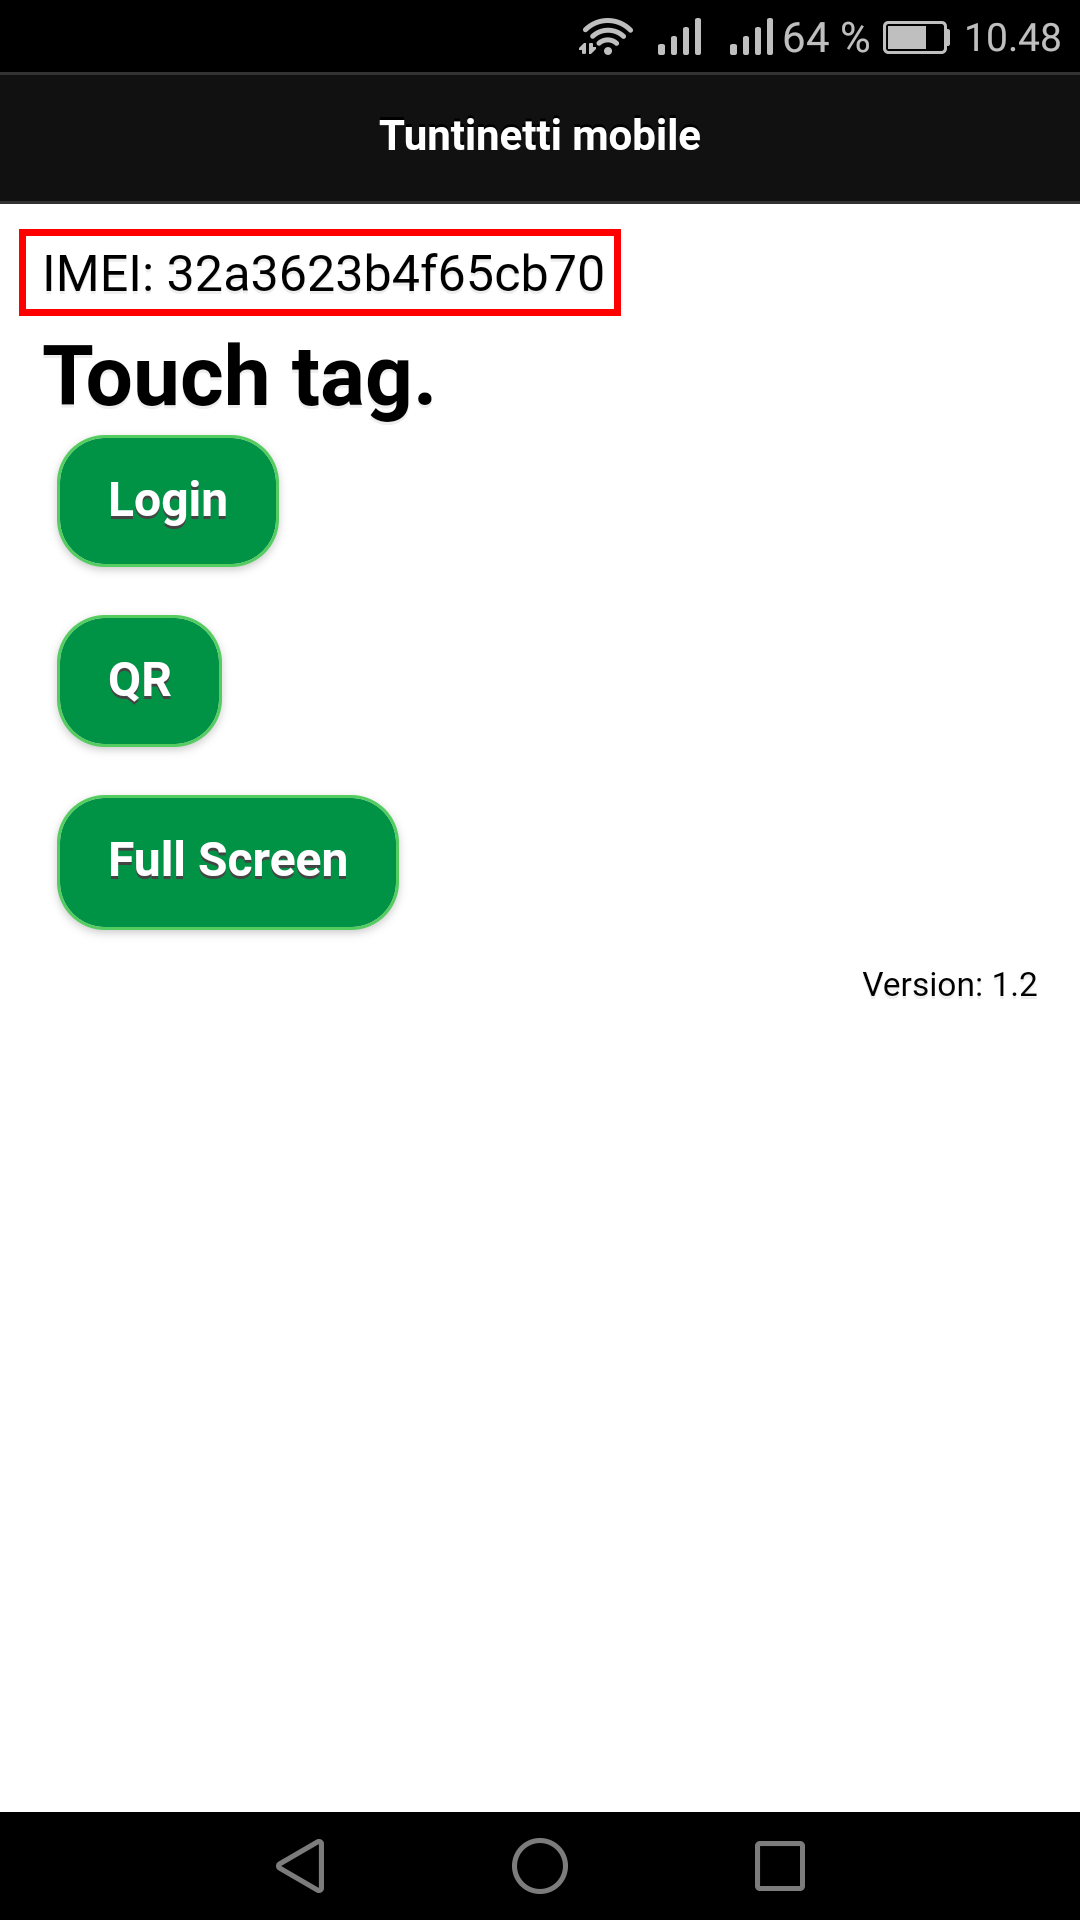
Wall mounted mobile NFC/QR mobile clock card
The IMEI code is visible on top of the view of the program.
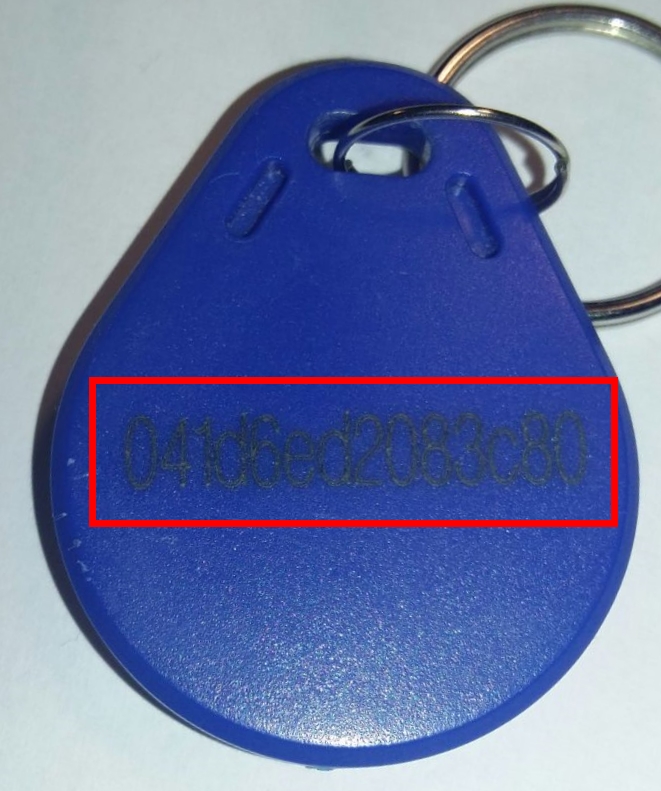
NFC code
The code of NFC tags (often referred as ID or UID) is usually printed on the device. In some cases the code or ID isn't visible and it has to be scanned with a separate scanning tool or program to find out the code.
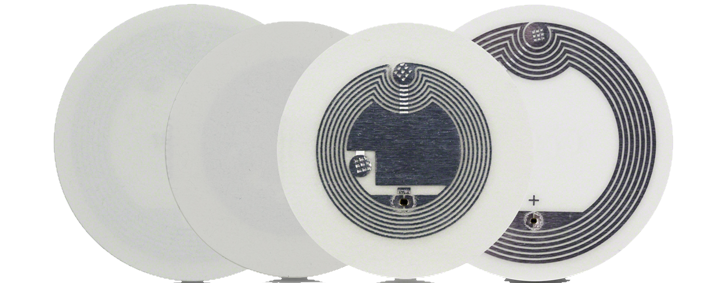
NFC tag
The NFC tags which can be ordered the code is usually printed or carved on the front side of the tag itself.
NFC sticker
NFC stickers don't necessarily have a code, because they are often reprogrammable and don't have any information programmed to them. On the other hand the surface of NFC stickers is usually writable so you can write down the code if needed. There is also the possibility to order these pre-printed so that the code is printed on the sticker.
Valtti card
The code of a Valtti card that includes a digital UID identifier doesn't read on the card. You can ask the ID from tilaajavastuu.fi or you can do a stamp with the card and pick the ID from the mail Tuntinetti sends because of unsuccesful stamping or from the excel that gathers unsuccesful stampings. The excel can be found from Time Reports-tab from the red clock image.
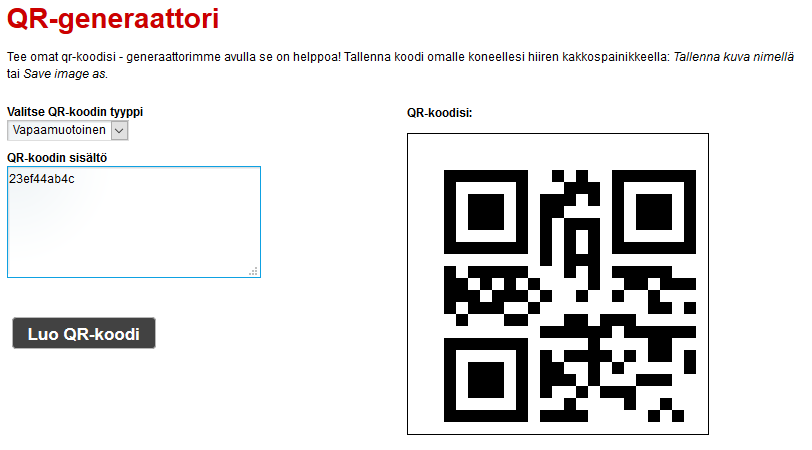
QR code
You usually create QR codes yourself (for example with a generator http://www.qr-koodit.fi/generaattori) so that you can select the code yourself or that you can use an employee's or project's existing code.
Clock card settings in the basic information
The following clock card settings are on the Company's basic information tab.
Technical notifications from the time clock to email
- Determines the email addresses where technical notifications concerning time clock devices are sent.

Clock card enforces standard workdays
- The rounding rules for time stamping are primarily derived from the unit of the cost center. This happens when the time stamp is associated with the right cost center.

Allow long day code on clock card machine
- This code is used for skipping overtime recording, in which case the overtime hours are added to flex time.
- This code is used for skipping overtime recording, in which case the overtime hours are added to flex time.

Overtime key on clock card machine
- With this key the overtime is recorded as overtime.

Work time extra compensations
- Choose here compensations and overwork types that are associated with the overtime key.

Overtime leave key on clock card machine
- The key for marking the day as overtime leave when signing off.

Overtime compensated as paid leave
- Choose here the extra compensations that are associated with the overtime leave key.

Overtime base hours compensated as free time
- You can compensate work time as freetime only for the active work time decompositions.

Work time reduction vacation key
- This code is used for marking reduction vacations.

Sick leave key on the time clock
- With this key a day is counted as a sick leave day.

Saldo query key on the time clock
- This code is used for making saldo queries.

The time stamps will be rounded
- Choose how and how much rounding affects time stamps.

Time stamp alternate rounding
- Define an alternative rounding rule, which rounds time stamps to the next nearest half hour or whole hour.
